Build a Sound Booth for ¥10,000 — A Rental-Friendly Home Recording Booth with LabRico and Plasterboard
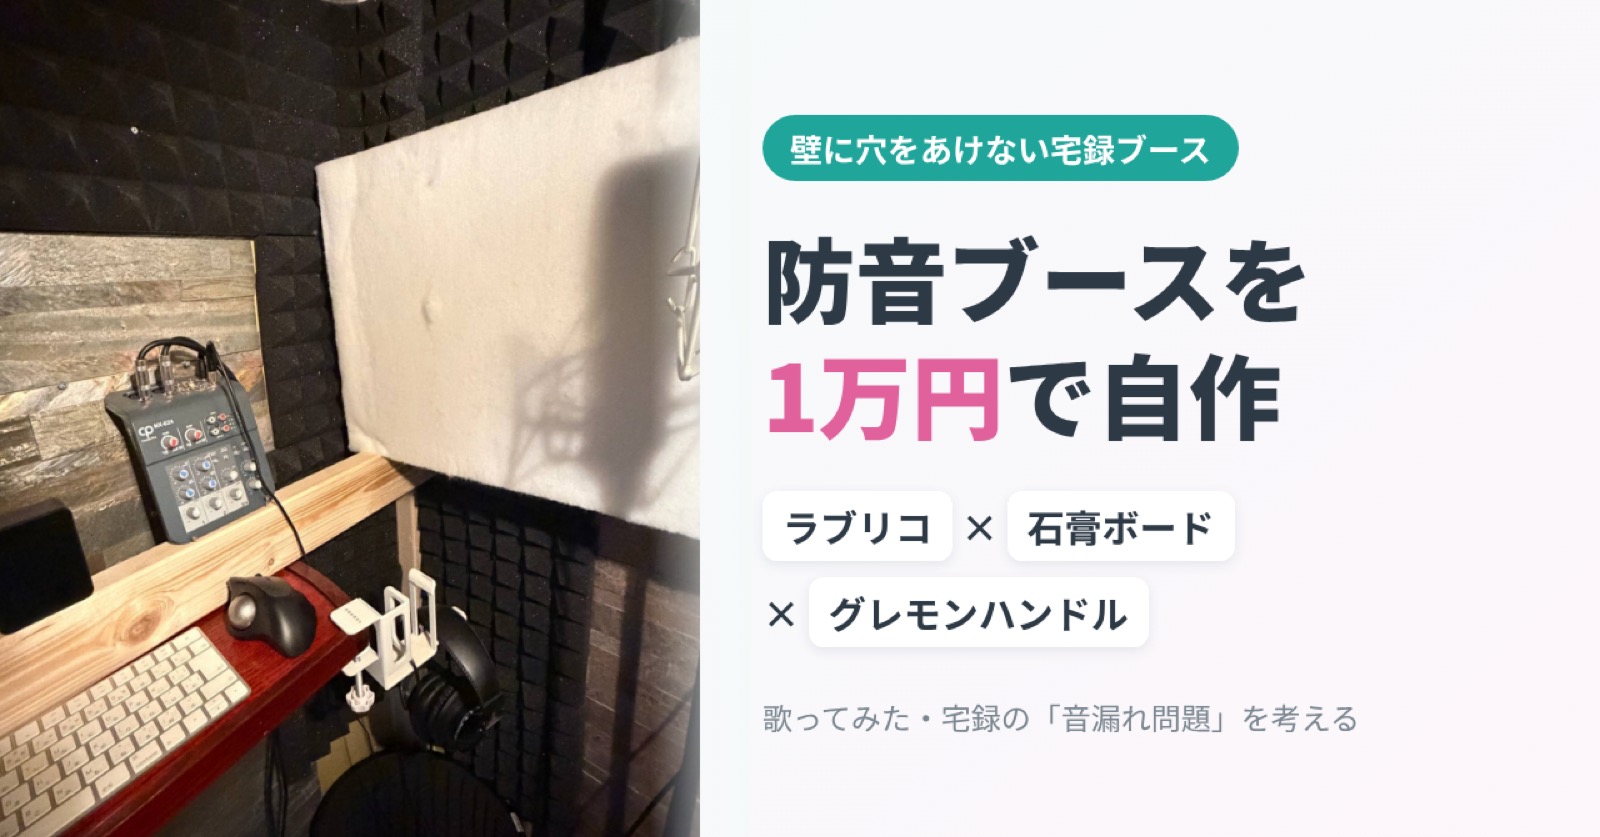
🎙️ What you’ll learn
- Why LabRico posts and plasterboard can create a sound-isolated space
- The difference between sound absorption and sound isolation—and how mixing them up wastes money
- Why gaps are the biggest enemy, and how a compression latch helps seal a door
- How to keep your computer outside while controlling it wirelessly from inside the booth
- What you need to know about safety before you build
The 10 p.m. Problem: You Can’t Sing at Full Volume
It’s 10 p.m. The family is asleep. At last, you have some time to yourself. You put on your headphones and step up to the microphone.
The intro rolls, and here comes the chorus.
…But somehow, your voice won’t come out.
“Can the person in the next room hear me?”
“What if someone on the other side of the wall is laughing at me?”
The moment you think that, your throat tightens. The high note that came so easily a second ago suddenly won’t come out. Have you ever felt that?
For many people starting home recording or a singing-cover channel, the first obstacle isn’t the microphone. It’s sound leaking out of the room.
Hi, I work in audio and write columns. When I started recording vocal covers, I ran into the same problem before I even got to the gear.
My solution was a handmade booth: LabRico posts, plasterboard walls, and a compression latch on the door. You can get started for around ¥10,000. It’s a very different option from a soundproof room that costs hundreds of thousands of yen.
Here, I’ll walk through the ideas behind it, with photos and diagrams.
Soundproofing Has Two Different Jobs
Before building a booth, keep one thing in mind. If you buy soundproofing products without understanding this, you’re almost certain to waste money.
Sound absorption and sound isolation are completely different things.
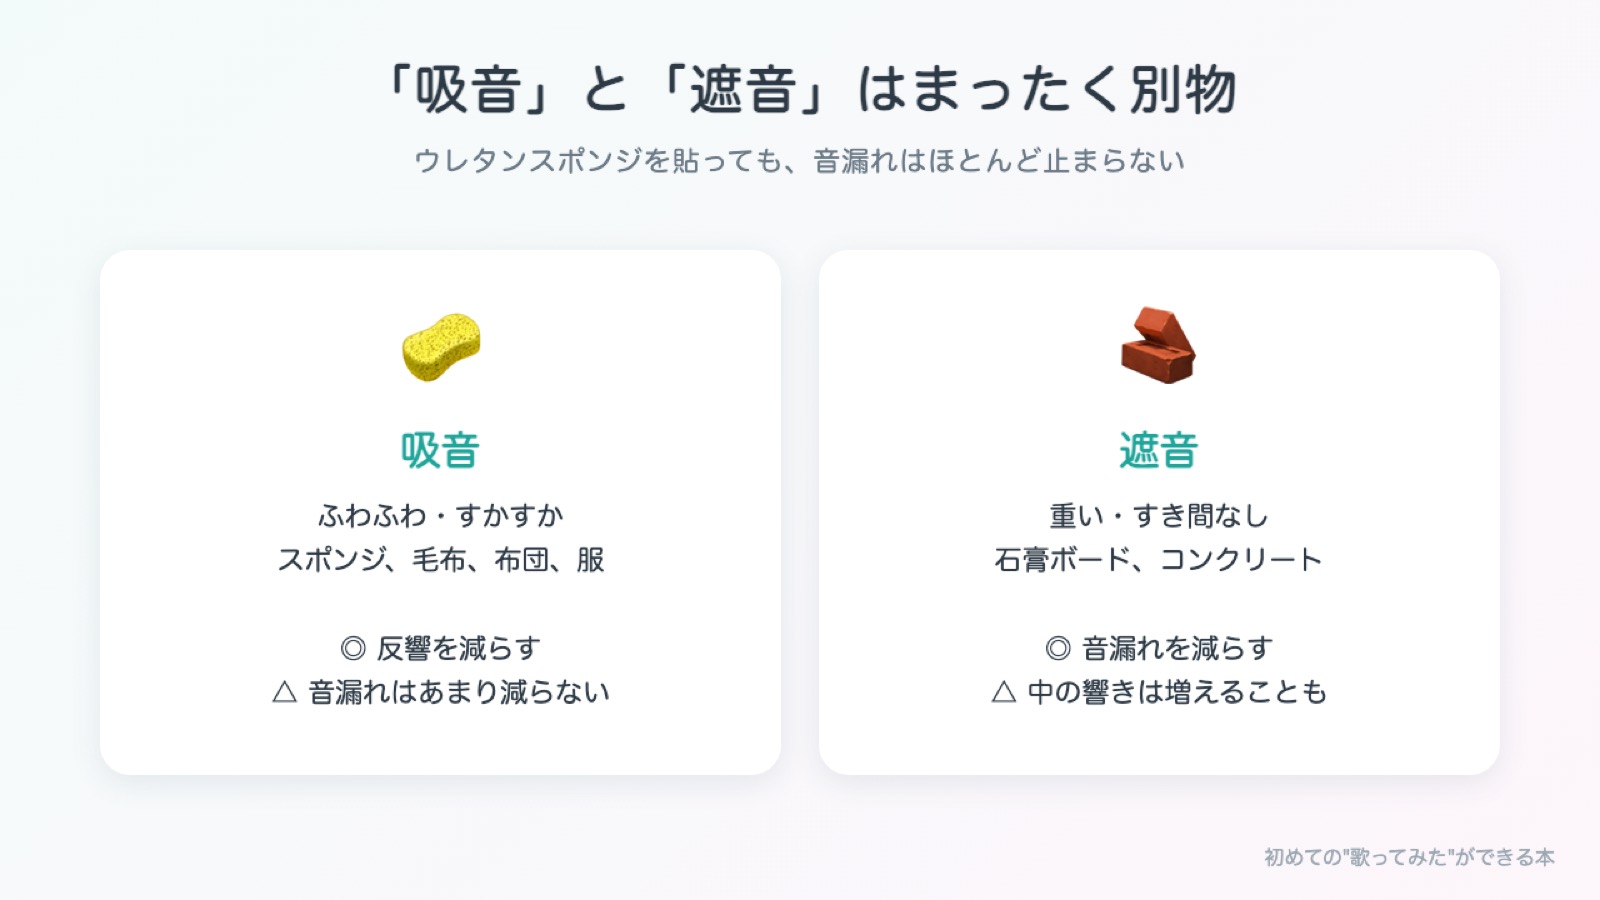
Absorption = Reducing Echo Inside the Room
Foam, blankets, curtains, clothes—soft, porous materials absorb reflections.
Think of how your voice rings out in a bathroom. Absorption reduces that ring. It’s very useful in home recording because it makes a recorded voice sound clearer.
But soft materials let sound pass through. No matter how much absorption material you put up, it will do very little to stop sound leaking outside.
The ridged urethane foam you often see online is exactly this kind of product. It may be sold as “soundproofing foam,” but what it does well is reduce reflections.
Isolation = Keeping Sound from Passing Through
Sound isolation is what reduces noise escaping the room. It comes down to two things:
- Mass
- No gaps
You can barely hear the next room through a concrete wall because it’s heavy and has no gaps. Sound is vibration in the air, and a heavy, rigid wall does a better job of stopping that vibration from reaching the other side.
In short:
- Want less echo? Use soft, absorptive materials.
- Want less sound escaping? Make it heavy and airtight.
Keeping these two jobs straight is the starting point for building a sound booth.
Why LabRico and Plasterboard Work Together
Here’s the main idea behind this booth.
LabRico: Posts Without Drilling Holes
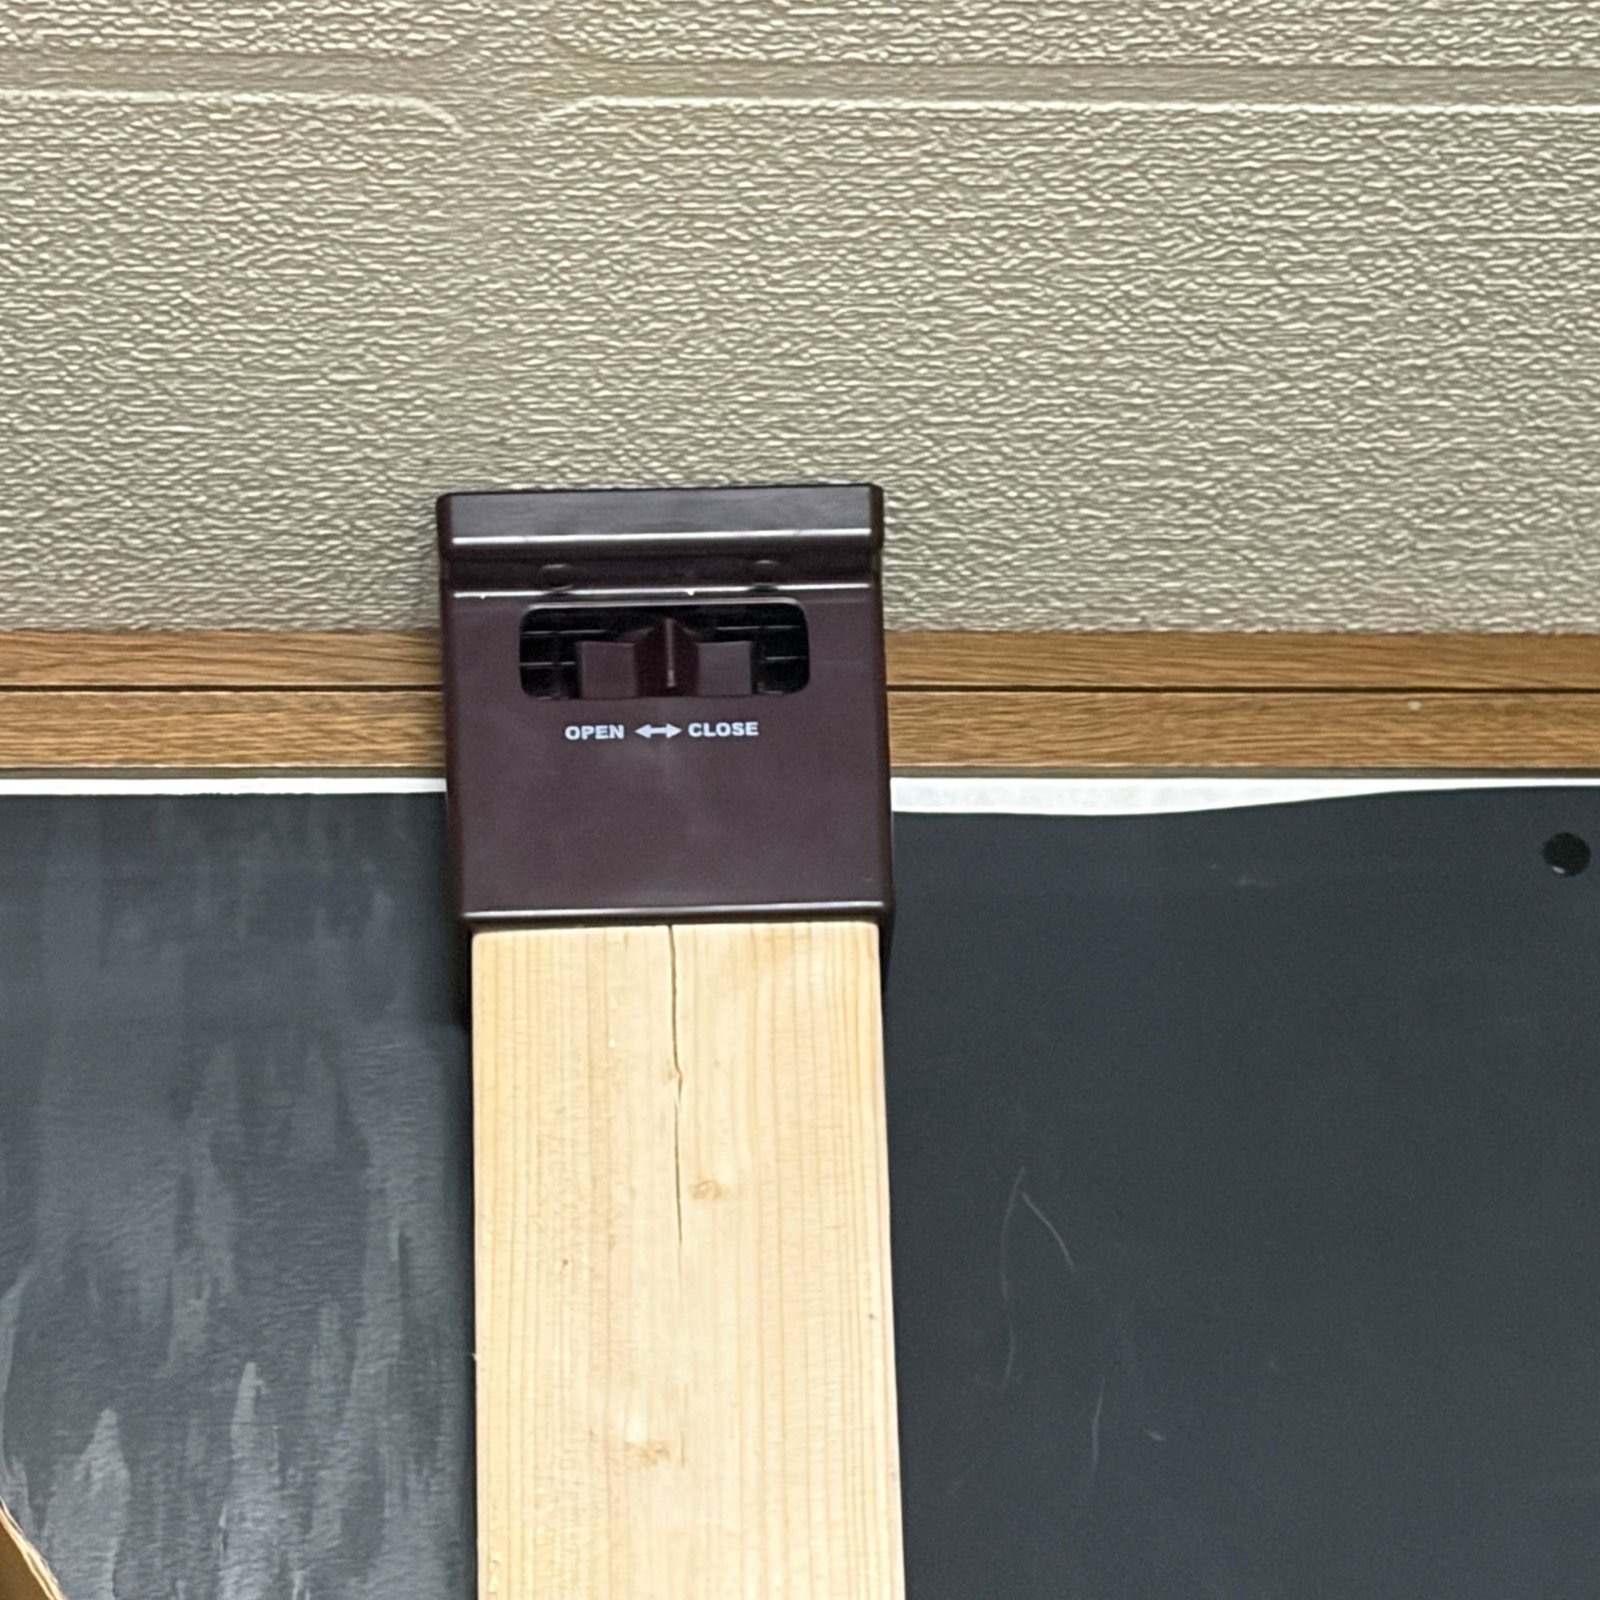
LabRico is an adjustable fitting that caps the ends of standard 2×4 lumber. It lets you brace a post between the floor and ceiling. You can find it at home improvement stores and online.
A screw mechanism pushes against the ceiling, so you can add posts without drilling nails or screws into the walls or ceiling. That’s helpful if you want to avoid damaging a room.
Plasterboard: Inexpensive, Yet Heavy
Plasterboard is a panel made of gypsum sandwiched between sheets of paper. It’s a common building material used inside the walls of ordinary homes.
Remember the rule for isolation: mass. Plasterboard is relatively affordable at a home improvement store, yet it’s heavy. It gives you a lot of mass for the money, which makes it a useful material for isolation.
Together, They Add Another Wall Inside the Room
Screw plasterboard onto posts held in place by LabRico, and you create a heavy wall around the place where you sing, separate from the room’s existing walls.
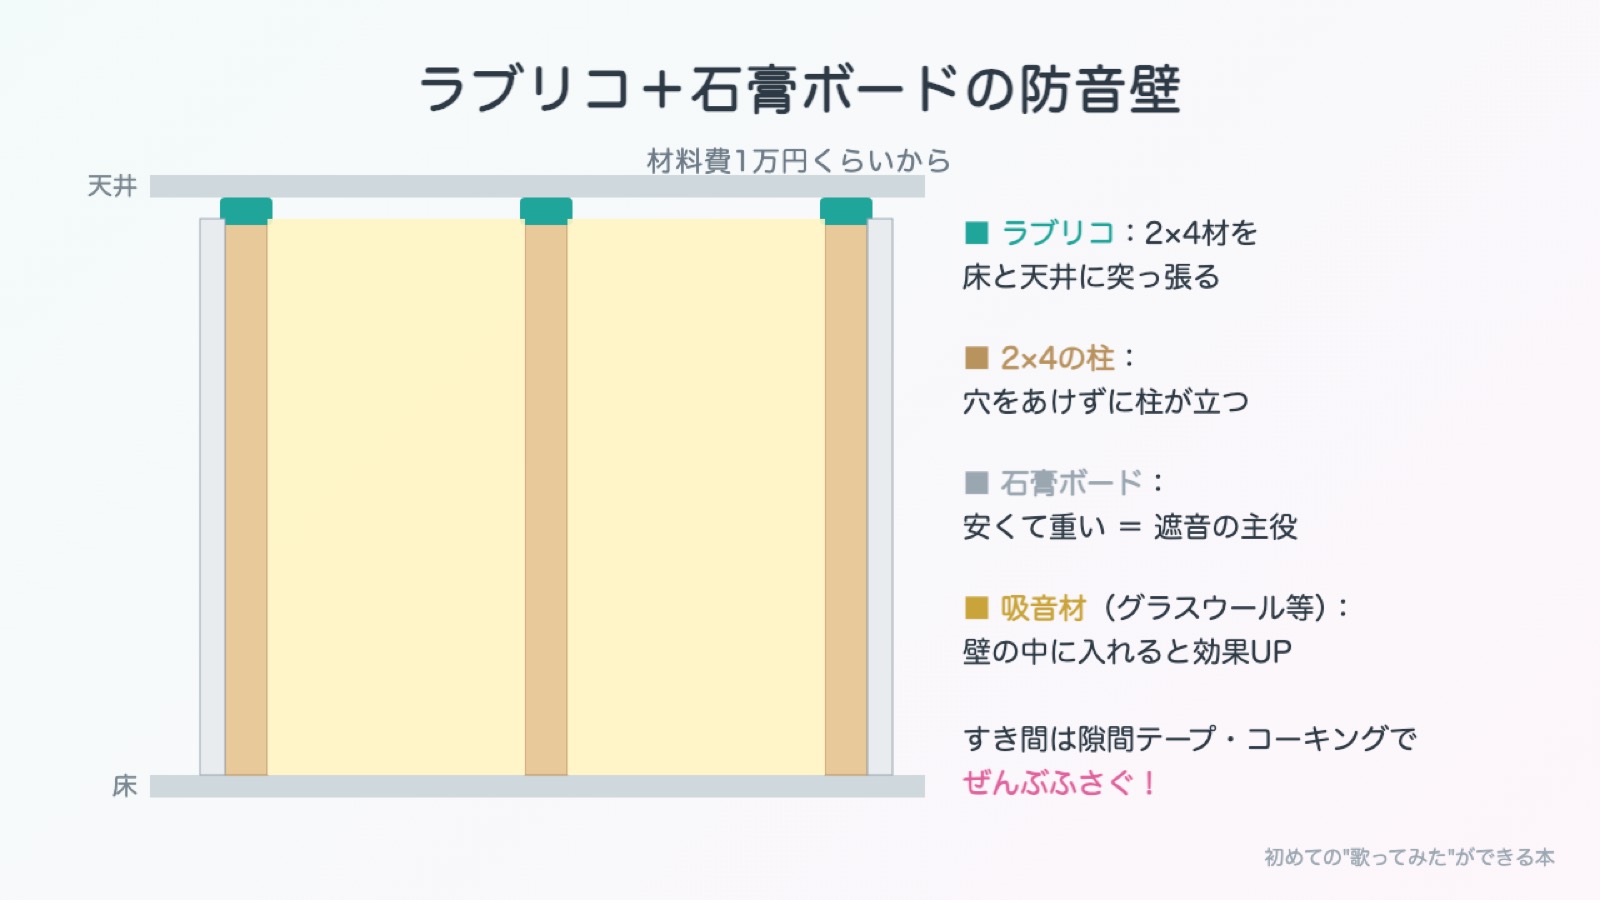
Using a corner of the room means you need to build fewer new walls. The sound has to pass through both the booth wall and the original room wall before it gets outside, so the idea is that less of it makes it through.
That’s the answer to “Why LabRico and plasterboard?” LabRico provides the posts; plasterboard provides the mass. Each has a clear job.
Gaps Are the Biggest Enemy
A heavy wall is only half the job. The other rule of isolation—no gaps—still matters.
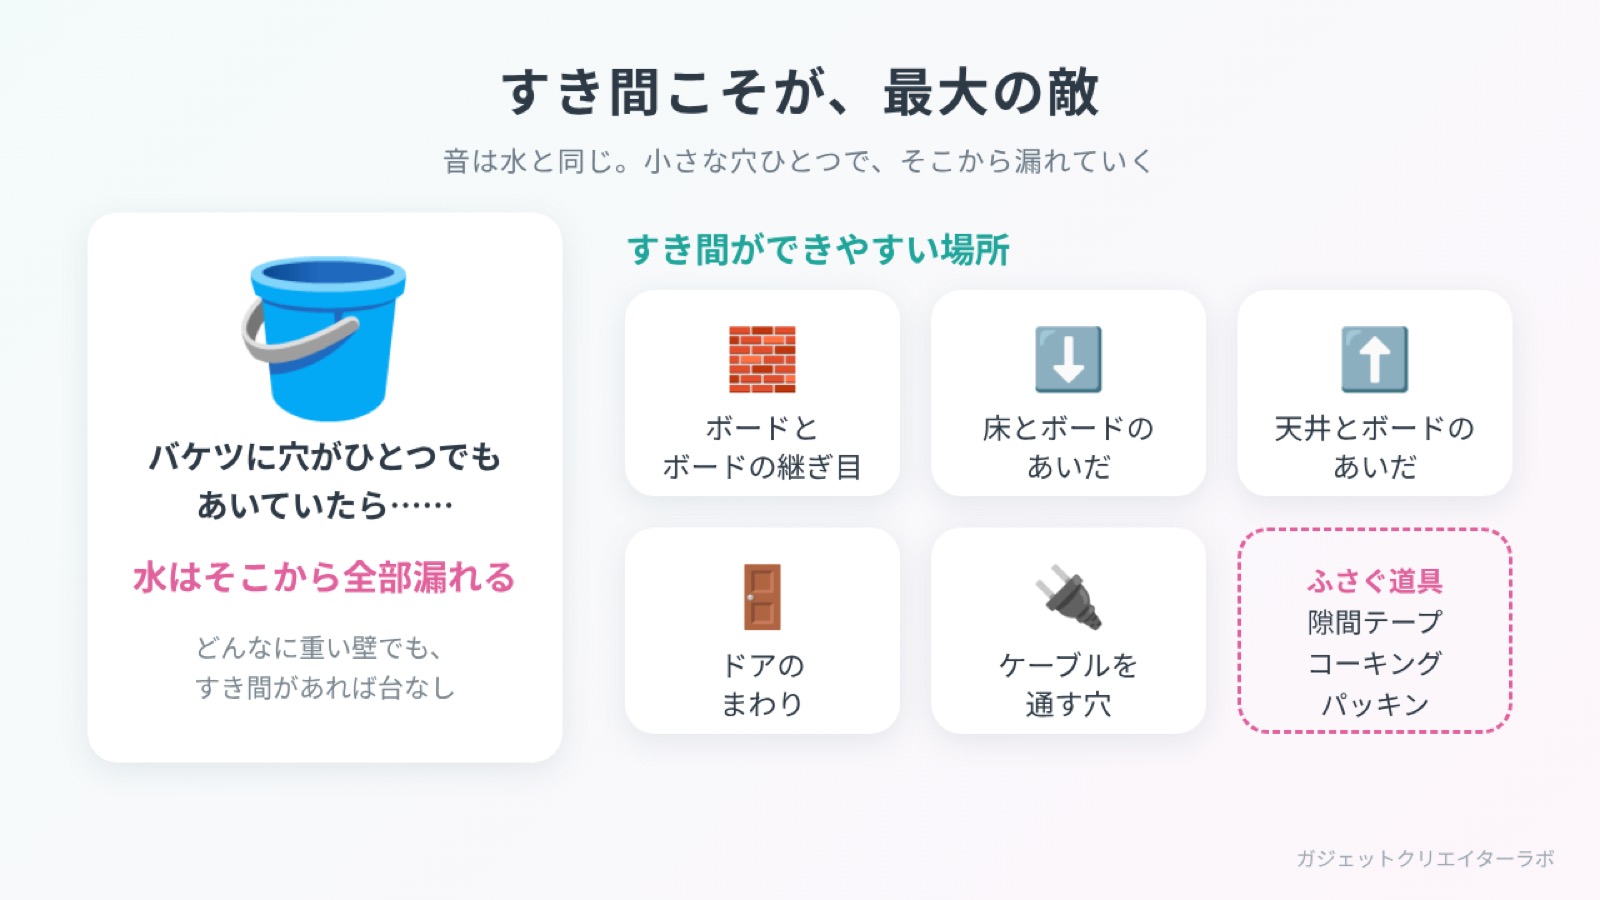
Sound is a little like water. If there’s even one small hole in a bucket, water will leak through it.
Sound behaves similarly. Even a very heavy wall can’t do its job if there’s a gap for sound to escape through. And there are usually more gaps than you expect:
- Seams between boards
- The gap between a board and the floor
- The gap between a board and the ceiling
- Around the door
- Holes for cables
Seal each one with weatherstripping, caulk, or a gasket. It’s unglamorous work, but this is where you can make the biggest difference to how well the booth isolates sound.
The toughest gap to deal with is the one around the door, which you open and close every time you go in or out.
Use a Compression Latch to Pull the Door Tight
A wall stays put once you screw it in place. A door has to open, so there’s always a chance of gaps between it and the frame.
A compression latch can help.
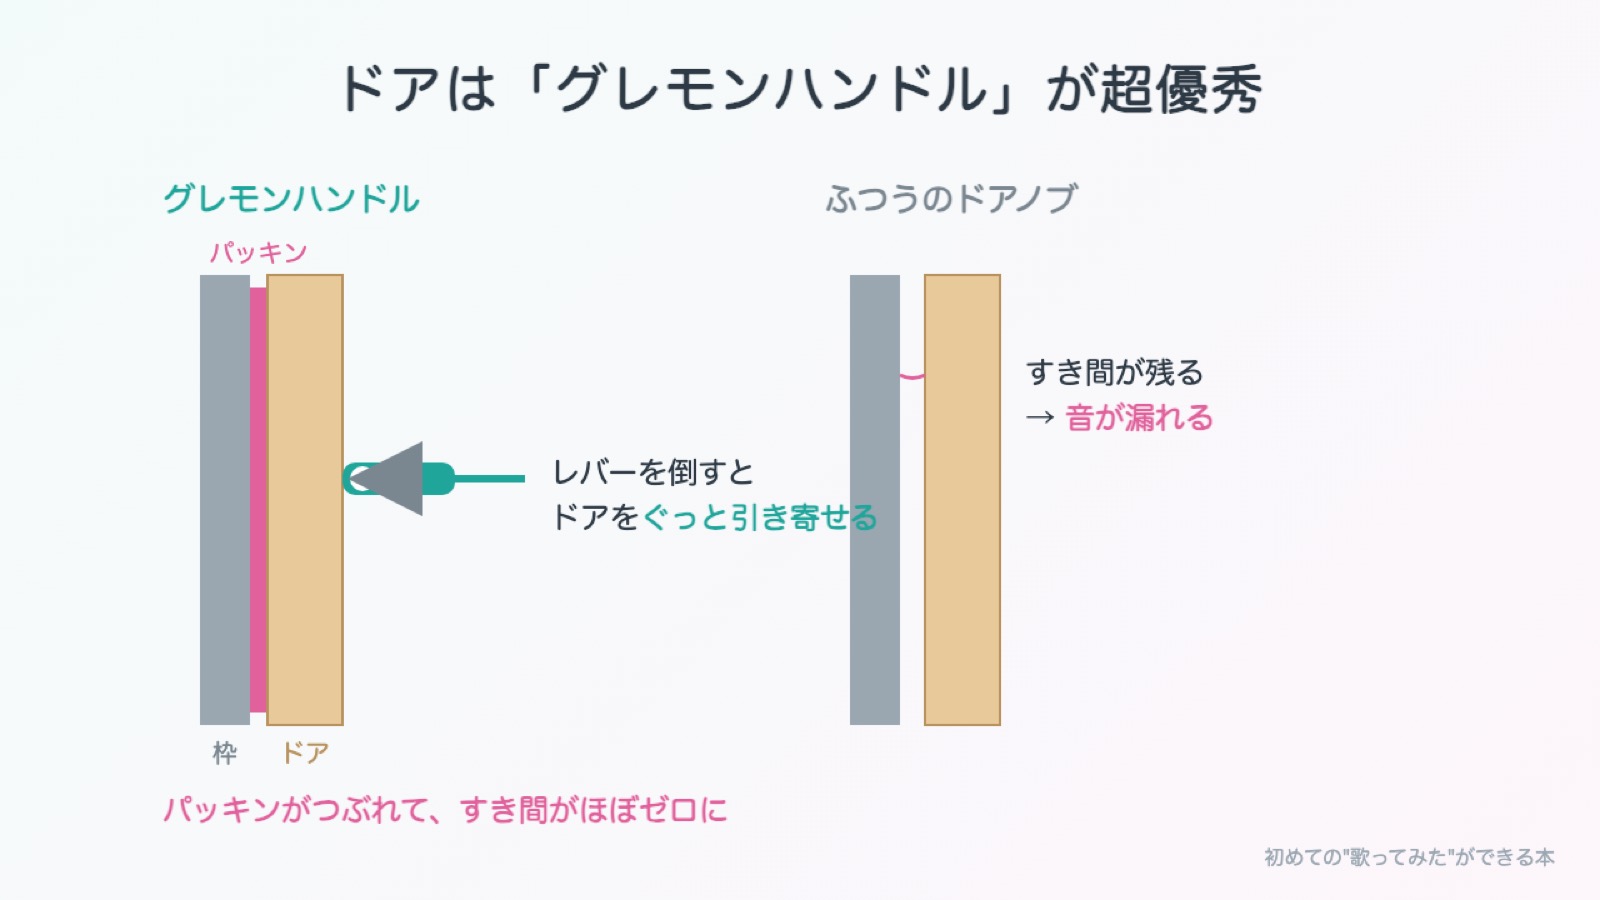
An ordinary doorknob just closes the door. A compression latch pulls the door firmly against its frame when you move the lever. You’ll find this type of latch on commercial refrigerators and soundproof doors, among other places.
Put a rubber gasket around the frame. When you pull the lever, the gasket compresses and leaves very little space. There’s a difference between “closed” and “sealed.” That difference matters on a handmade booth door.
I installed a compression latch on my booth, too.
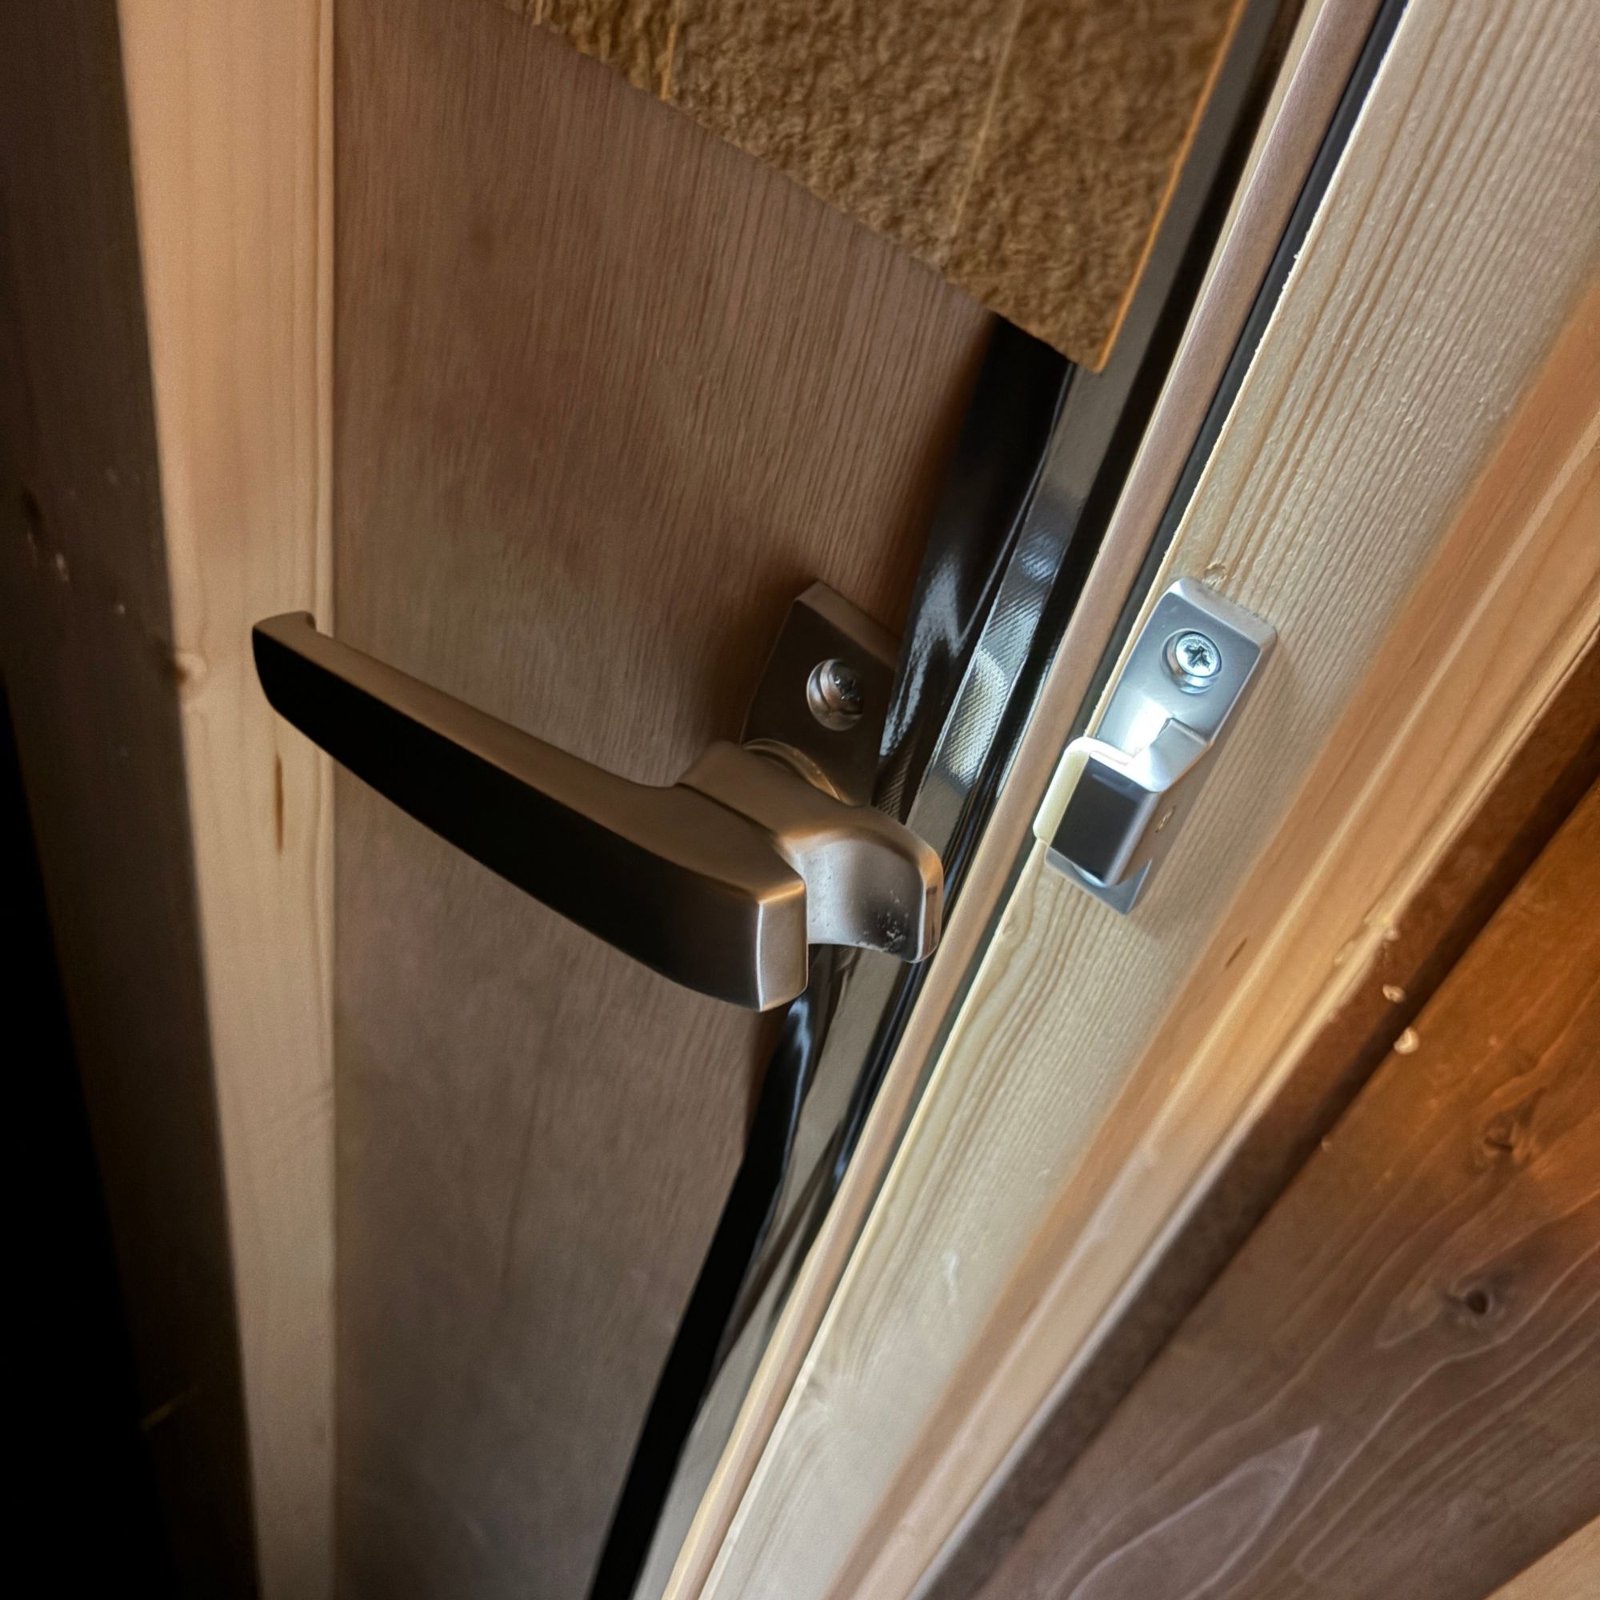
The first one I used was Shibutani’s EL-105-2 sealing handle.
Soft on the Inside; Heavy and Sealed on the Outside
A booth enclosed with plasterboard does a better job of keeping sound in. But there’s a problem if you leave it bare.
Plasterboard is hard and flat, so your voice bounces around, turning the booth into a very echoey little room. In a small space, that echo is more likely to color your recording.
That’s where absorption comes in. I’ve added sound-absorbing material to the inside of my booth.
Make the outside heavy and airtight to isolate sound. Make the inside soft to absorb reflections. The two approaches to soundproofing finally work together.
My Booth: The Computer Outside, the Controls Inside
Here’s a quick look inside my booth.
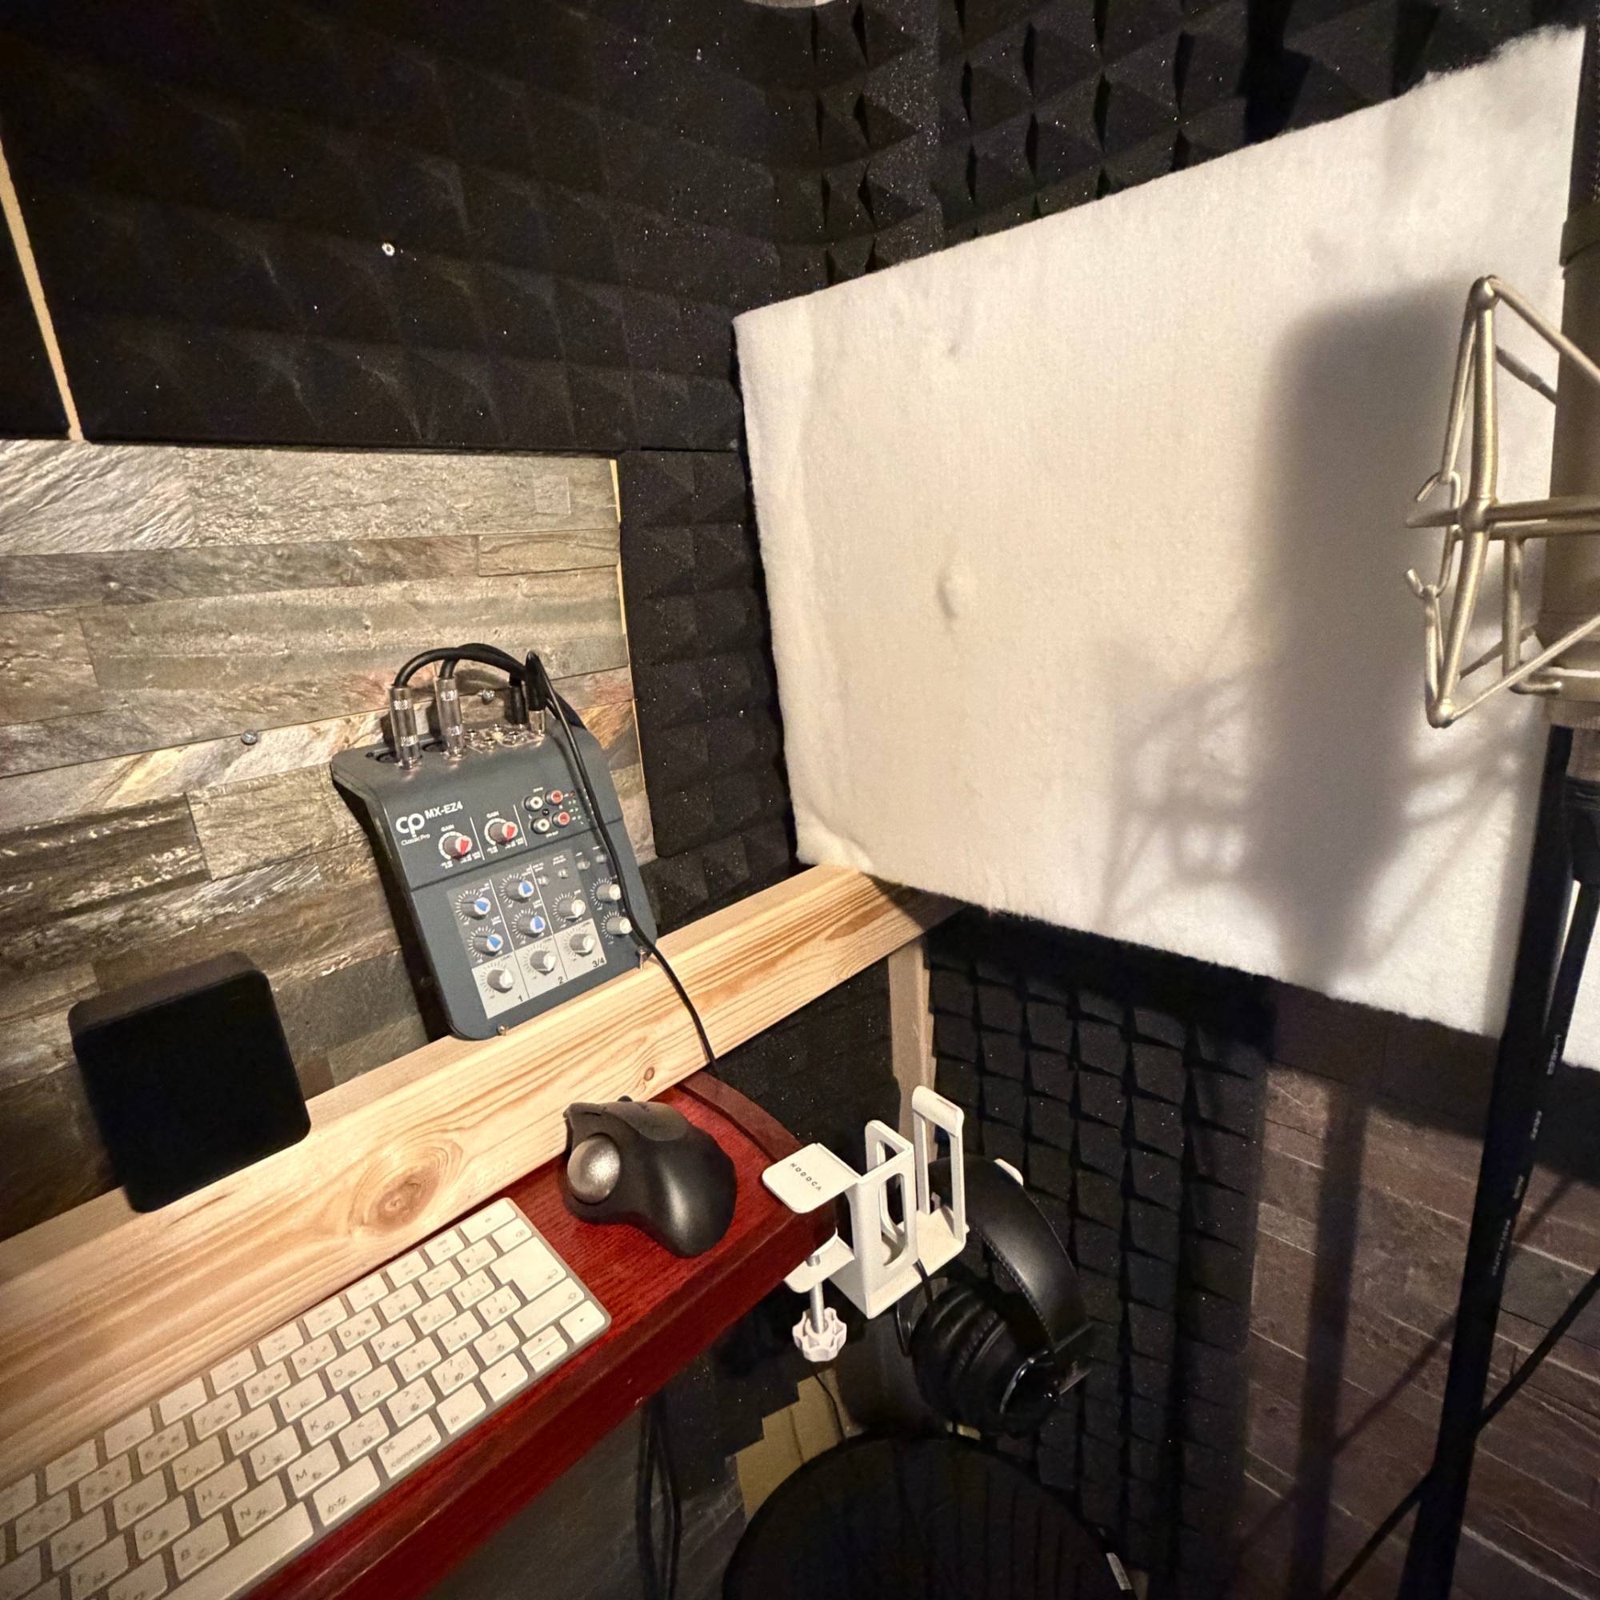
There’s one thing I recommend planning for when you build a booth: keep the computer itself outside, and arrange things so you can control it from inside.
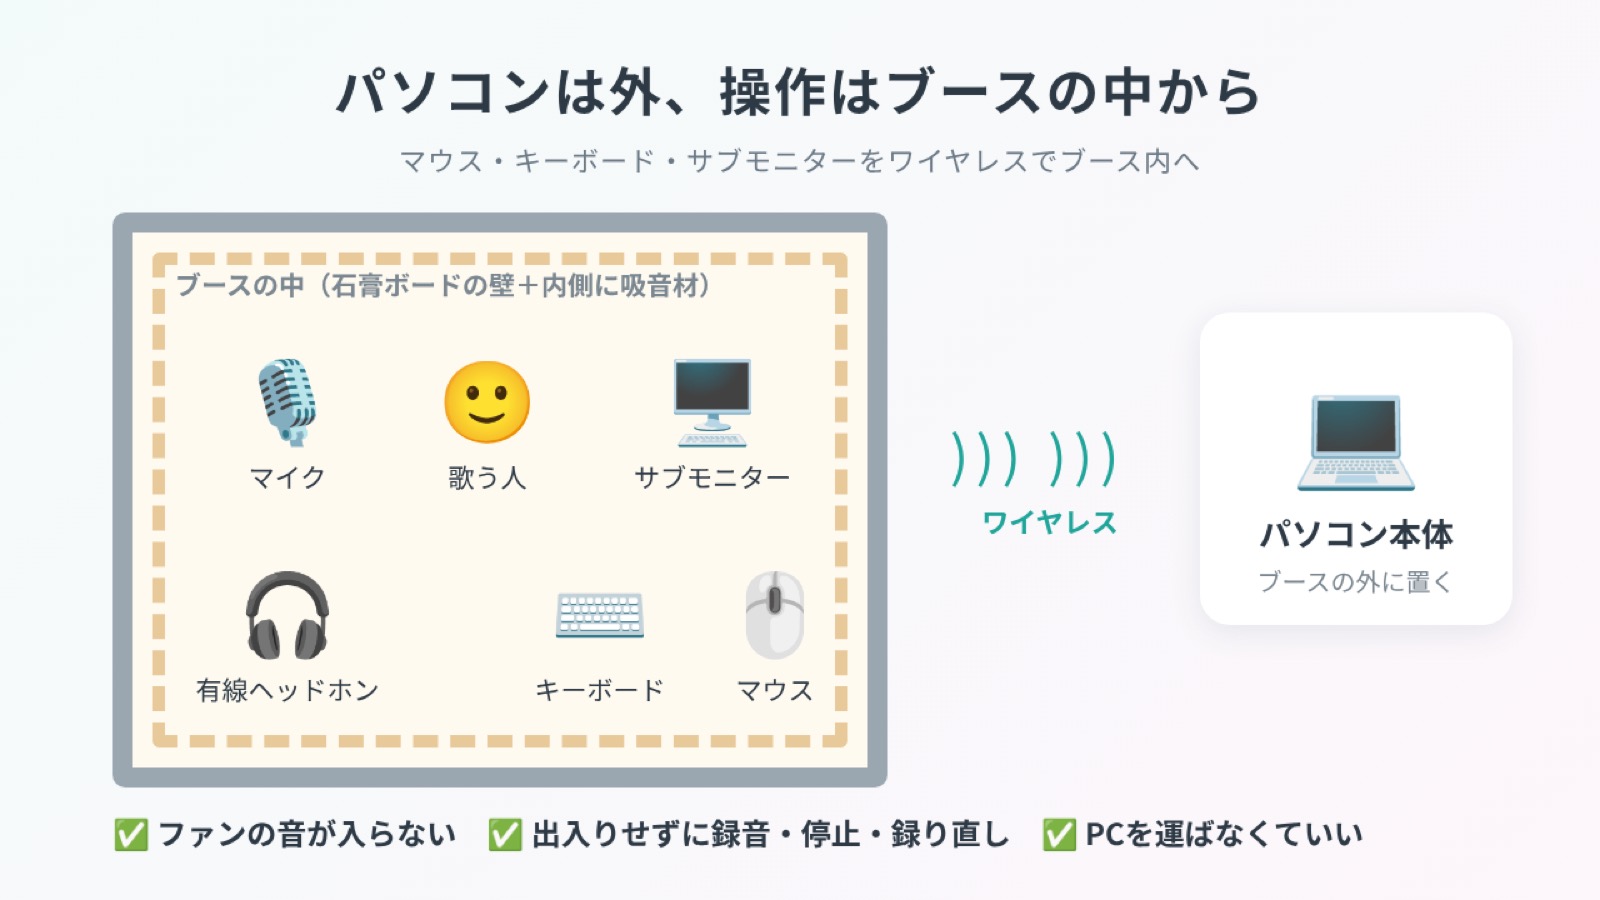
I keep a wireless mouse, keyboard, and secondary monitor inside, connected to the computer outside. There are three benefits:
- The computer’s fan noise stays out of the microphone. In a quiet booth, even a faint whir can stand out.
- You don’t have to keep going in and out. You can start, stop, and redo a take from where you sing.
- You don’t have to move the computer around. You also get more usable desk space inside the booth.
When you’re recording alone, the routine of pressing Record, stepping into the booth, closing the door, singing, then coming back out to stop the recording gets old fast. It’s even more of a hassle when the door seals tightly with a compression latch.
Cutting out those trips makes it much easier to think, “Let’s do one more take.”
💡 A note about wireless gear
The booth walls may weaken the signal. Check that your wireless devices can reach the computer outside before you rely on them. Keep your headphones wired. Wireless audio has a slight delay, which can make it harder to stay in time and on pitch.
Safety: Read This Before You Build
If you’re building this yourself, safety comes first. Please read this section all the way through.
- Plasterboard is heavy. A single sheet can easily weigh more than 10 kg. Don’t lift it alone if you can avoid it. Ideally, have someone help. Rest the lower edge on the floor so the floor supports the weight.
- LabRico has a rated load limit. Read the manufacturer’s instructions and stay within the stated limits. For a heavy wall, build with a margin of safety—for example, by adding more posts.
- Check the ceiling’s strength. LabRico works by pushing against the ceiling. Don’t brace it against a weak spot, such as a ceiling that flexes when pushed or the area around an access hatch.
- Check for looseness regularly. Once it’s built, give the booth a gentle push to check for wobble. To reduce the risk of it tipping during an earthquake, check the fittings for looseness from time to time, such as when the seasons change.
- Wear a mask when cutting plasterboard. Cutting it creates fine dust.
- Small spaces get hot. Don’t stay inside for too long. Take breaks and drink water.
- Ask for advice if you’re unsure. Many home improvement stores can help with material choices and cutting lumber to size.
You Don’t Need Perfect Sound Isolation
One last thought that may take some pressure off.
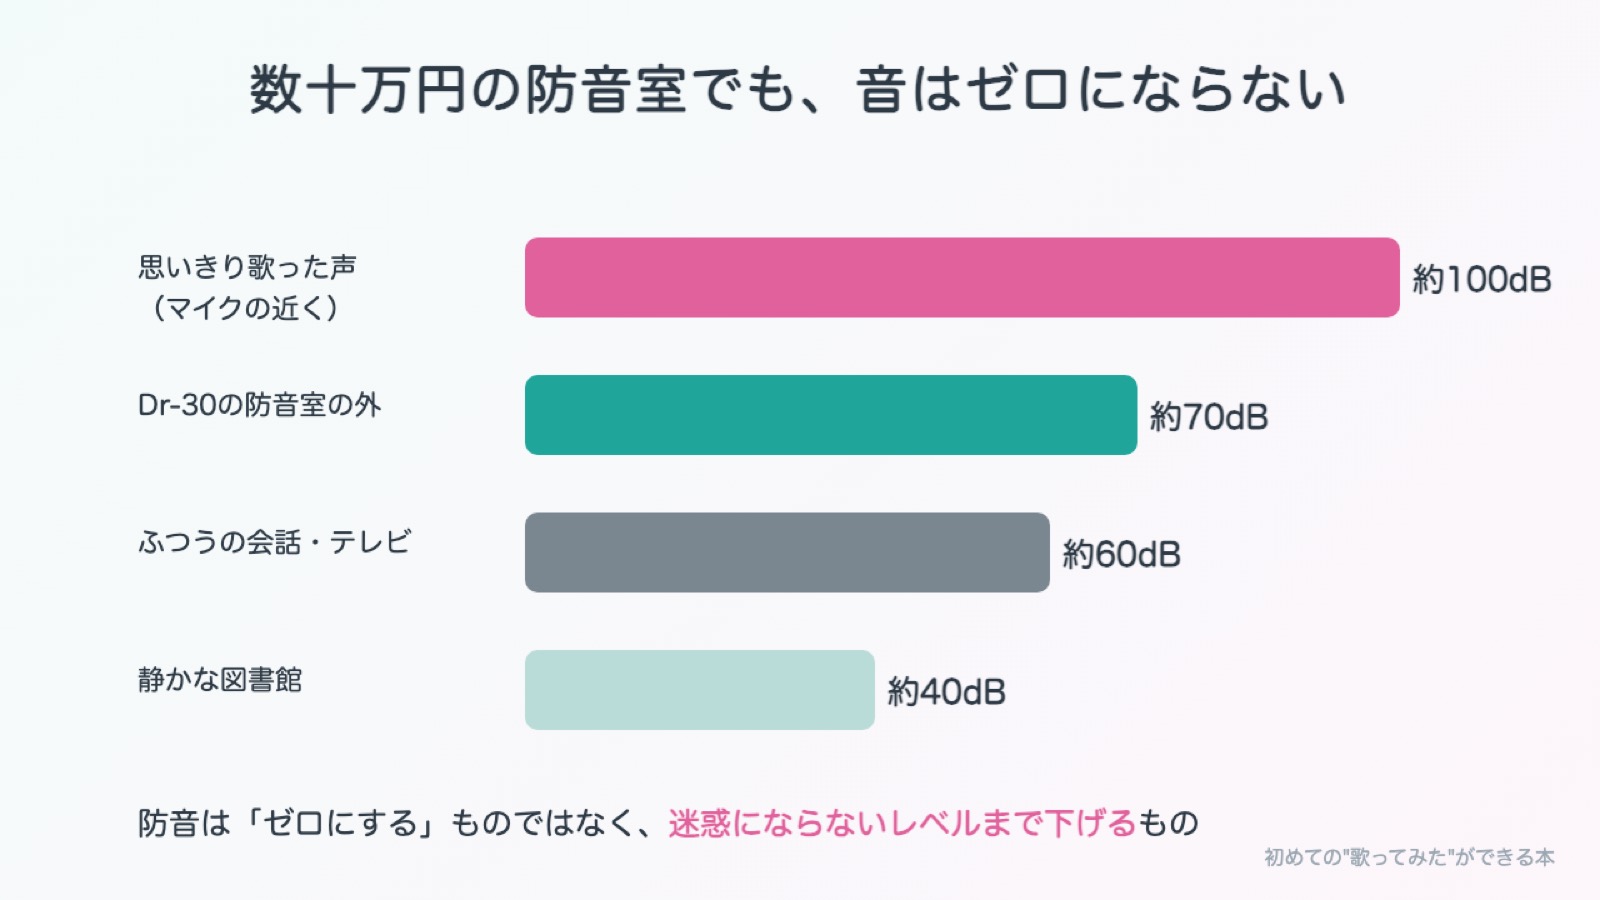
Commercial modular soundproof rooms can cost hundreds of thousands of yen. Even then, they don’t eliminate sound completely. Their performance is measured by how much quieter the sound becomes outside. A realistic goal is for a loud voice to become quiet enough that it’s no longer bothersome to people outside.
Soundproofing isn’t about making sound disappear. It’s about reducing it to a level that won’t disturb others.
Seen that way, even a handmade booth costing around ¥10,000 can make a real difference. I believe it matters more to create a place where you can sing freely today than to wait until everything is perfect.
Takeaways
- Soundproofing has two jobs: absorption (reducing reflections) and isolation (stopping sound from passing through).
- The rules for isolation are mass and no gaps.
- LabRico posts and heavy plasterboard create another wall inside the room.
- Gaps are the biggest enemy. The door is especially tricky; a compression latch pulls it tight against the frame.
- Add absorption inside. Heavy on the outside, soft on the inside.
- Keep the computer outside and control it wirelessly from the booth to make recording easier.
- Check the weight of plasterboard, LabRico’s load limit, and the ceiling’s strength. Always put safety first.
📐 Want the dimensions, materials, and instructions?
This article focuses on the general approach. A complete plan with the dimensions of my booth, a materials list and quantities, total cost, building steps, and lessons from mistakes is planned for a future article.
After the Booth: Your Next Step into Vocal Covers
A sound booth is a beginning, not a finish line. Once you have a place to sing freely, the next steps are choosing a microphone, recording, mixing, and putting out your first cover.
I wrote a book on note that I wish I could have handed to myself when I started making vocal covers. It includes everything I learned after hitting Stop the first time I heard my own voice—and failing on all of my first seven songs.
The chapter that inspired this article’s section on sound leaking out goes into more detail about recording in a closet, taming reflections inside the booth, and understanding soundproof-room performance ratings.
The introduction through Chapter 3 is free to read. It’s ¥300 for a limited time through December 31, 2026.
Photos and Diagrams
- Booth photos (post, door, and interior): Photos by the author
- Diagrams: Created by the author
Photo credits
- Header image, illustration of a home recording booth (created for this article)
- 04_kyuuon_shaon.jpg: Absorption and isolation do completely different jobs (diagram by the author)
- p04_my_labrico.jpg: The author’s booth post, with a LabRico fitting over a 2×4 and braced against the ceiling (Photo: the author)
- 04_labrico_wall.jpg: Plasterboard fastened to LabRico posts to make a heavy wall (diagram by the author)
- booth_sukima.jpg: Common places where gaps form and materials for sealing them (diagram by the author)
- 04_gremon.jpg: A compression latch pulls the door against its frame (diagram by the author)
- p04_my_gremon.jpg: Compression latch fitted to the author’s booth door (Photo: the author)
- p04_my_booth.jpg: Inside the author’s handmade booth, with acoustic treatment and a wireless keyboard and mouse (Photo: the author)
- booth_pc_outside.jpg: Computer outside; wireless mouse, keyboard, and secondary monitor inside the booth (diagram by the author)
- 04_bouonshitsu_db.jpg: Even a soundproof room costing hundreds of thousands of yen doesn’t make sound disappear (diagram by the author)