How to Stream Games with OBS on a Mac — A Hands-On Guide from Clear Voice Audio to Captions and VTuber Avatars
Introduction
What makes this guide different
How to use this guide
Chapter 1 — Install OBS and get past Mac permissions
1-1 Get OBS from the official site
1-2 Installation is just a drag and drop
1-3 Your first look at OBS
1-4 The most important step: app permissions
1-5 Check permissions in System Settings
1-6 Build a foundation with the Auto-Configuration Wizard
Chapter 1 recap
Chapter 2 — Reading the screen: scenes and sources explain everything
2-1 The OBS screen has six areas
2-2 Scenes are settings; sources are ingredients
2-3 Higher sources appear in front
2-4 Adding a source in OBS 33
2-5 Select, move, and configure sources
Chapter 2 recap
Chapter 3 — Capture games on your Mac, Switch, or PS5
3-1 Capture Mac games with macOS Screen Capture
3-2 Capture game audio at the same time
3-3 Fit the image and arrange the layers
3-4 Crop unwanted edges
3-5 Capture Switch and PS5 with a capture card
Chapter 3 recap
Chapter 4 — Separate game audio, voice, and music: think in three tracks
4-1 OBS has two kinds of audio input
4-2 The most common mistake: hearing the same sound twice
4-3 Voice: add a microphone with Audio Input Capture
4-4 Game audio and music: macOS Audio Capture
4-5 Watch the three tracks in the mixer
4-6 See everything in Advanced Audio Properties
4-7 Set the sample rate to 48 kHz
Chapter 4 recap
Chapter 5 — Voice filters: order and starting-point settings
5-1 Filters are applied from top to bottom
5-2 ① Gain: start at 0 dB
5-3 ② Noise Suppression: choose RNNoise
5-4 ③ Noise Gate: close it when you are not speaking
5-5 ④ Equalizer: just trim a little low end
5-6 ⑤ Compressor: smooth out vocal dynamics
5-7 ⑥ Limiter: set a ceiling that cannot be exceeded
5-8 Listen and check the result
Chapter 5 recap
Chapter 6 — Balance and sync: how to read the meters
6-1 Read the meter colors: green, yellow, and red
6-2 A useful target for level
6-3 Listen for yourself with audio monitoring
6-4 Fix sync problems with Sync Offset
Chapter 6 recap
Chapter 7 — Captions and lower thirds: show and hide them with one button
7-1 Build a lower third from a color block and text
7-2 Group the lower third
7-3 Show and hide it with a hotkey
7-4 Make it slide in with a visibility transition
7-5 Lower-third ideas
Chapter 7 recap
Chapter 8 — Stream as a VTuber: remove the background and layer your avatar
8-1 VTuber streaming uses two apps
8-2 Remove the background with chroma key
8-3 Place the avatar over the game
8-4 Notes for VTuber streaming on a Mac
Chapter 8 recap
Chapter 9 — Streaming settings: image quality and your Mac’s encoder
9-1 Resolution and FPS in Settings → Video
9-2 Encoder: use Apple hardware on a Mac
9-3 Bitrate: follow your platform’s guidance
9-4 Streaming service and stream key in Settings → Stream
Chapter 9 recap
Chapter 10 — Recording and archives: keep voice and game audio on separate tracks
10-1 Why separate tracks?
10-2 Check the recording settings
10-3 Assign audio to tracks
10-4 Working with the tracks in an editor
Chapter 10 recap
Chapter 11 — Pre-stream checklist and troubleshooting
11-1 The five-minute pre-stream checklist
11-2 Check Stats while streaming
11-3 Common problems and fixes
11-4 Find help in the log file
Chapter 12 — Operate OBS with your left hand and keep playing
12-1 Choose your hotkeys
12-2 Put the controls on a left-hand device
12-3 Turn a phone or tablet into a control surface
12-4 Bonus: rehearse scene changes in Studio Mode
Chapter 12 recap
Starter kits for different budgets
Kit A: Get your voice out there (around ¥20,000 or less)
Kit B: Upgrade the audio (around ¥50,000 or less)
Kit C: Go all in (no set budget)
Closing
☕ A coffee-length story: a hands-on guide to game streaming on a Mac, from clear voice audio to captions and VTuber avatars.
Introduction
This is a practical guide to getting started with game streaming in OBS on a Mac. Every screenshot was captured hands-on in OBS 33.0.0 on a Mac.
It covers video, but also the sound viewers spend the most time hearing: your voice. The steps and starting values are laid out in order.
If you are new to streaming, start with Chapter 1. If you are putting together a setup, jump to “Starter kits for different budgets” at the end.
What makes this guide different
1. Screenshots captured on a Mac, using the current version of OBS
Every screenshot was taken while operating OBS 33.0.0 on a Mac. The guide shows Mac-specific permission settings and the updated screens in the current OBS interface.
2. Audio guidance includes both the order and the numbers
For voice filters, I explain which order to use and what values to start with. These numbers are only starting points, but they should get you past the feeling of not knowing where to begin.
3. A complete walkthrough of what game streaming takes
You will learn how to show the game, separate audio, show and hide captions and lower thirds, use a VTuber avatar, configure the stream, record, and run through a pre-stream checklist. This guide gives you the essentials to get a game stream going.
How to use this guide
- Chapters 1–3: Install OBS and get the game on screen. By the end, you will have the basic shape of a stream.
- Chapters 4–6: Audio: separate voice, game audio, and music, then process and balance them.
- Chapters 7–8: Captions, lower thirds, and VTubers—turning a stream into a show.
- Chapters 9–10: Streaming and recording settings.
- Chapters 11–12: Pre-stream checklist, troubleshooting, and left-hand controls.
If this is your first time, read from Chapter 1. If you already stream, feel free to jump to a chapter that interests you. Chapters 4 and 5 in particular can help you take a fresh look at your stream audio.
📝 About the screenshots
These screenshots were captured in macOS using OBS 33.0.0, the latest version when I wrote this guide in October 2026. OBS is updated frequently, so button locations and labels may differ slightly in other versions. Personal details in screenshots, such as account names and device numbers, have been hidden or removed. The game screens and characters shown are samples prepared for this guide.
Let’s get started.
Chapter 1 — Install OBS and get past Mac permissions
The day you decide to start streaming, the first obstacle is often not a setting at all.
The screen stays black. Nothing appears.
You speak into the microphone, but the meter does not move.
Many people starting out with OBS on a Mac get stuck here. In most cases, the cause is not an OBS setting. It is a permission on the Mac.
This chapter gets OBS installed correctly and takes care of the Mac’s permissions up front. Once you get past this, the rest is much easier.
1-1 Get OBS from the official site
OBS, formally OBS Studio, is free software for streaming and recording. It is used around the world, by professional streamers and first-timers alike.
Always get it from the official website:
Choose “macOS” on the home page to download the Mac installer (.dmg). The OBS team also publishes the same file on GitHub; the contents are identical whichever official source you use.
One thing to check is which kind of Mac you have:
- Apple silicon (M1, M2, M3, M4, and later): choose the download marked “Apple.”
- Intel Mac: choose the download marked “Intel.”
To find out, click the Apple menu at the top left of the screen and choose “About This Mac.” Look at the “Chip” field. If it says “Apple M…” you have Apple silicon.
💡 Do not download OBS from a site you found by searching “free OBS download.”
OBS is free, so suspicious download sites sometimes borrow its name. Bookmark obsproject.com and stick to that.
1-2 Installation is just a drag and drop
Open the downloaded .dmg file. A small window appears with the OBS icon and the Applications folder.
Drag the OBS icon into Applications. That is the installation.
The first time you open it, your Mac may ask, “OBS is an app downloaded from the Internet. Are you sure you want to open it?” If you downloaded OBS from the official site, choose “Open.”
📝 If you already have an older version of OBS
Installing the newer version in Applications preserves your scenes and settings. They are stored separately from the app. If you want a backup before replacing the app, use Scene Collection → Export in the menu.
The screenshots in this guide were taken with OBS 33.0.0, the latest version when I wrote it in October 2026. OBS changes frequently. If your version has slightly different button positions or wording, look for the closest matching option.
1-3 Your first look at OBS
When you open OBS, you will see a screen like this.
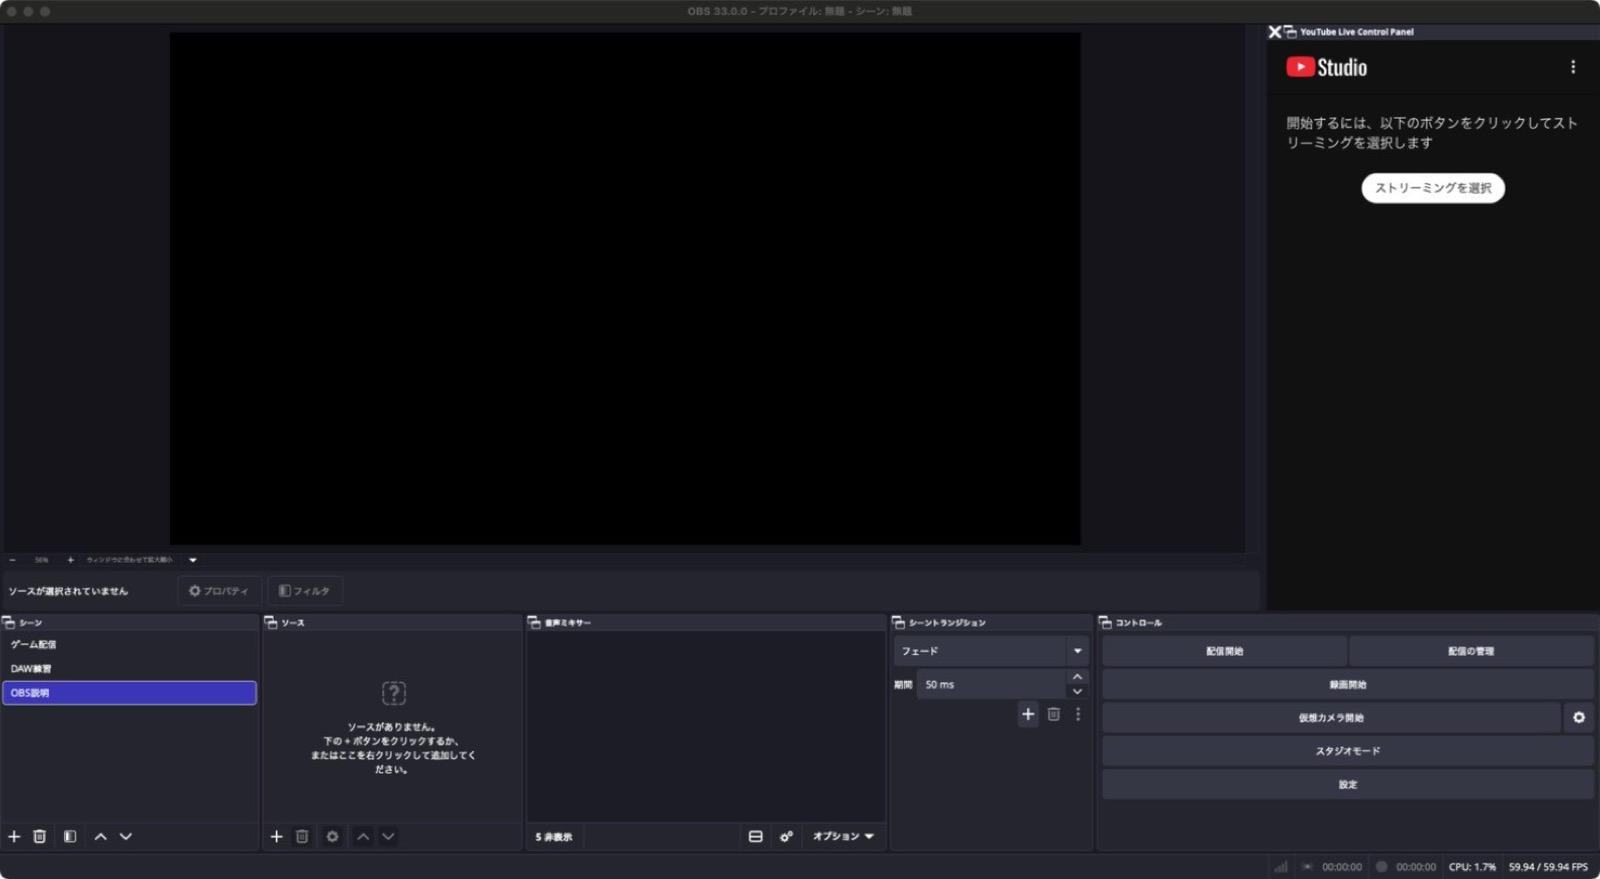
The large black square in the middle is the preview. Whatever appears there is what your stream will show. We will go through the smaller areas below in Chapter 2.
It is fine for the preview to be black right now. You have not added anything to show yet.
1-4 The most important step: app permissions
This is the heart of the chapter.
Your Mac is designed to stop apps from recording the screen or listening to the microphone without your permission. You need to tell OBS, one permission at a time, “You may capture the screen” and “You may use the microphone.”
OBS has a screen where you can check these permissions together:
OBS menu → Check App Permissions…
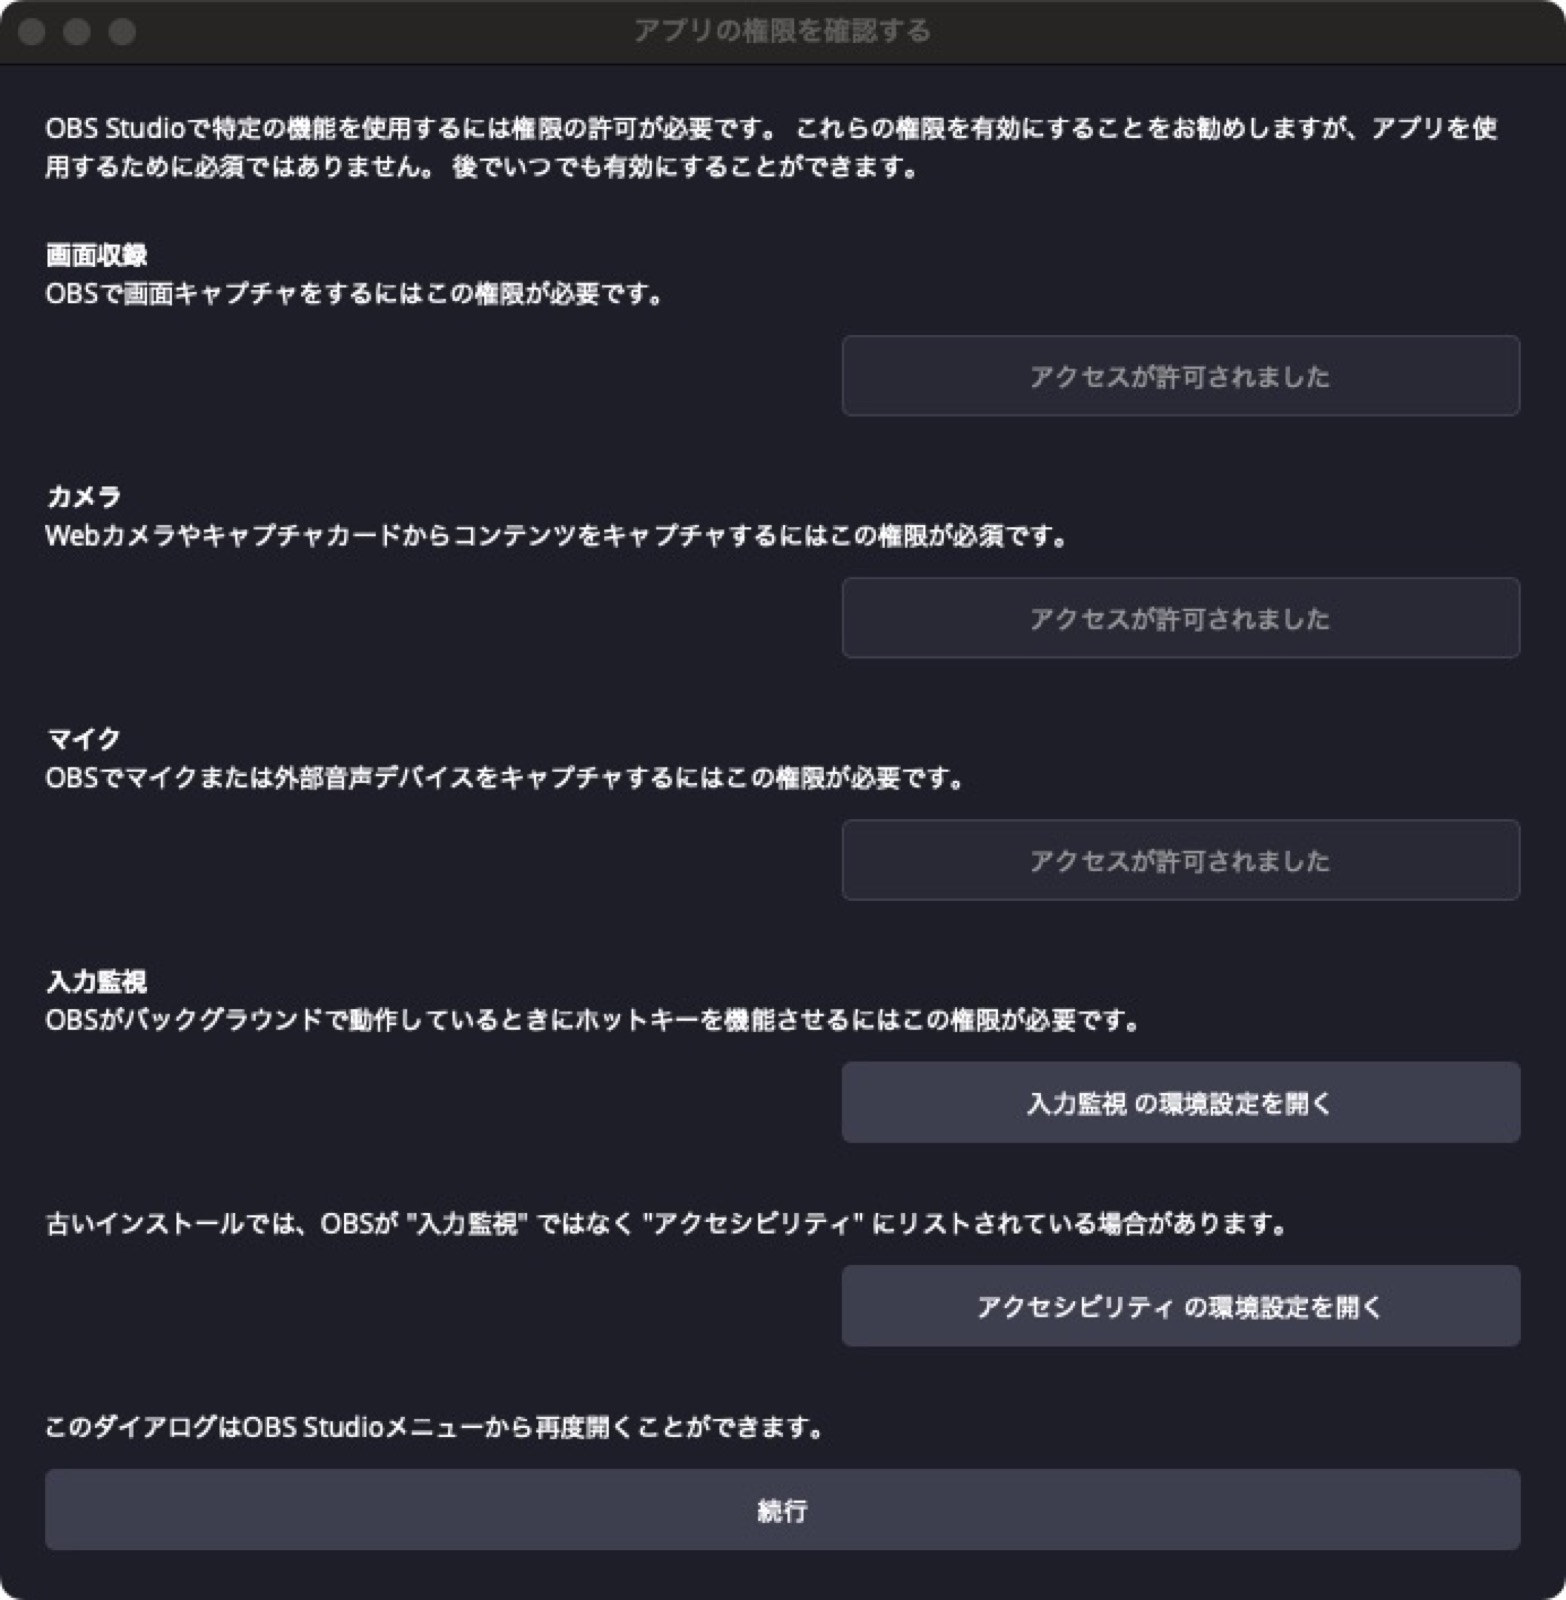
You will see four items:
- Screen Recording: required to show a game or the Mac screen.
- Camera: required for a webcam or the video from a capture card connected to a Switch or PS5.
- Microphone: required to capture a microphone or audio interface.
- Input Monitoring: lets OBS hotkeys (keyboard shortcuts) work while OBS is in the background.
Approved items say “Access granted.” The other items have buttons that take you to the permission screen.
For game streaming, grant Screen Recording, Camera, and Microphone. Grant Input Monitoring too if you want to use hotkeys during a stream.
💡 If the screen is black or audio is missing, check here first.
A permission can suddenly stop working during a stream or after a macOS update. Before changing OBS settings, open this screen. A permission may have been revoked.
1-5 Check permissions in System Settings
You can also check the same permissions in macOS:
System Settings → Privacy & Security → the relevant permission
For example, open “Screen & System Audio Recording” to see which apps can record the screen.
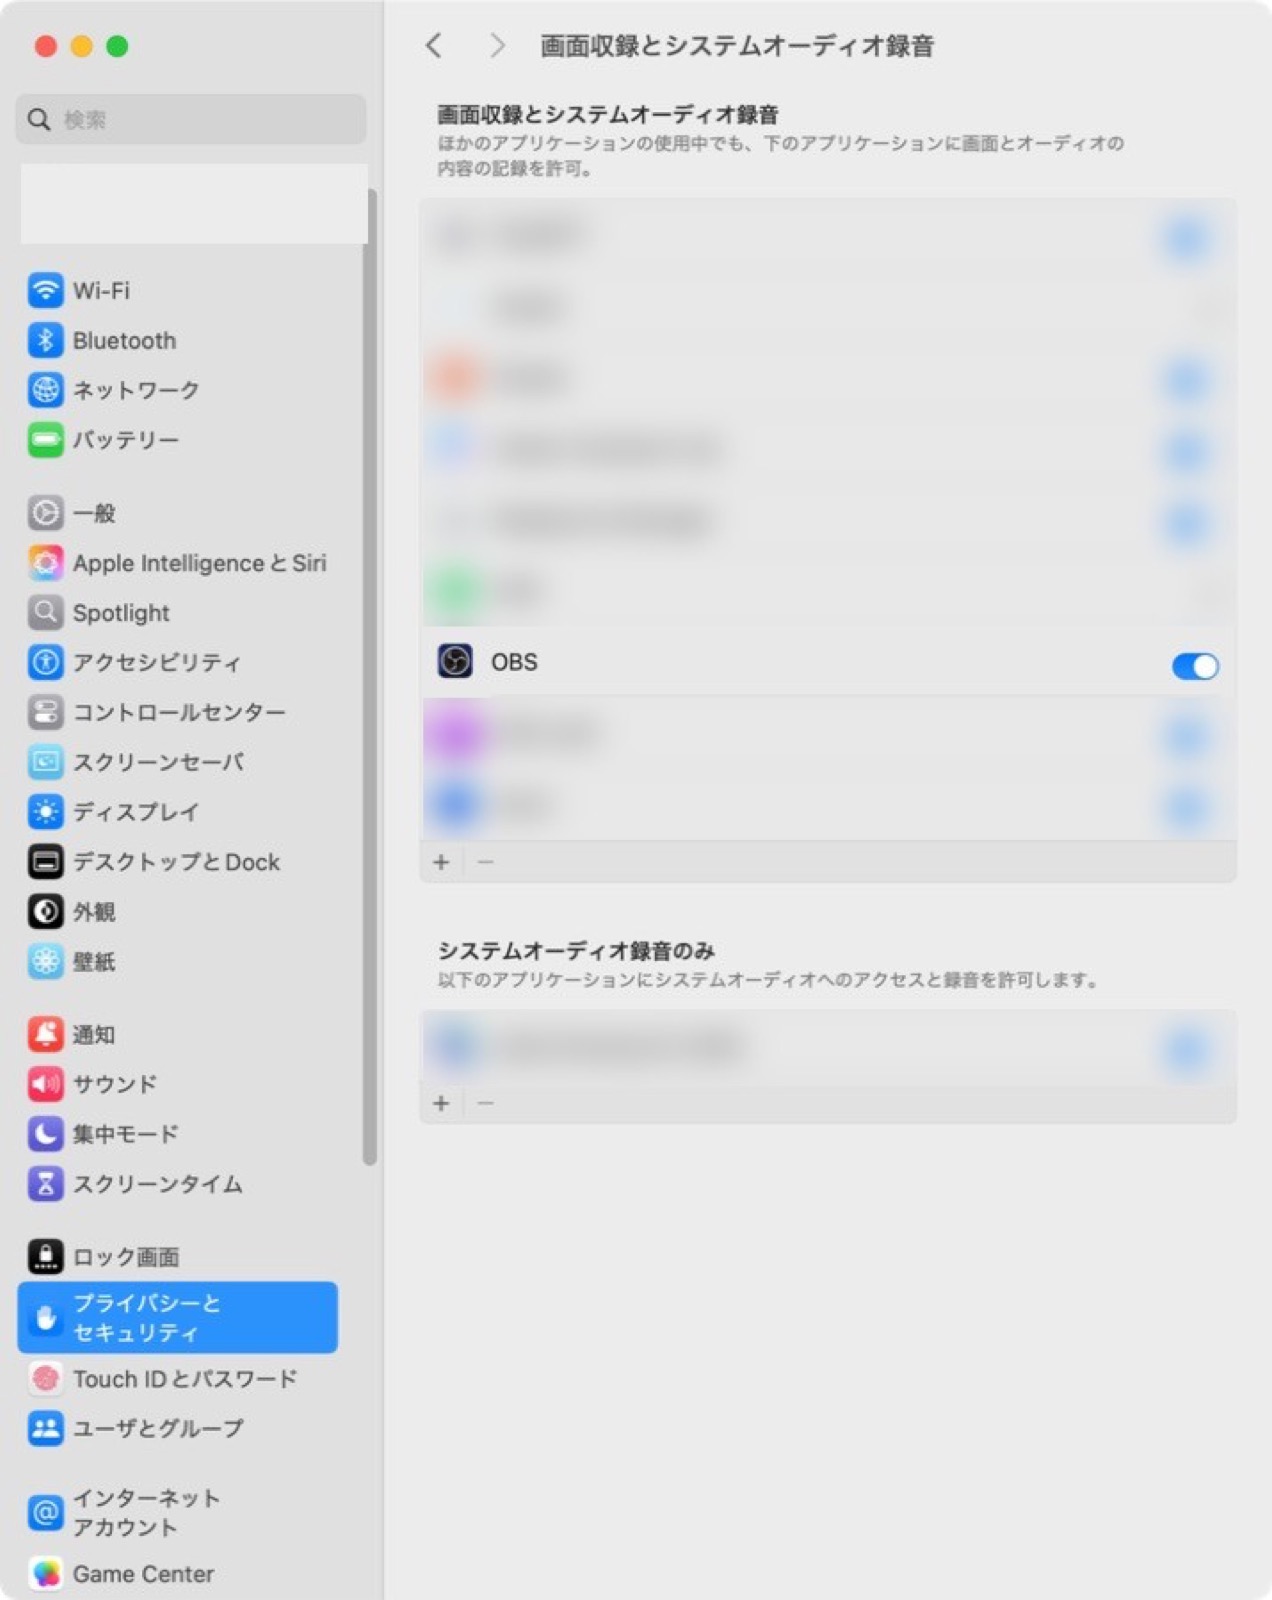
Make sure the OBS switch in the list is on (blue). Check the Microphone screen the same way.
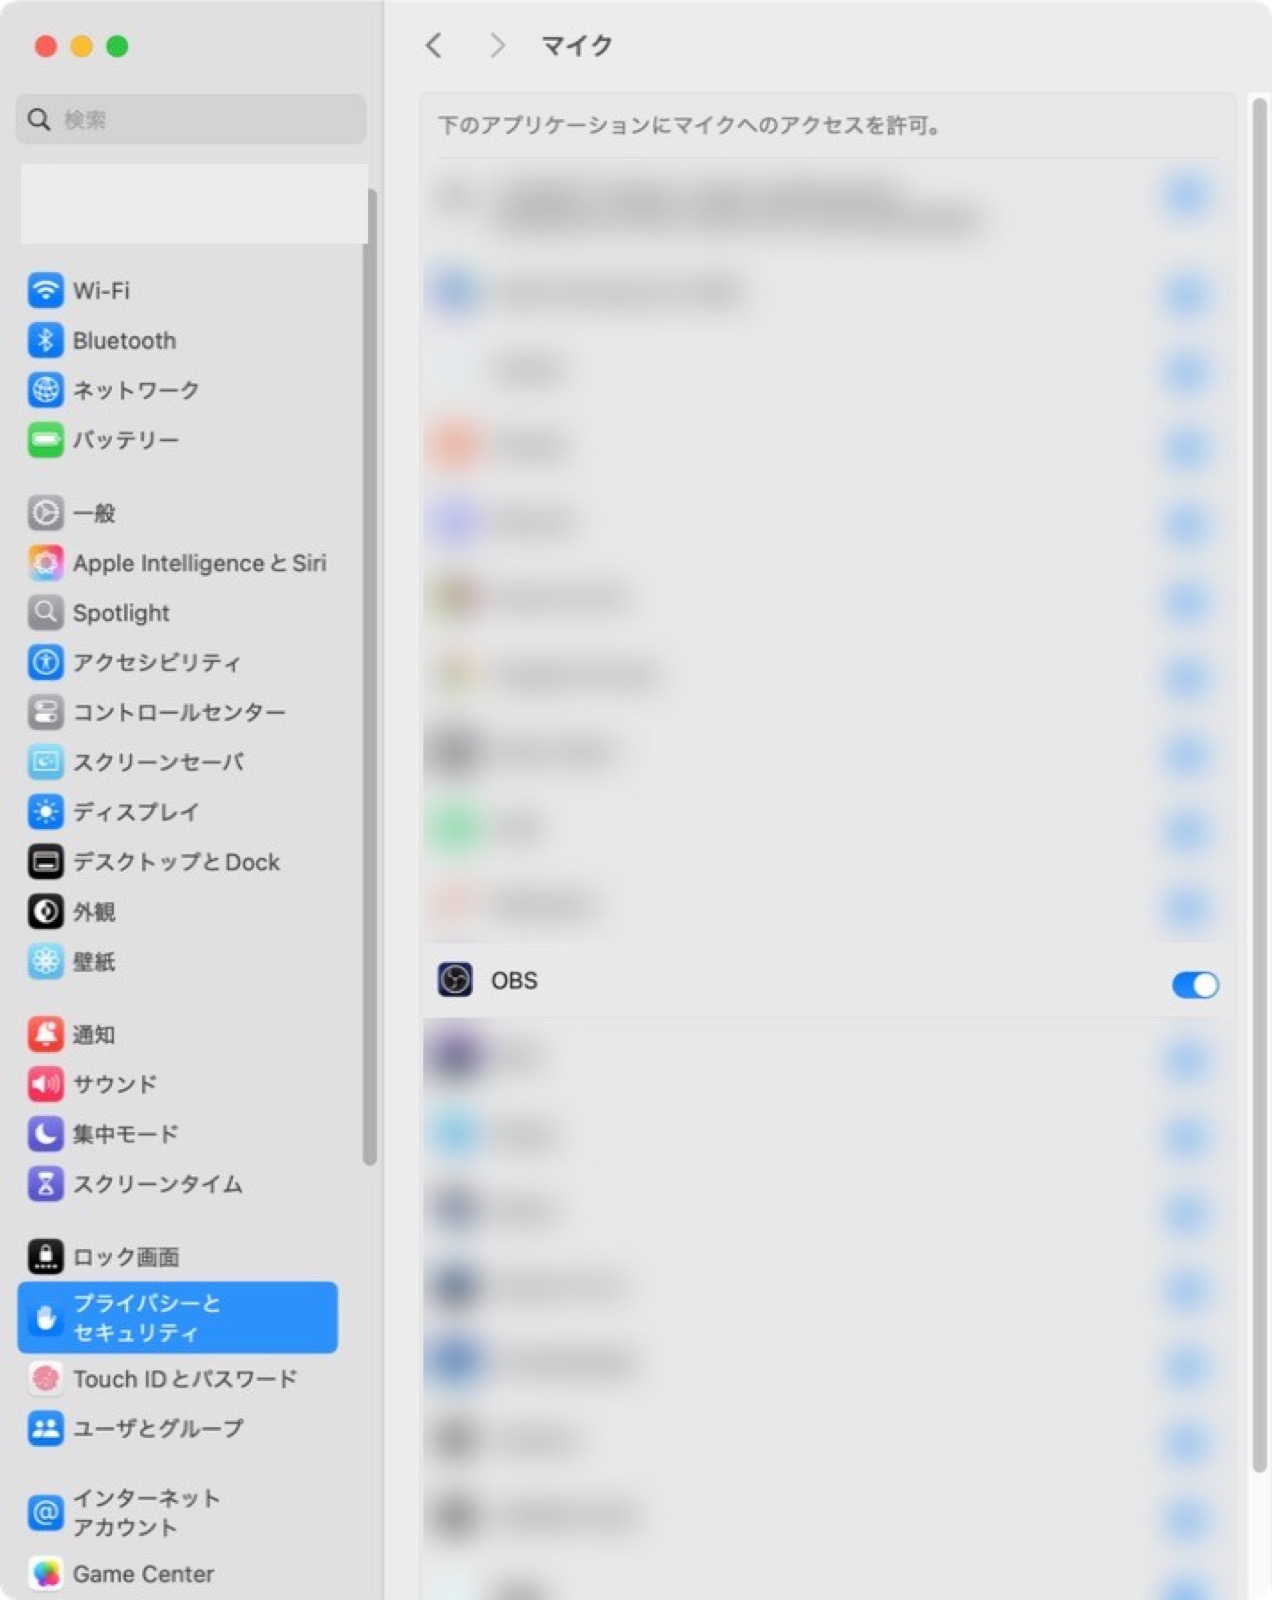
📝 If turning on the switch does not take effect
Screen Recording and Microphone permissions may take effect after you quit and reopen OBS. Turn on the switch, choose Quit OBS, then open OBS again.
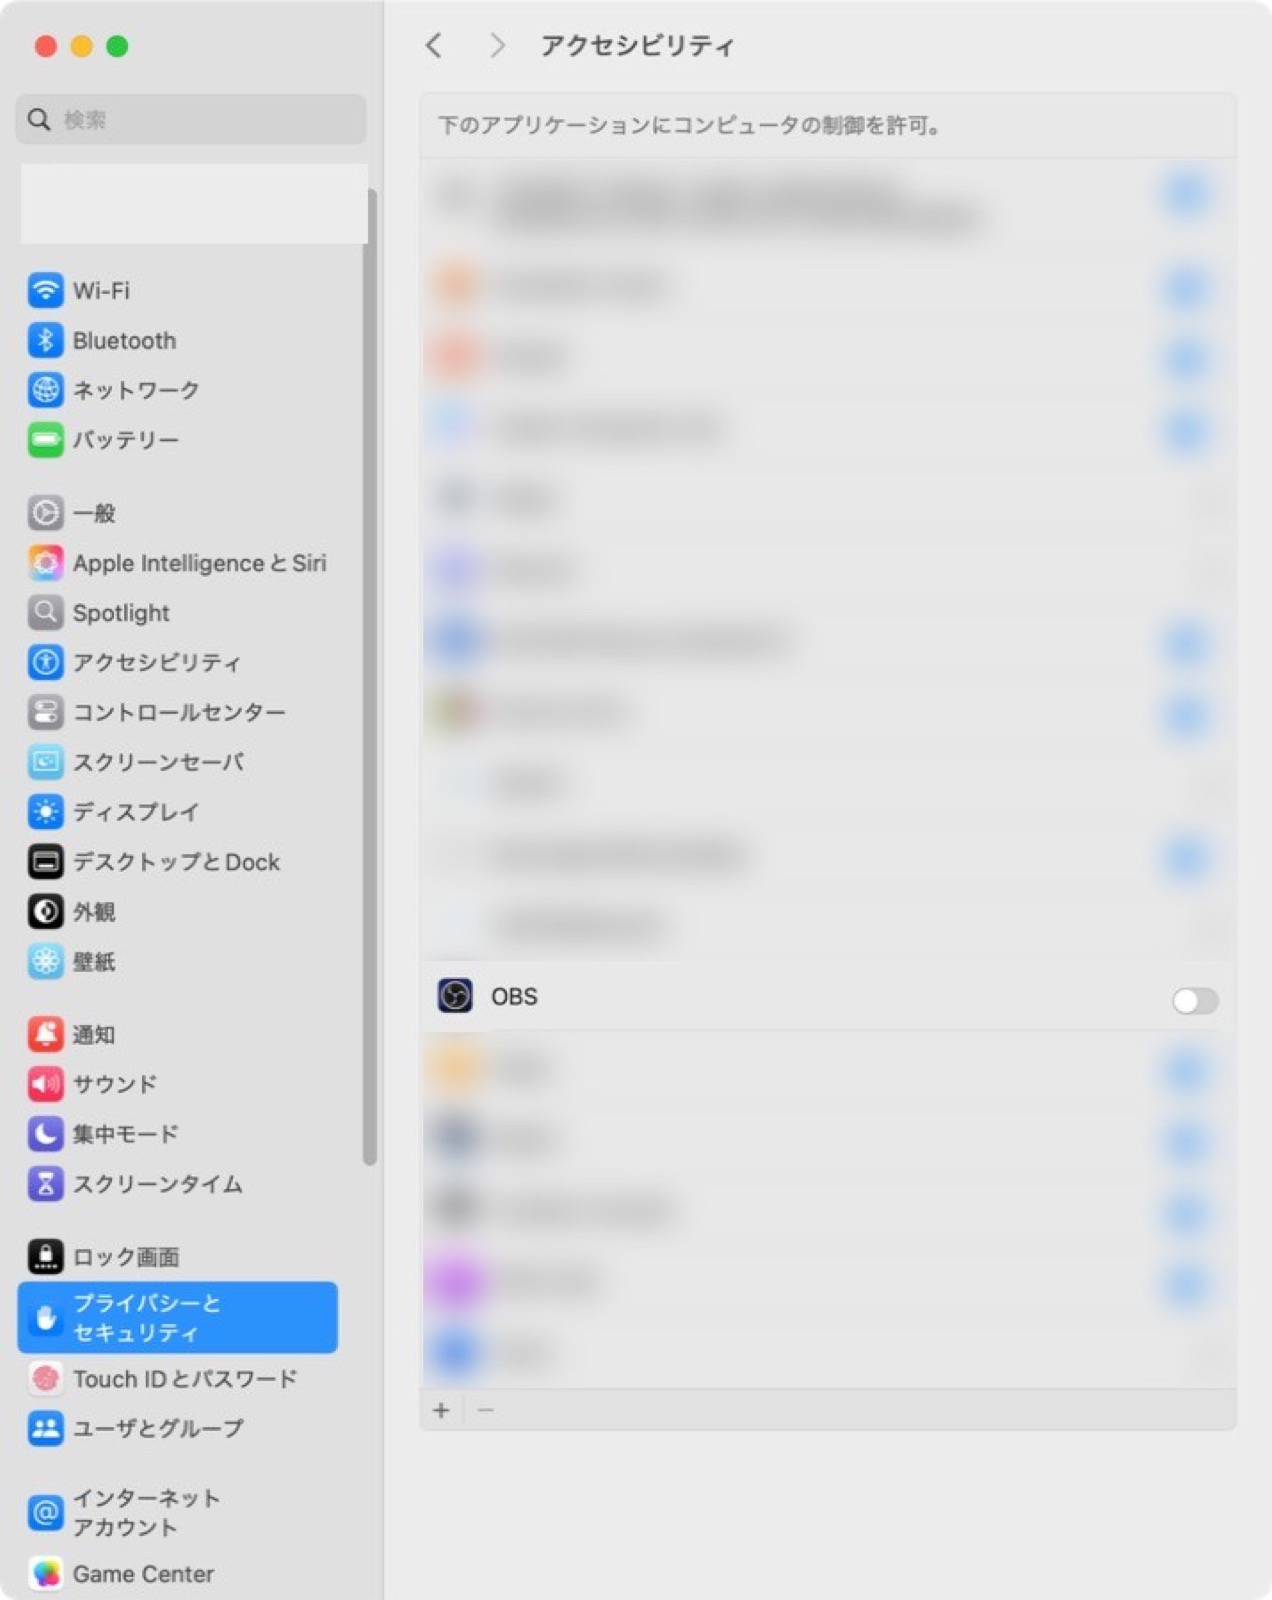
On newer Macs, hotkey permission is under Input Monitoring. On Macs that have used OBS for a long time, OBS may instead appear in Accessibility. Either way, check that OBS is enabled.
1-6 Build a foundation with the Auto-Configuration Wizard
Once permissions are set, let OBS work out what streaming quality your Mac can handle.
Tools → Auto-Configuration Wizard
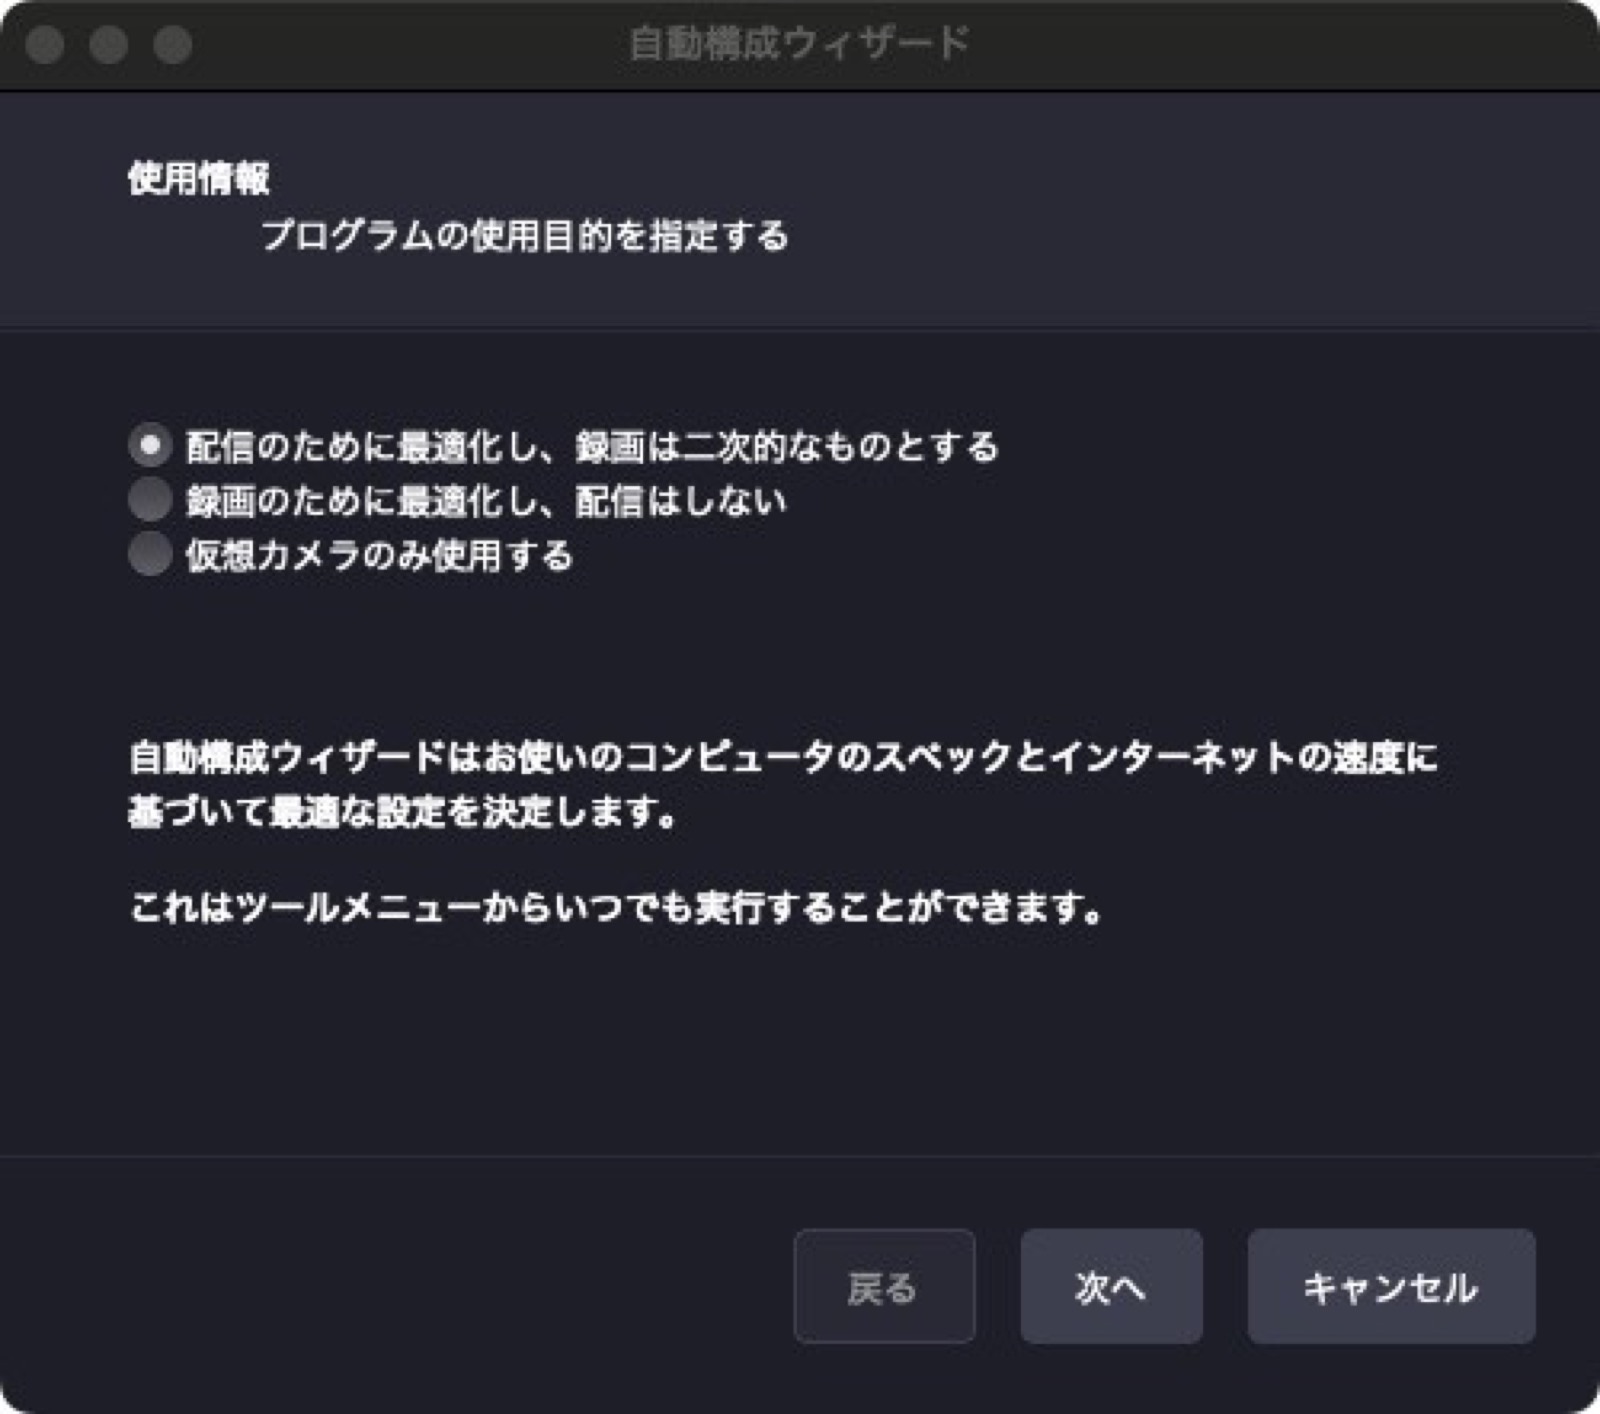
On the first screen, choose how you plan to use OBS. For game streaming, choose the first option: “Optimize for streaming, recording is secondary.”
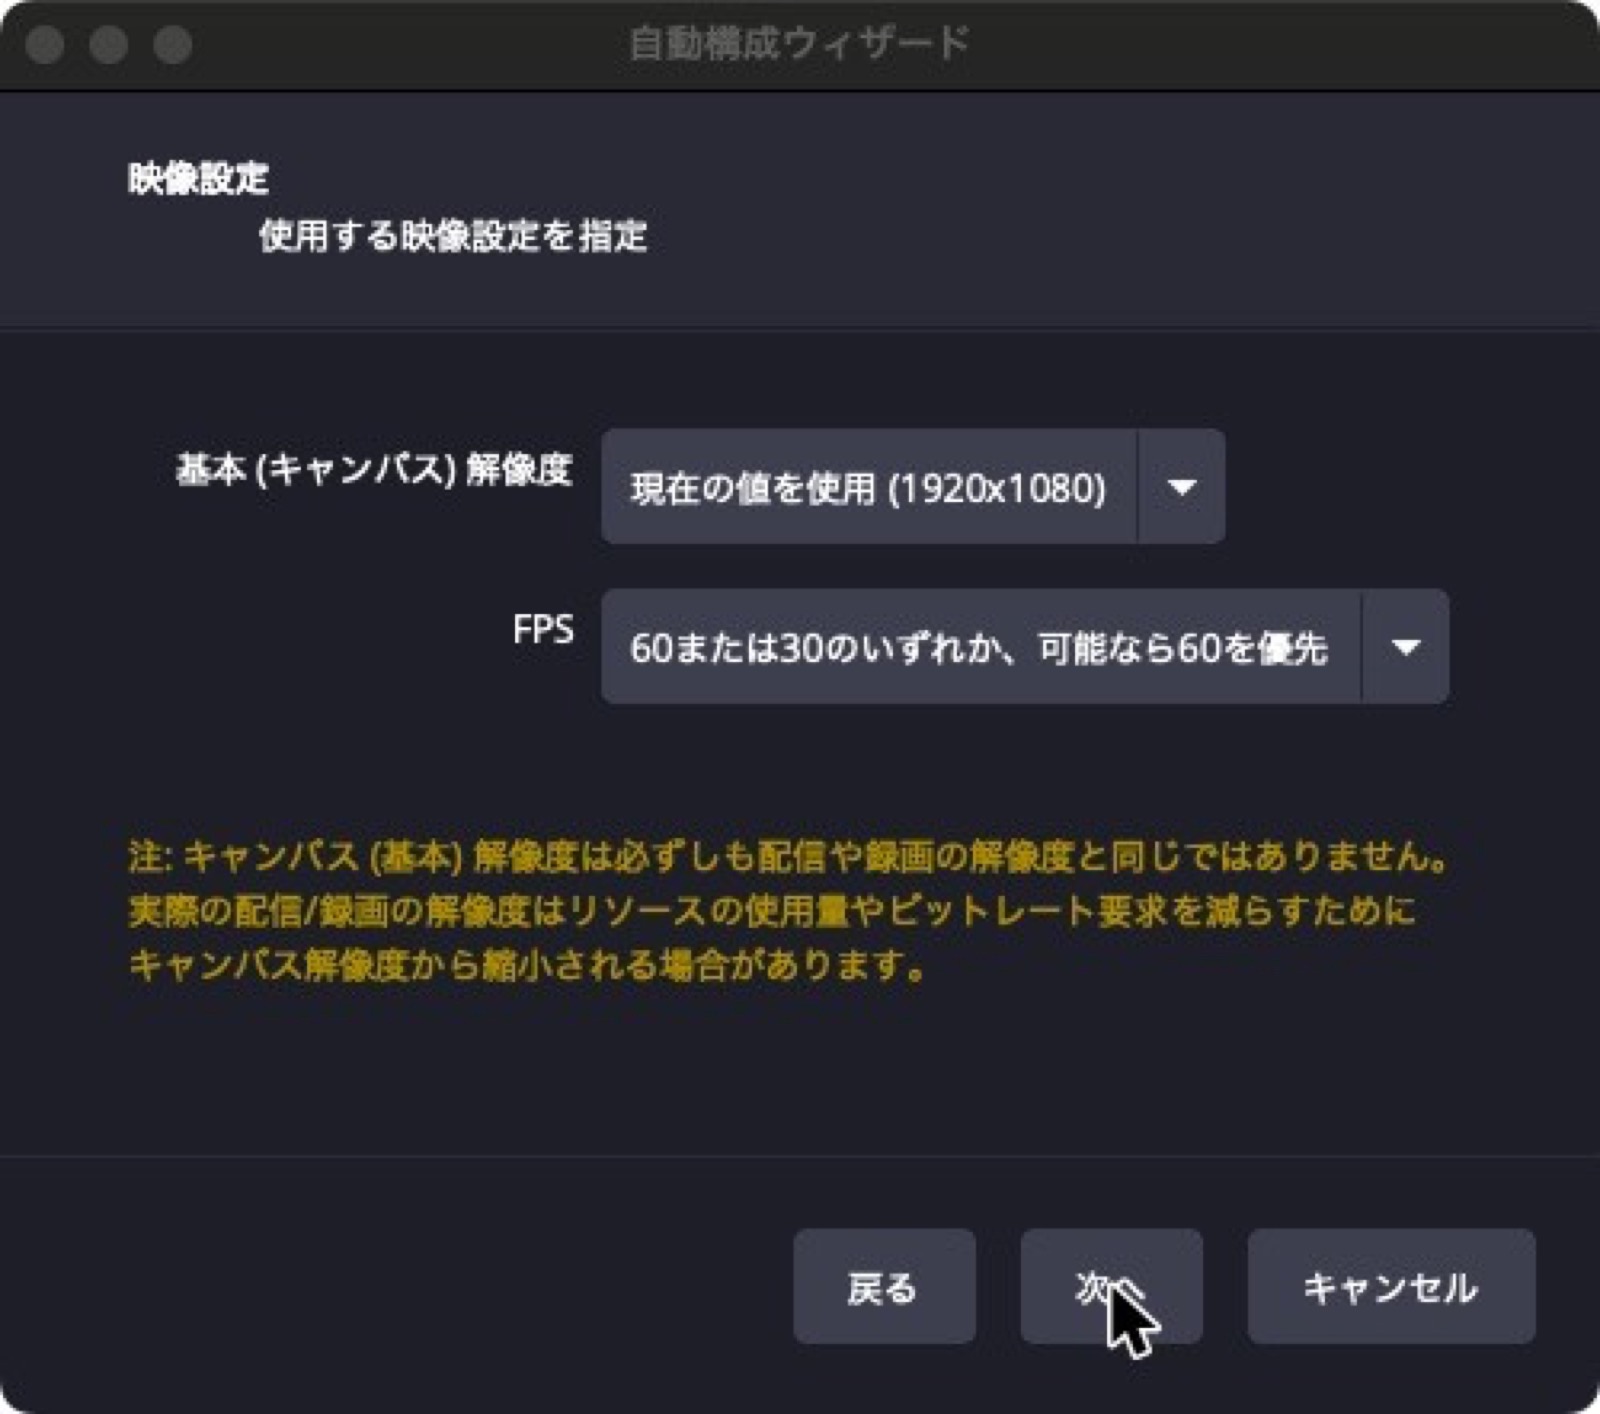
The second screen is for video settings. To start, leave resolution at “Use Current” and FPS at “Either 60 or 30, but prefer 60 when possible.” Fast-moving games look smoother at 60 FPS, but if your Mac struggles, OBS will choose 30.
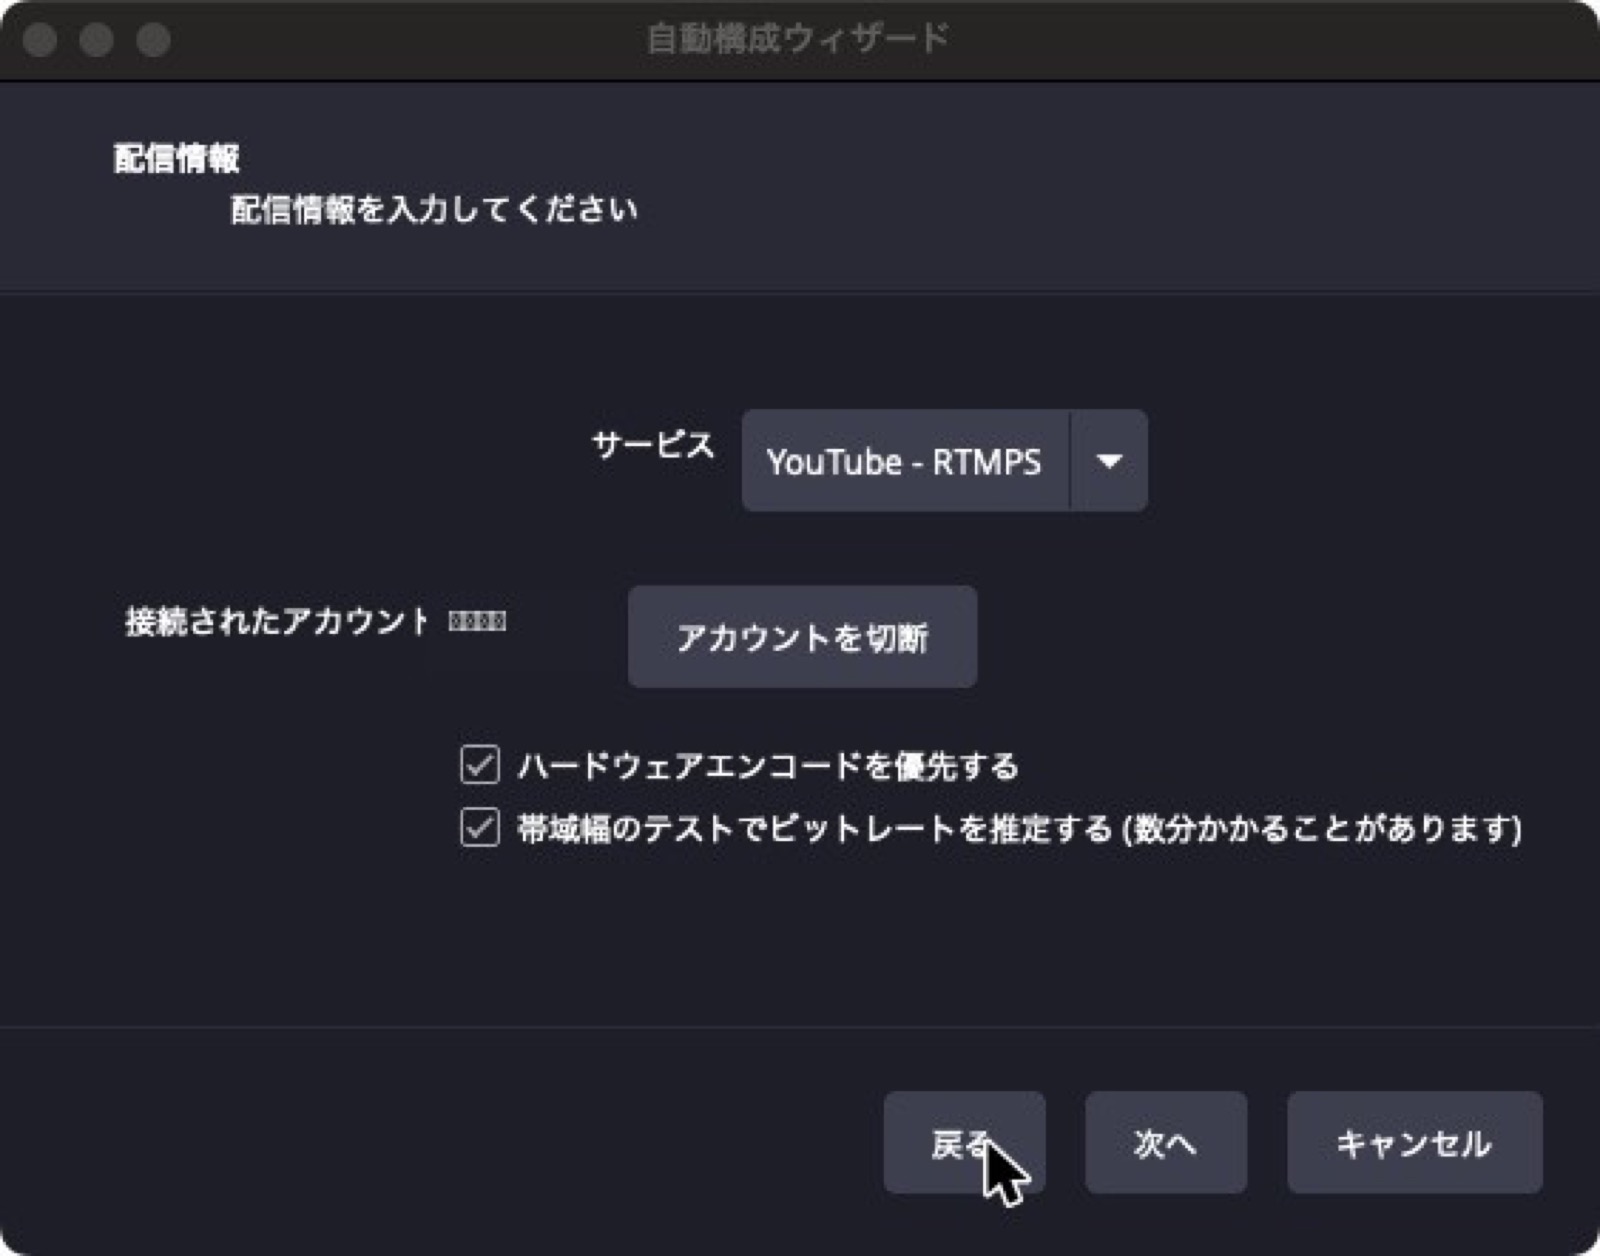
The third screen is for your streaming service. Choose YouTube, Twitch, or wherever you plan to stream. If you check “Estimate bitrate with bandwidth test,” OBS will measure your actual internet speed and choose a suitable quality setting. This takes a few minutes.
Click Apply Settings to finish the basic setup.
💡 You can run the wizard again at any time.
It is a good idea to run it again after moving, changing internet providers, or getting a new Mac. Chapter 9 explains the settings and numbers in more detail.
Chapter 1 recap
- Download OBS from obsproject.com and choose the right build for Apple silicon or Intel.
- Install by dragging OBS into Applications. Replacing an older version preserves your settings.
- Check Screen Recording, Camera, Microphone, and Input Monitoring under OBS → Check App Permissions.
- If the picture or audio is missing, check permissions first. After changing a switch, reopen OBS.
- Use Tools → Auto-Configuration Wizard to set up the stream.
In the next chapter, we will learn the OBS screen and the two ideas at the center of streaming: scenes and sources. Once those make sense, captions and VTuber avatars use the same building blocks.
Chapter 2 — Reading the screen: scenes and sources explain everything
The OBS screen can look like a wall of buttons at first. But there are really just two things to learn:
Scenes and sources.
Once you understand them, a game screen, captions, and a VTuber avatar all fit together in the same way.
2-1 The OBS screen has six areas
Let’s start with the map. The OBS screen is divided into six main areas.
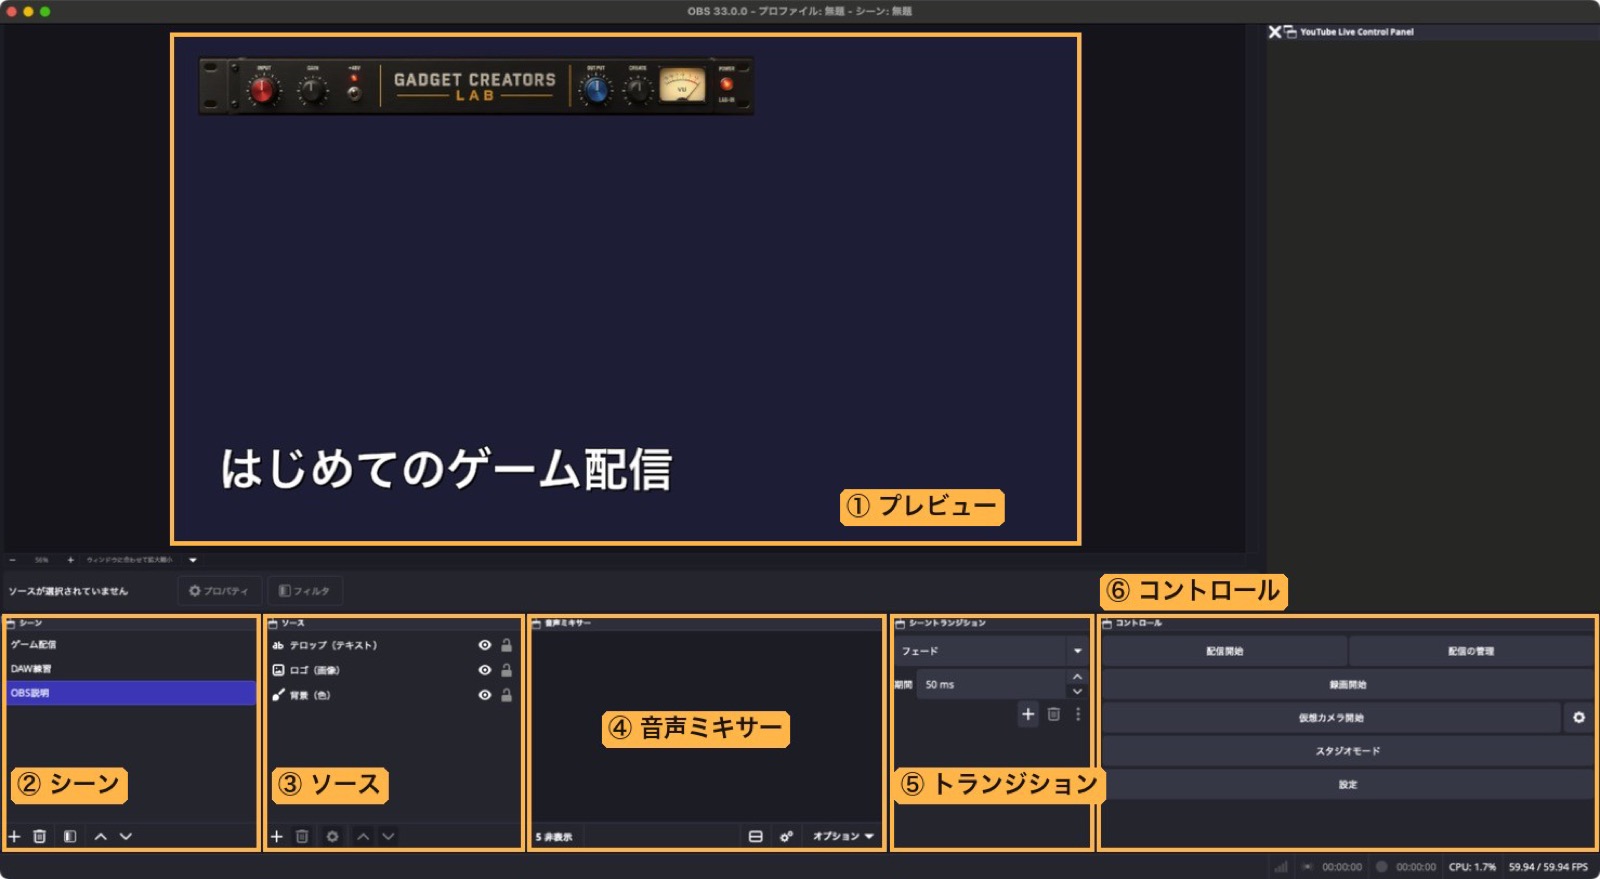
- ① Preview: what viewers see right now. Whatever appears here goes to the stream.
- ② Scenes: a list of “situations”—sets of screens you can switch between while streaming.
- ③ Sources: the ingredients placed in a scene, such as the game screen, microphone, text, and images.
- ④ Audio Mixer: where you watch and adjust levels. We will cover this in Chapters 4–6.
- ⑤ Scene Transitions: effects such as fades when changing scenes.
- ⑥ Controls: buttons for starting a stream or recording, opening settings, and more.
You may also see a service panel on the right, such as “YouTube Live Control Panel.” It is optional, so you can ignore it for now.
2-2 Scenes are situations; sources are ingredients
Think of a live television show.
A program has situations such as an opening, the studio, a remote segment, and a closing. You can switch between them with a button. Each situation has ingredients on screen: camera footage, captions, and music.
OBS works the same way:
- Scene = situation (for example, a starting screen, gameplay, a break, or an ending).
- Source = ingredient (for example, the game, your microphone, the stream title, or a logo).
For a game stream, four scenes will cover most situations:
- Starting screen: “We’ll be right back” or “Starting soon,” shown just before the stream begins.
- Gameplay: the game, microphone, and captions.
- Break: a screen to show while you use the restroom or get a drink; mute the microphone.
- Ending: a “Thanks for watching” screen.
Add scenes with the + under area ②. Give them any names that make sense to you.
2-3 Higher sources appear in front
This is the most important part.
The screenshot below shows three sources in one scene.
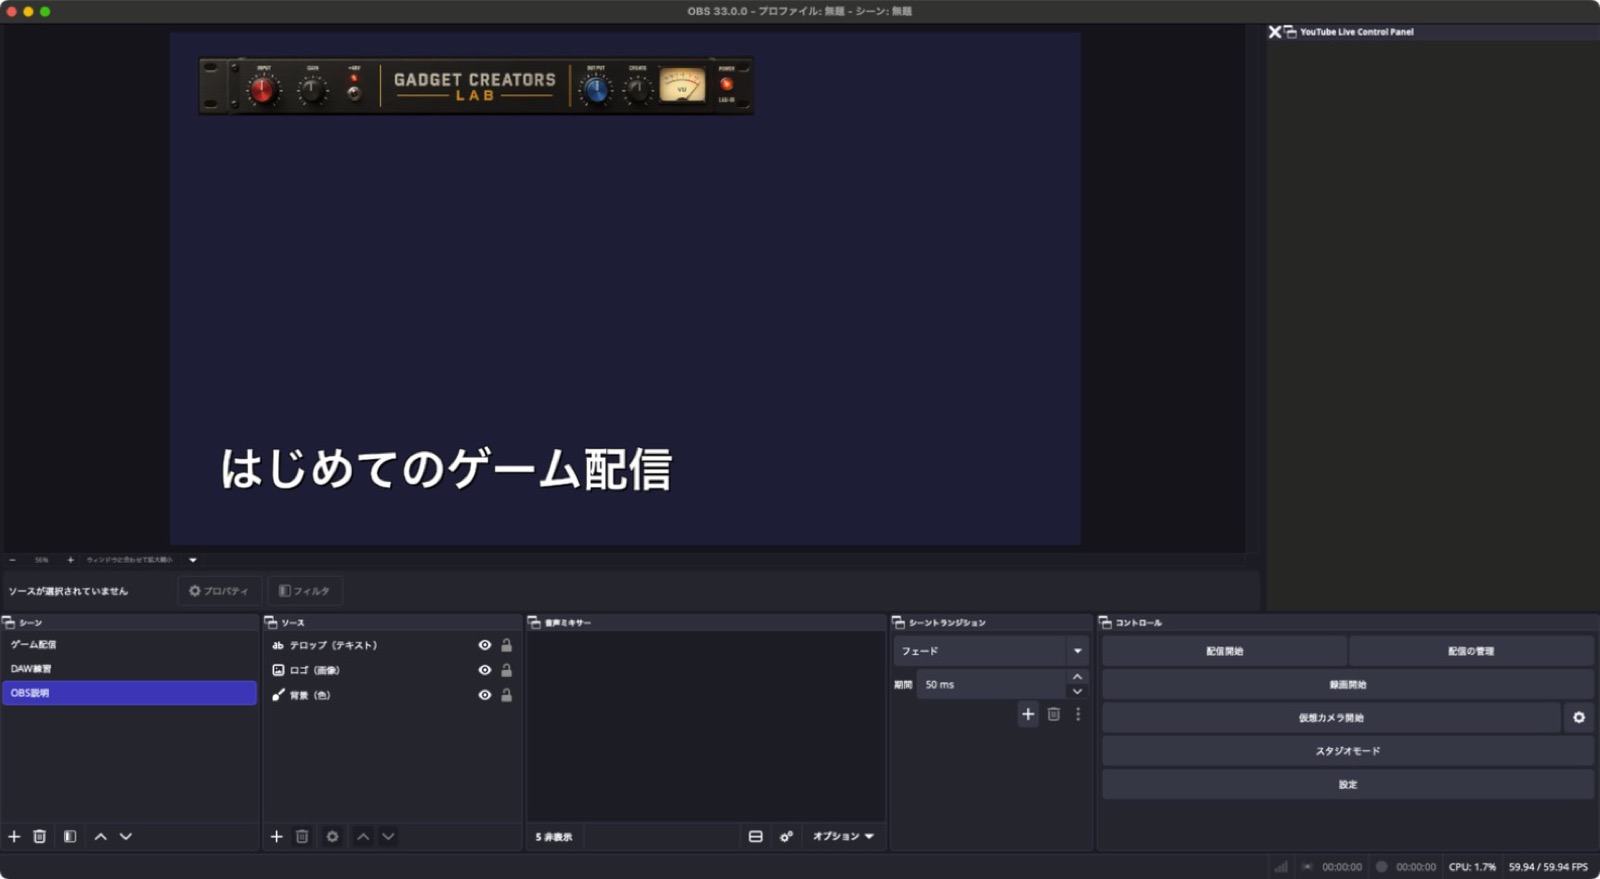
The Sources list (③) shows, from top to bottom:
1. Caption (text)
2. Logo (image)
3. Background (color)
On screen, the navy background is at the back, the logo sits on it, and the words “Your First Game Stream” are in front. In other words, the higher a source is in the list, the farther forward it appears. Think of stacking transparent sheets from the bottom up.
💡 If your text is invisible, it is usually a layer-order problem.
If a caption disappears after you add it, it is probably underneath the game source. Select it, then use the ∧ button below the list to move it up.
Two icons beside each source are handy:
- Eye: temporarily hide the source without deleting it.
- Lock: stop the source from moving. Lock backgrounds and game captures to avoid shifting them by accident.
2-4 Adding a source in OBS 33
Add a source with the + below the Sources area (③). In OBS 33, this opens a large Add Source window.
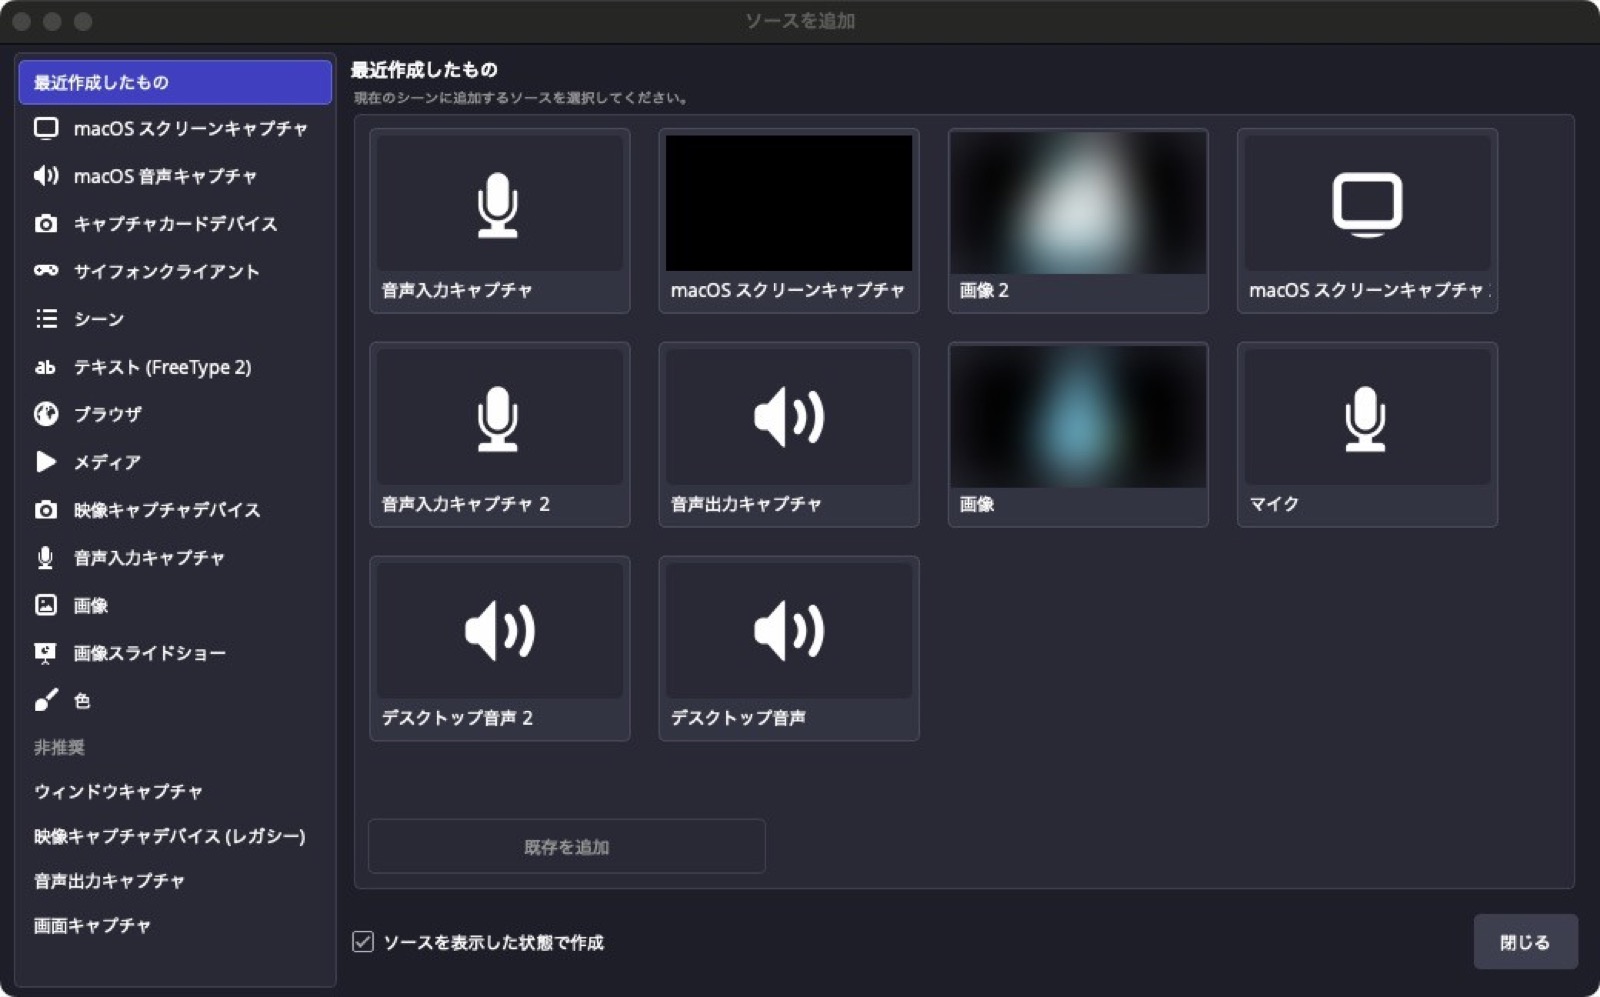
The source types are on the left, and recently created sources are on the right. Common sources for game streaming include:
- macOS Screen Capture: show the Mac screen or an app window (Chapter 3).
- Capture Card Device: show video from a capture card connected to a Switch or PS5 (Chapter 3).
- Audio Input Capture: capture a microphone or audio interface (Chapter 4).
- macOS Audio Capture: capture sound playing on the Mac, such as game audio (Chapter 4).
- Text (FreeType 2): add captions (Chapter 7).
- Image: add a logo or a starting-screen illustration.
- Color: create a solid-color background.
Near the bottom of the list is a Deprecated heading with sources such as Window Capture and Display Capture. These use older methods. Older tutorials may recommend them, but on a current Mac, use macOS Screen Capture above.
📝 Reuse a source in another scene
Choose a source under “Recently created” on the right and click Add Existing to put it in another scene. Microphones and logos are usually reused across all scenes. Change the source once and the update appears everywhere it is used.
2-5 Select, move, and configure sources
Click a source name and it will be outlined in red in the preview.
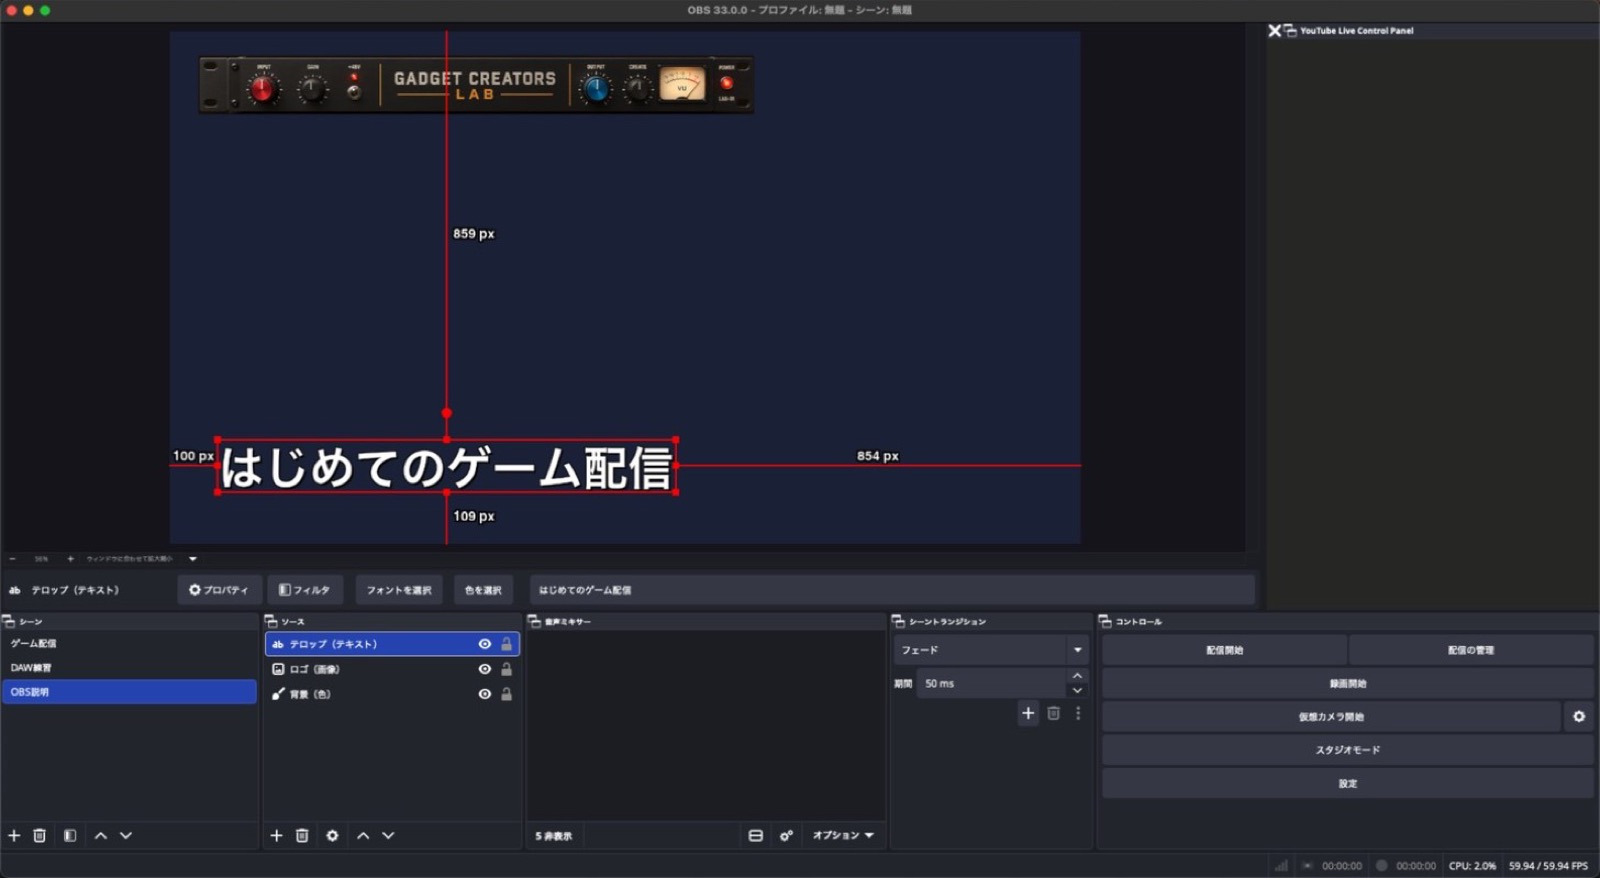
Drag inside the red outline to move the source. Drag one of the corner handles to resize it.
While you move it, OBS shows distances from the screen edges in pixels, such as “100 px.” This is useful for lining up captions precisely.
Double-click a source name to open its properties.
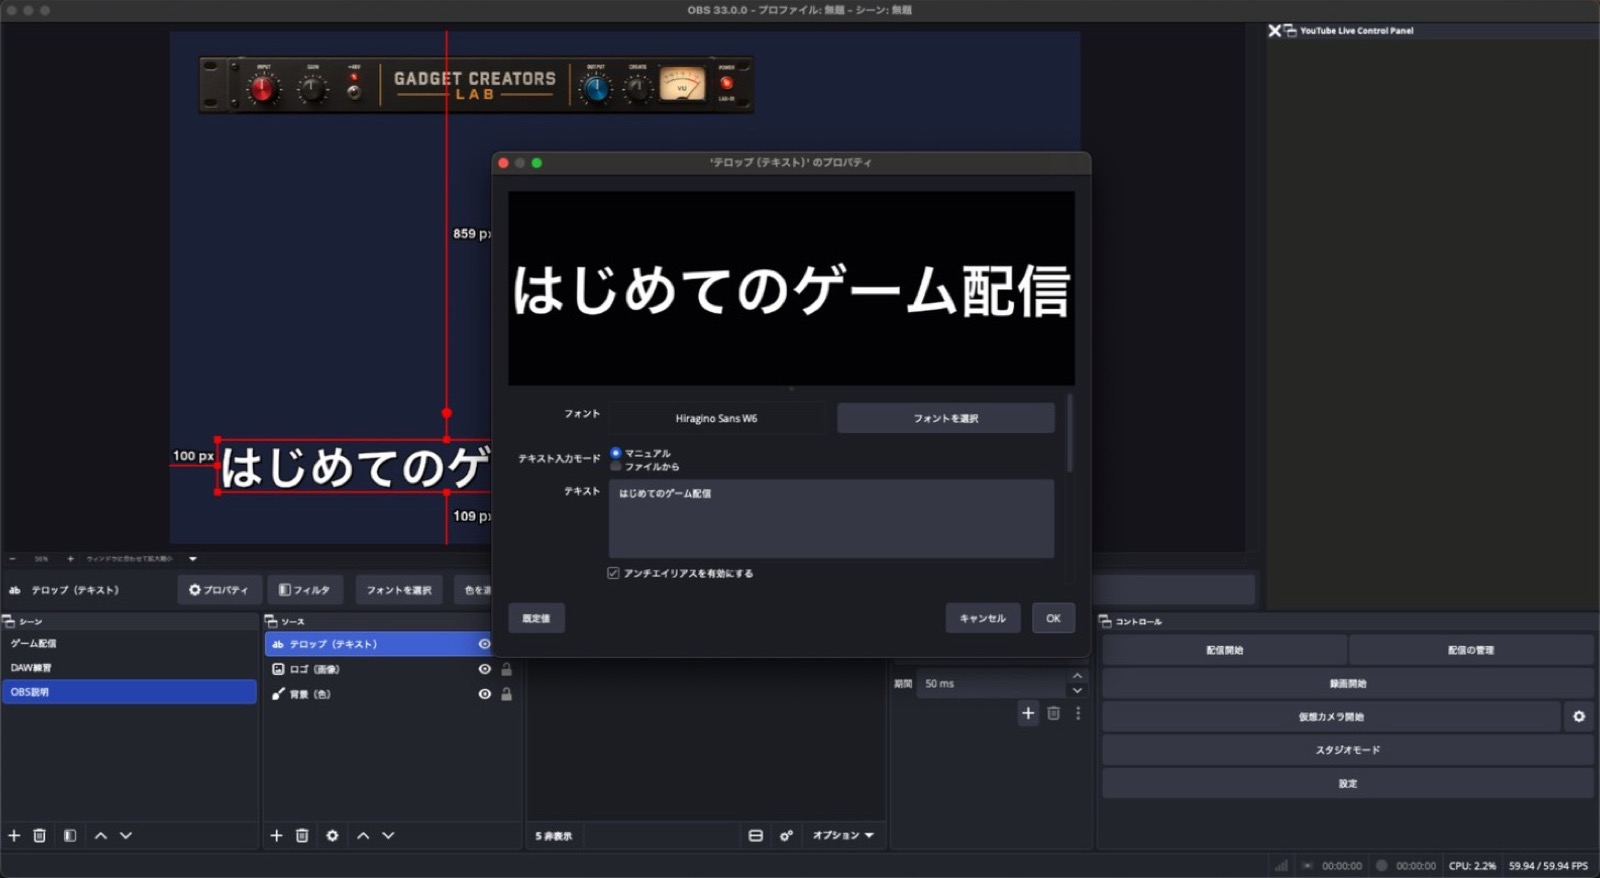
For text, set the font, wording, and color. For an image, choose the file. Each source type has its own settings here.
💡 Changes are not final until you click OK.
If you want to undo your changes, click Cancel. Feel free to explore the settings.
Chapter 2 recap
- OBS has six areas: Preview, Scenes, Sources, Audio Mixer, Scene Transitions, and Controls.
- Scenes are situations (starting, gameplay, break, ending); sources are ingredients (game, mic, text, image).
- Higher sources appear in front. Check the order if text is hidden.
- Use the eye to hide a source and the lock to keep it in place.
- Add sources with + → Add Source. On a current Mac, use macOS Screen Capture.
- Use Add Existing to reuse a source in another scene.
Next, we will bring a game into OBS. We will look at games running on the Mac and games on a Switch or PS5.
Chapter 3 — Capture games on your Mac, Switch, or PS5
Now it is time to bring the game into OBS.
There are two ways, depending on where you play:
- Games running on the Mac (Steam games, browser games, and so on): use macOS Screen Capture.
- A console such as a Switch or PS5: use a capture card and Capture Card Device.
We will start with Mac games, then look at consoles. The screenshots use a sample game prepared for this guide.
3-1 Capture Mac games with macOS Screen Capture
As in Chapter 2, click + in Sources and open Add Source. Choose macOS Screen Capture on the left, then click + Add New macOS Screen Capture at the top right.
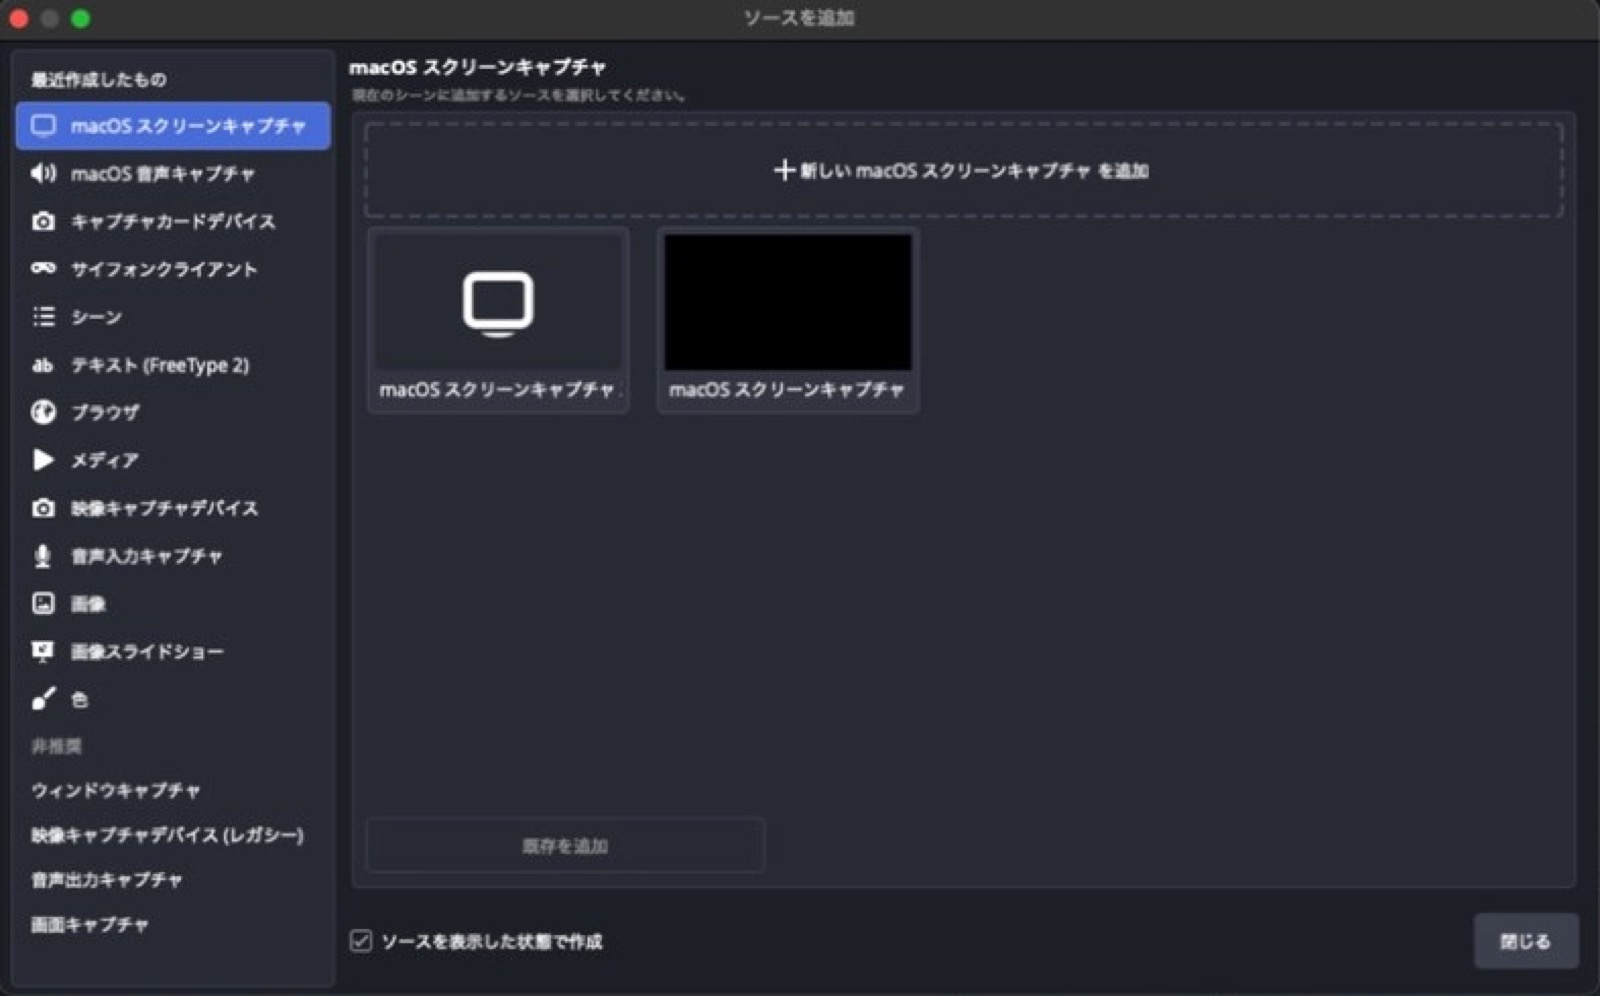
The properties window opens. The most important setting is Method at the top.
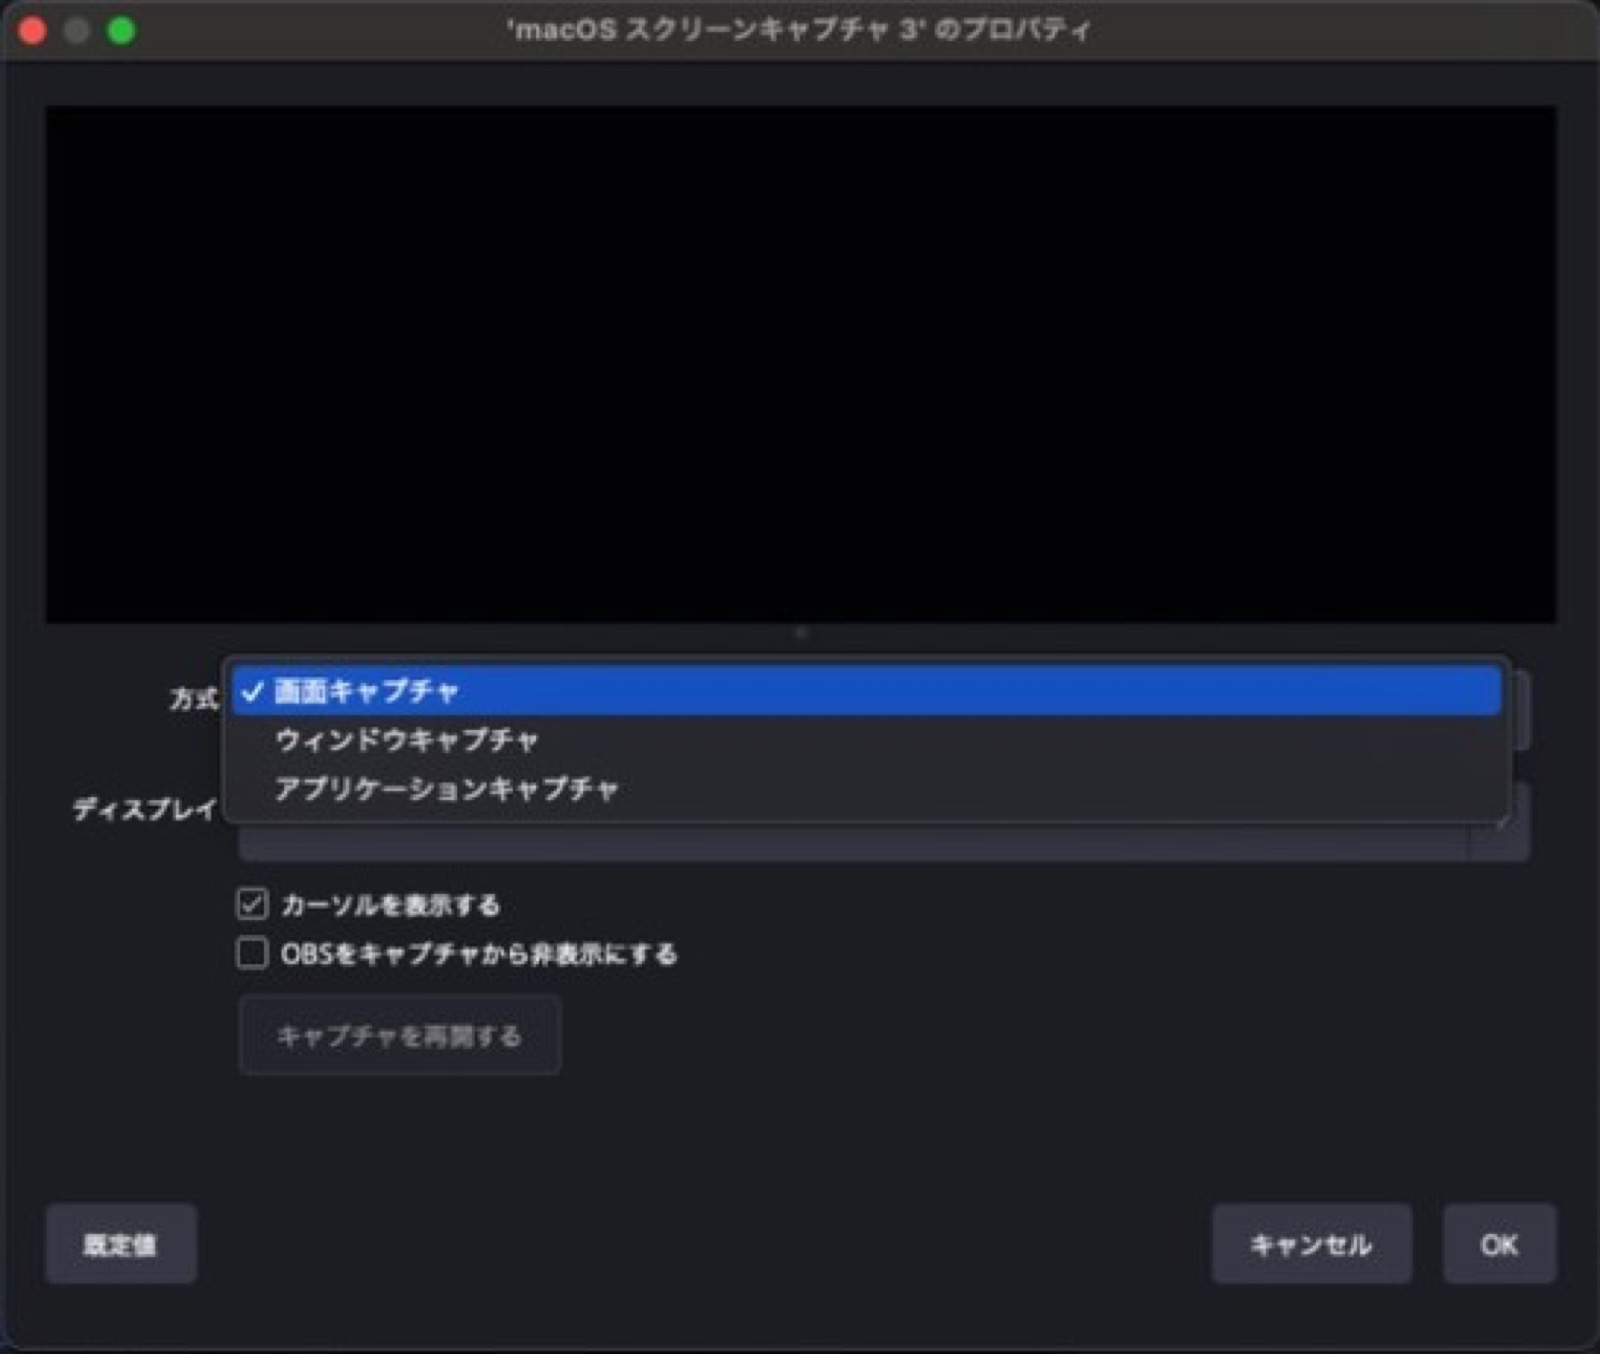
- Display Capture: show the entire display.
- Window Capture: show only the selected window.
- Application Capture: show the windows belonging to a selected app.
For game streaming, start with Window Capture. Display Capture can show notifications, other apps, and even filenames on your desktop. Window Capture shows only the game window, so you are less likely to reveal something private by accident.
💡 The best way to protect private information is not to capture it.
Message notifications, email subject lines, and browser bookmarks can all appear unexpectedly when you stream your whole screen. Make capturing only the game window your default.
After choosing Window Capture, select the game from the Window list below. Entries appear in the format “[app name]: window name.”
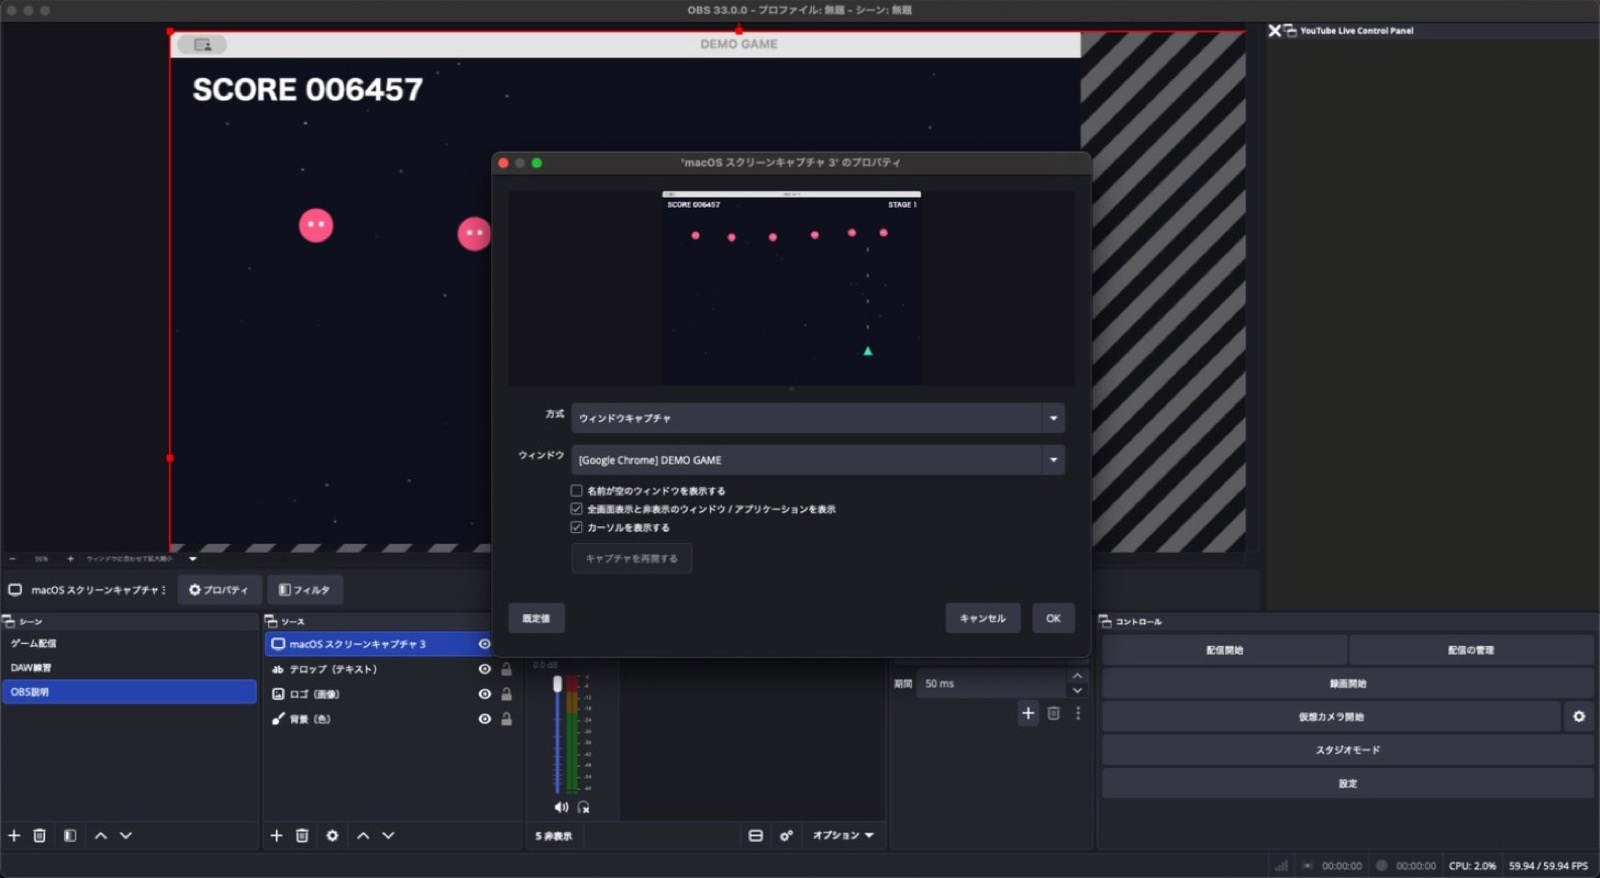
As soon as you select the game, it appears in the small preview at the top of the properties window and in the main preview behind it. Click OK to create the source.
📝 If the game window does not appear in the list
- Launch the game first, then reopen the list.
- Check Show fullscreen and hidden windows/applications.
- If it still does not appear, try Application Capture.
A game in fullscreen mode may not appear as a window.
3-2 Capture game audio at the same time
When you capture the game window, a meter with that source’s name should appear in the Audio Mixer.
That is because macOS Screen Capture also captures audio from the window or app. Older Mac versions of OBS needed separate software just to capture game audio. With current OBS, capturing the window can bring the sound along too.
Chapter 4 explains how to separate game audio, voice, and music and balance their levels. For now, remember: if the meter moves, the game audio is coming in.
3-3 Fit the image and arrange the layers
A game window may not match the stream canvas (for example, 1920 × 1080). It may appear cropped or too small.
Select the source and press ⌘ Command + F. This is Fit to Screen; it resizes the source while preserving its aspect ratio.
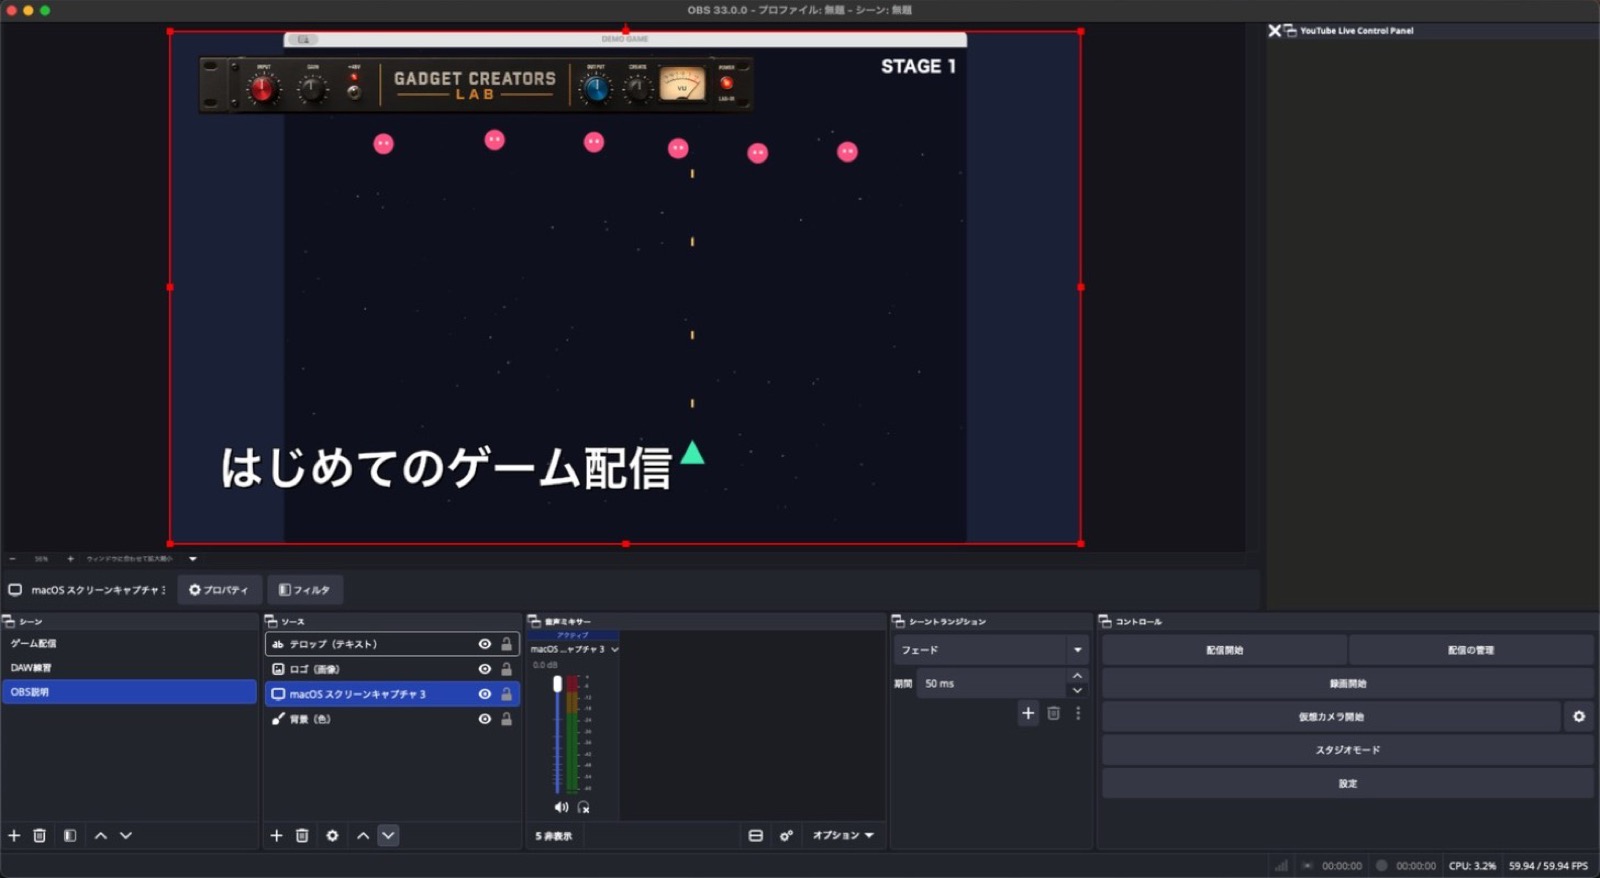
A new source is added at the top of the list, which means it is in front. If it covers your captions or logo, use ∨ below the list to move the game down. In the screenshot, the order from top to bottom is caption → logo → game → background, so the caption and logo appear over the game.
3-4 Crop unwanted edges
You may notice the game window’s title bar (the “DEMO GAME” area) in the capture. Remove unwanted edges with a crop.
Select the source and press ⌘ + E to open Edit Transform.
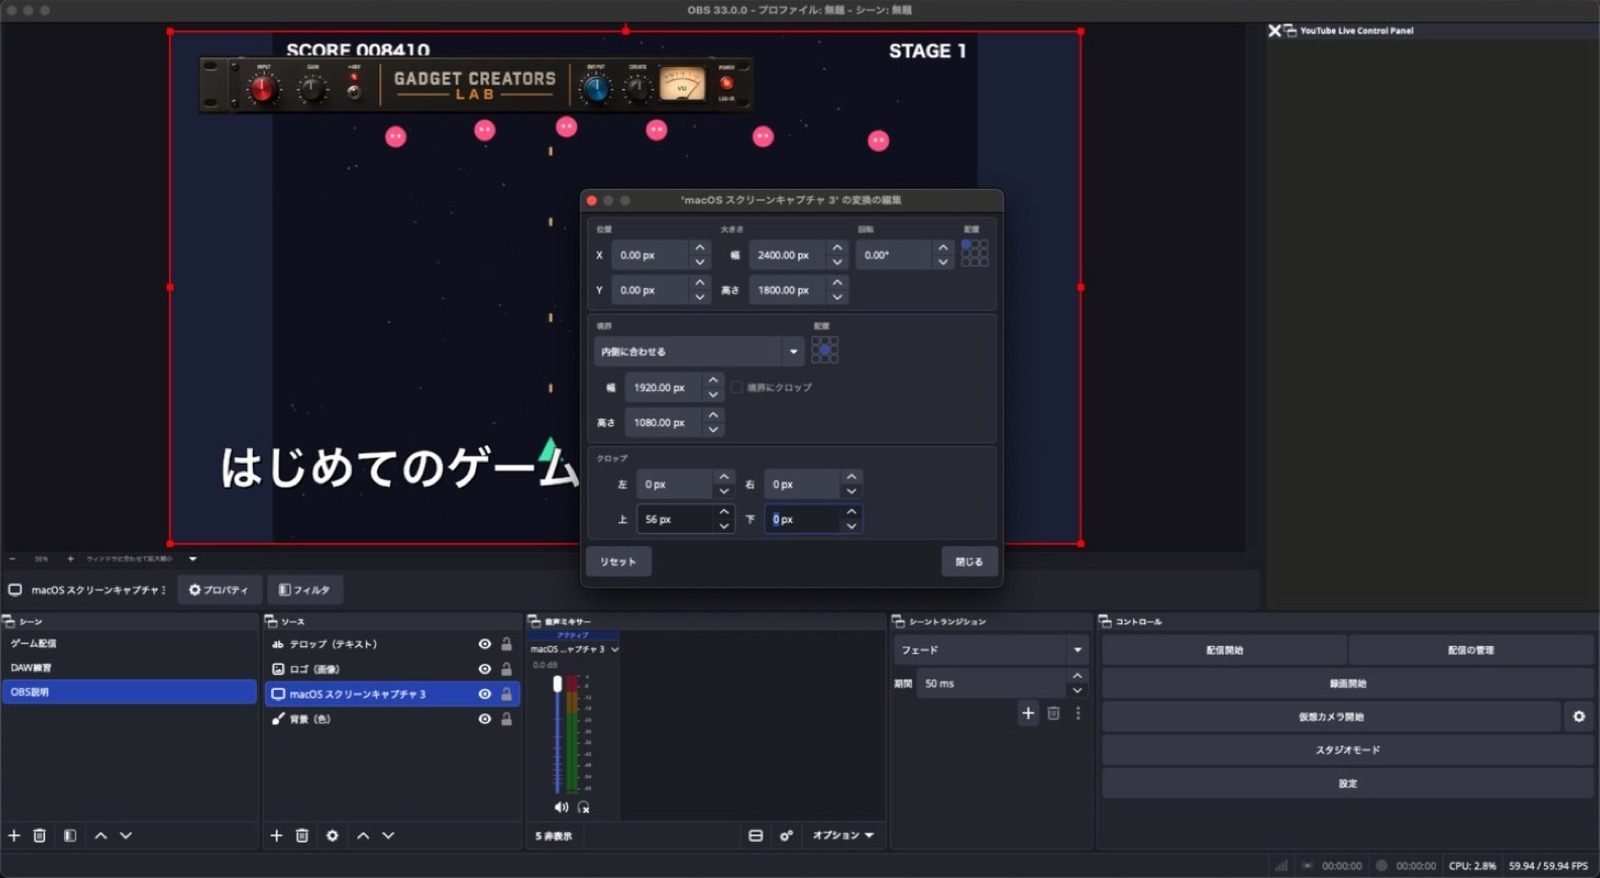
At the bottom, enter the number of pixels to crop from the top, bottom, left, and right. In the screenshot, 56 px is entered for the top to remove the title bar.
If you do not know the right number, increase it a little at a time while watching the preview. You can also hold Option and drag an edge of the red outline in the preview to crop by eye.
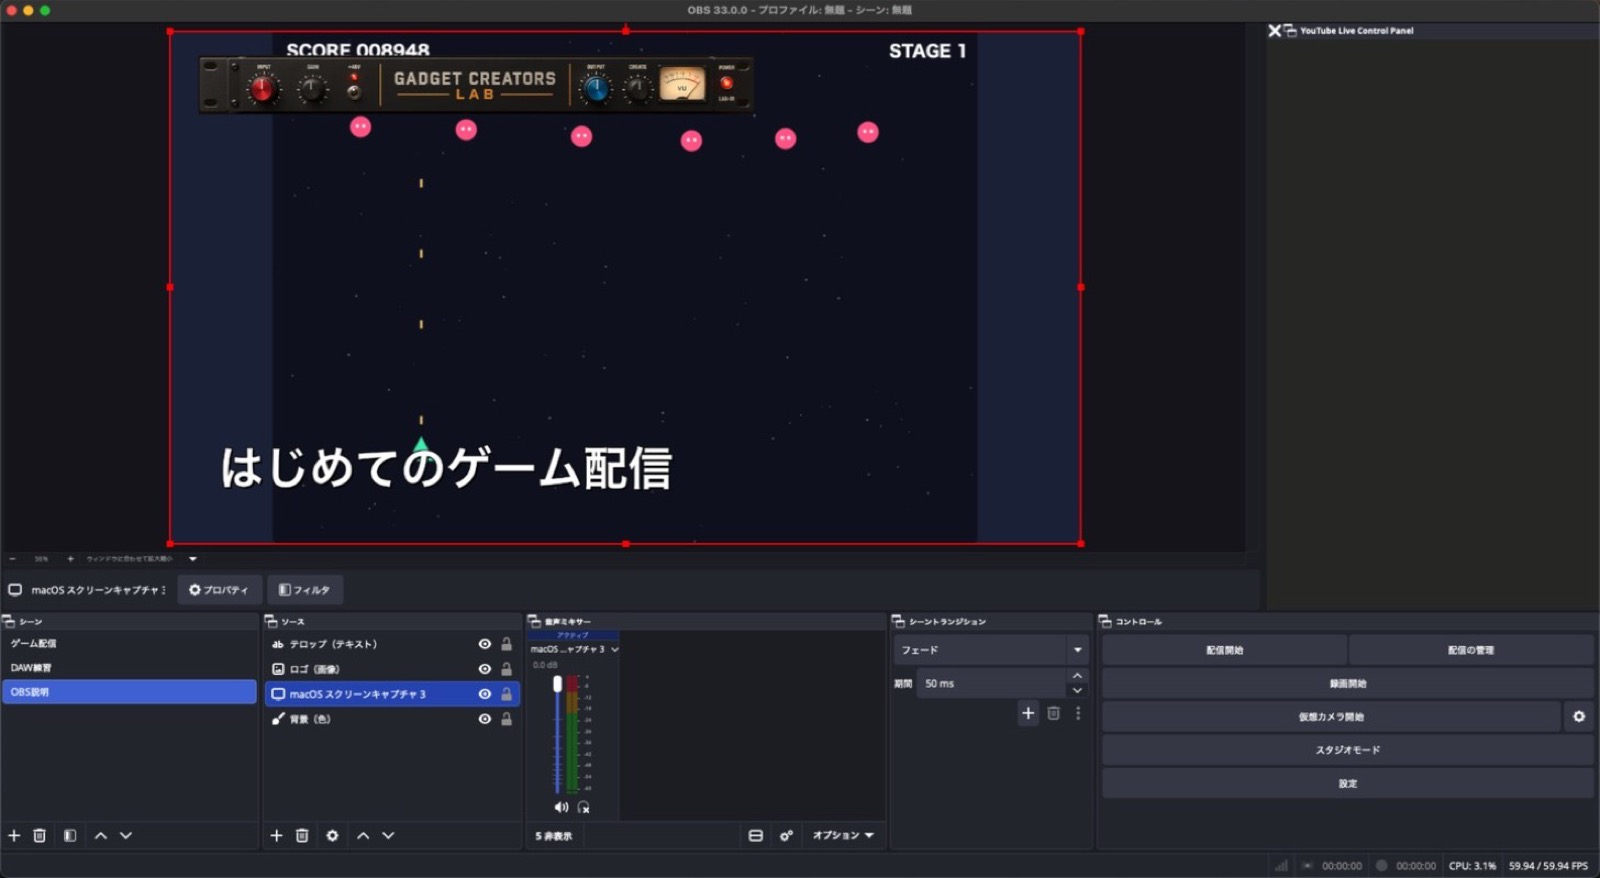
Now the game alone appears cleanly on screen.
3-5 Capture Switch and PS5 with a capture card
To bring video from a console such as a Switch or PS5 into your Mac, you need a capture card.
The basic connections are:
1. Connect the console’s HDMI output to the capture card’s IN.
2. Connect the card’s OUT (passthrough) to a TV or monitor.
3. Connect the capture card’s USB cable to your Mac.
With passthrough, you can play while watching the TV and send the video to the stream through the Mac. The video that passes through the Mac arrives a little later, so playing from the TV feels more responsive.
In OBS, add Capture Card Device as a source.
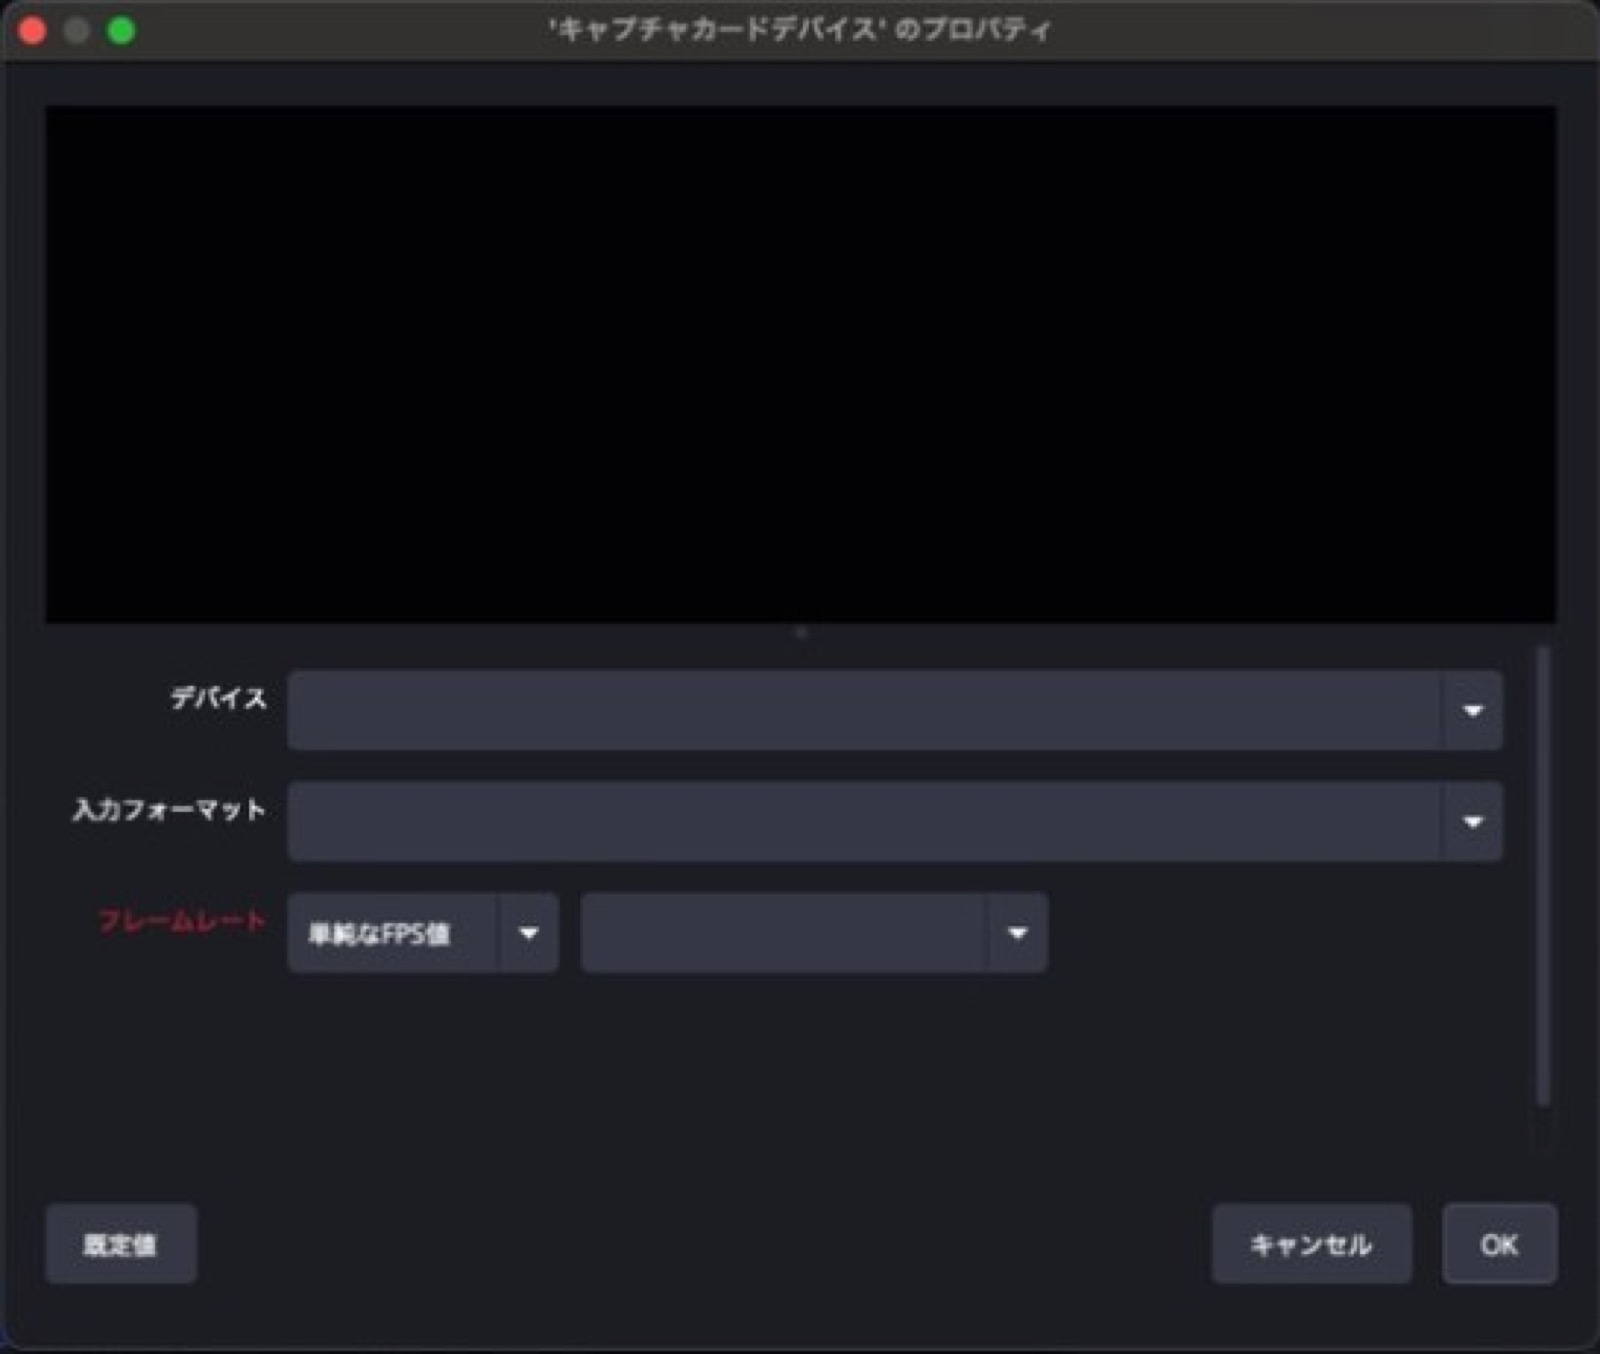
- Device: choose the connected capture card.
- Video Format: the video format. The default selection is fine to start.
- Frame Rate: frames per second; 60 is standard for games.
If the capture card does not appear, check the Camera permission from Chapter 1. macOS treats a capture card as a kind of camera.
📝 Try a PS5 without buying a capture card
You can install Sony’s PS Remote Play app on your Mac and capture its window. Because the video travels over the internet, the image quality and latency will not match a capture card. It is a way to try streaming before buying equipment.
Chapter 3 recap
- Capture Mac games with macOS Screen Capture, usually in Window Capture mode, to avoid showing private information.
- Capturing a window also captures its game audio. Chapter 4 covers the details.
- Use ⌘F to fit the source, and ∨ to move the game below captions.
- Use ⌘E → Crop to remove unwanted edges such as the title bar.
- Capture consoles with a capture card and Capture Card Device. If the device is missing, check Camera permission.
Next comes the heart of this guide: audio. Learning to handle game audio, your voice, and music as three separate tracks can make a dramatic difference in how easy your stream is to listen to.
Chapter 4 — Separate game audio, voice, and music: think in three tracks
This is the heart of the guide.
Have you ever watched a stream where the game was so loud you could not hear the streamer, or the music drowned out everything else? In most cases, the cause is that all the sound has been combined into one signal.
The goal of this chapter is to bring three separate tracks into OBS:
- Voice (microphone)
- Game audio
- Music
Once they are separate, you can adjust their levels individually, process them (Chapter 5), and assign them to different recording tracks (Chapter 10).
4-1 OBS has two kinds of audio input
First, let’s look at the two ways audio can enter OBS.
1. Global Audio Devices in Settings
Open Settings → Audio to find Global Audio Devices.
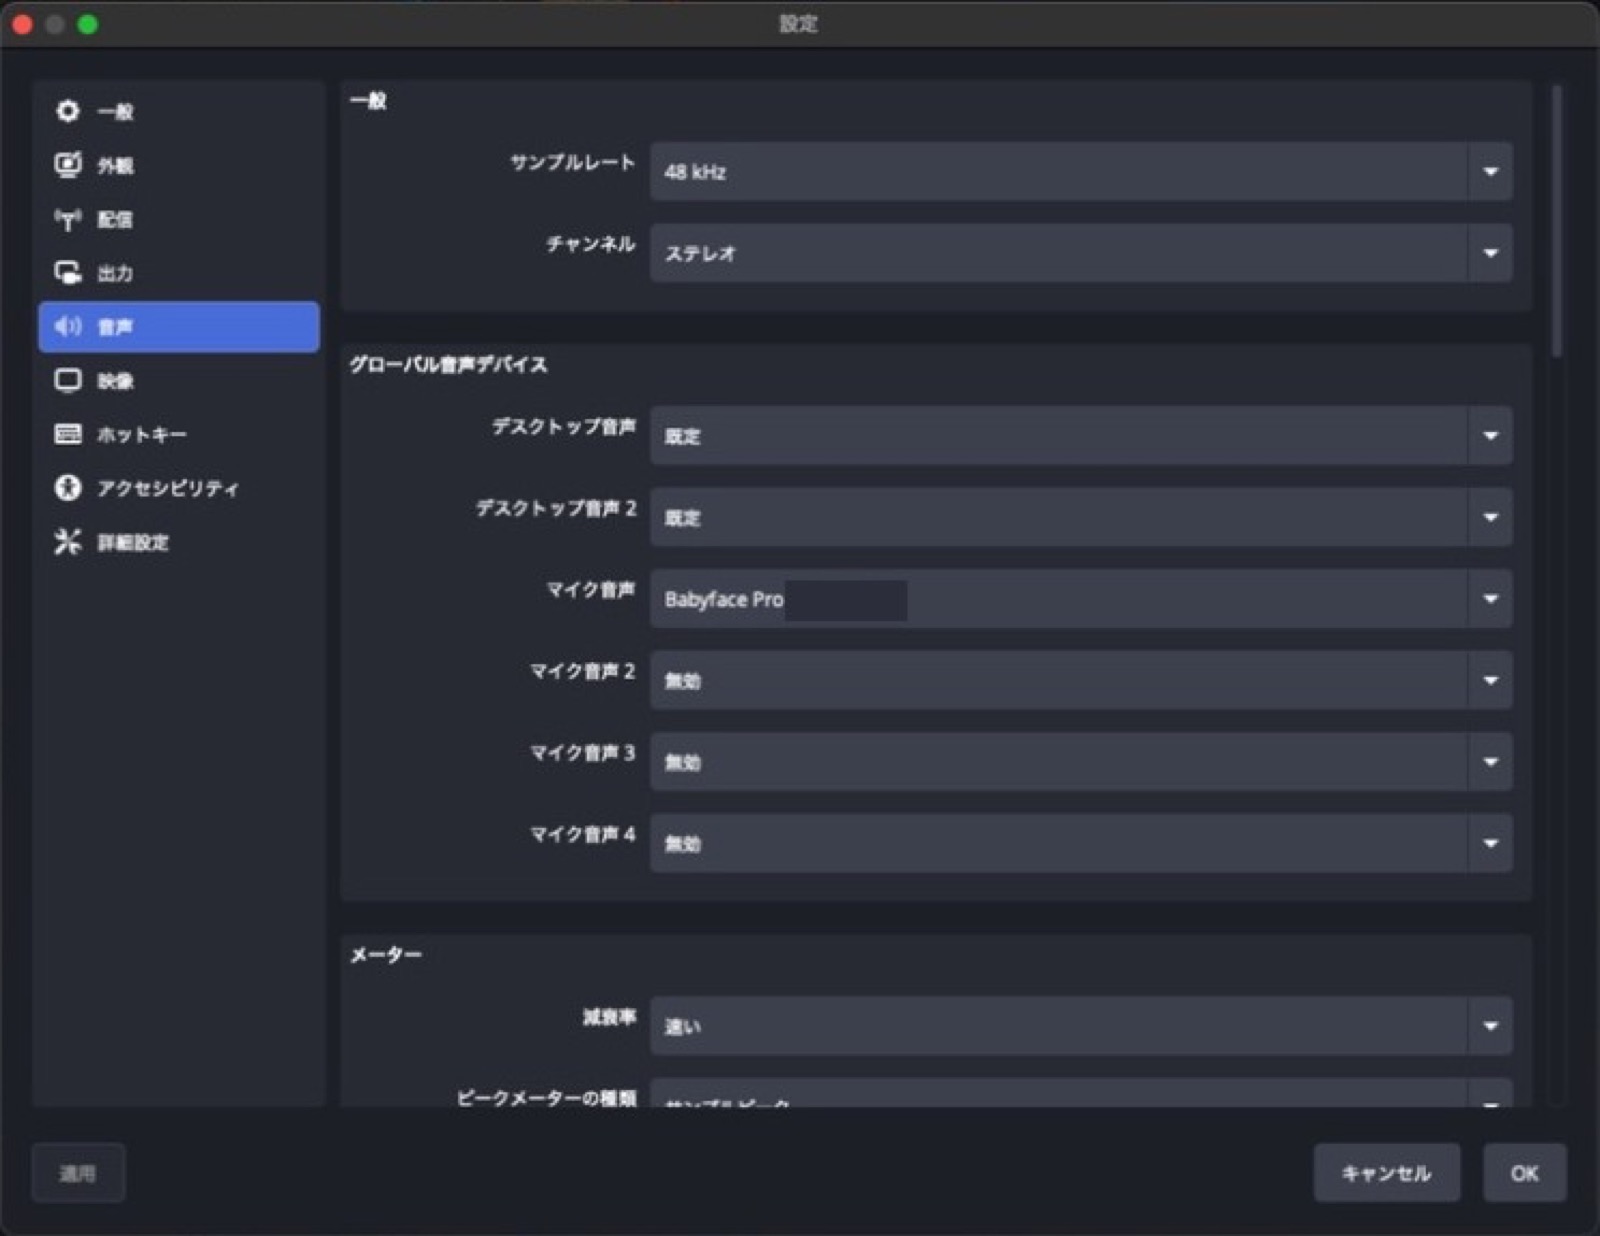
A device selected here is active no matter which scene is on screen.
2. Audio sources added to a scene
The other option is to add audio as a source, as you learned in Chapter 2. It is active only in that scene.
For game streaming, I recommend adding audio as a source. That lets you leave the microphone out of the break scene, for example, or keep game audio out of the starting screen. Switching scenes handles the change.
4-2 The most common mistake: hearing the same sound twice
This is the point I most want to emphasize as someone who works with audio.
In Chapter 3, we saw that capturing a game window with macOS Screen Capture also brings in its audio. But if Desktop Audio is still active under Global Audio Devices, all sound from the Mac comes in again. The game audio is captured twice.
That can cause:
- The game to sound nearly twice as loud.
- A slight timing difference that makes it sound swirly or muddy.
- Confusion about which fader to lower when you want to turn down only the game.
💡 Use one input path for each sound.
If Screen Capture is already capturing the game window and its audio, mute Desktop Audio or disable it in Settings. If you use Desktop Audio to capture everything, mute the audio from Screen Capture. Either approach is fine; just make sure each sound enters only once.
4-3 Voice: add a microphone with Audio Input Capture
Add your microphone as an Audio Input Capture source. Its properties will ask you to choose a device.
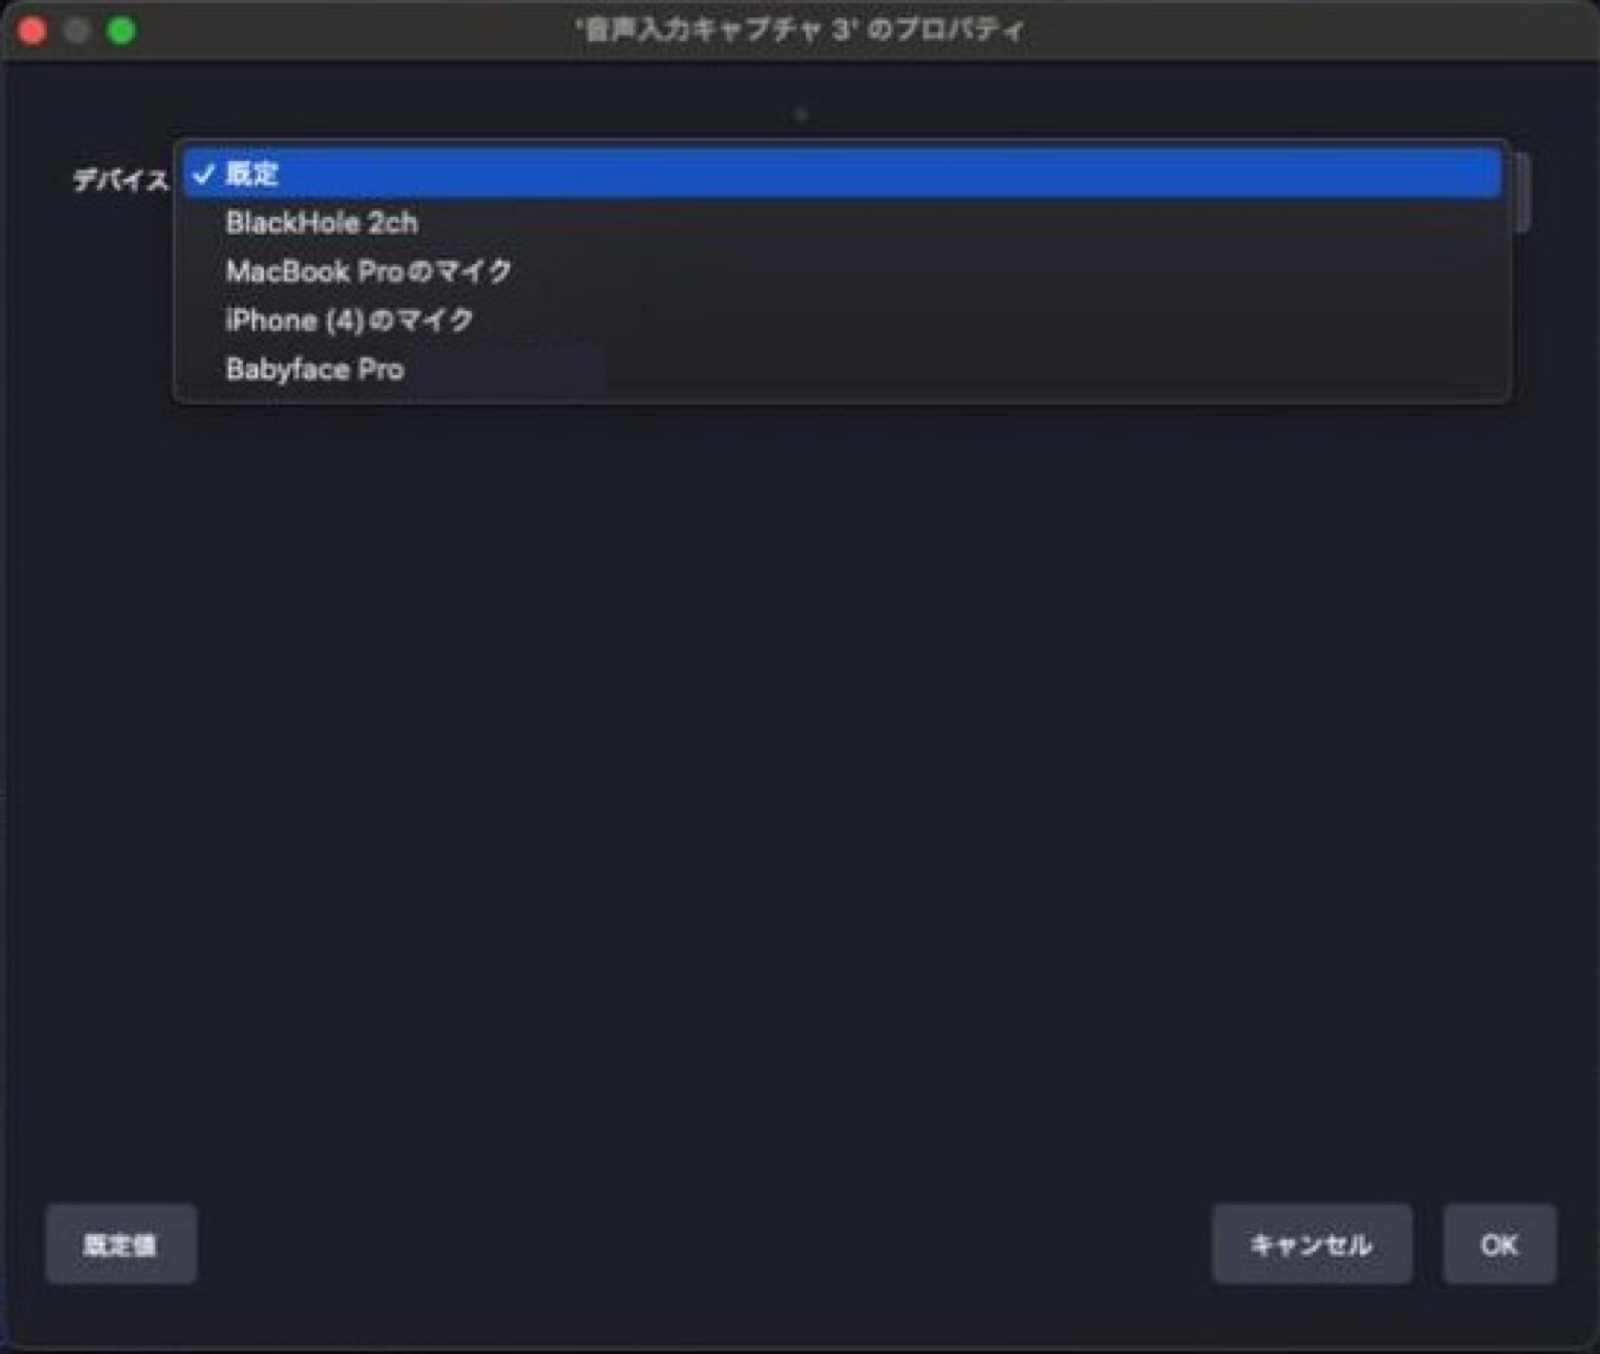
The list may include your Mac’s built-in mic, an iPhone microphone (if an iPhone on the same Apple account is nearby), and audio interfaces. To make your voice sound good on stream, choose the audio interface—the device your microphone is plugged into. If you use a USB mic, choose it by name.
📝 Avoid “Default”
“Default” means the input selected in the Mac’s Sound settings. If you change those Mac settings, your stream input may change too. It is safer to choose the device by name.
If your voice comes through only the left ear
A microphone plugged into input 1 on an audio interface may appear only on the left channel in OBS. Viewers using headphones will hear you in the left ear only. In Advanced Audio Properties, check Mono for the microphone (see below). Interface input 1 is often treated as left and input 2 as right.
4-4 Game audio and music: macOS Audio Capture
The easiest option is to bring in game audio along with the image using macOS Screen Capture from Chapter 3. But sometimes you may want video from a capture card and audio from a Mac app, or otherwise keep video and sound separate.
For that, use macOS Audio Capture.
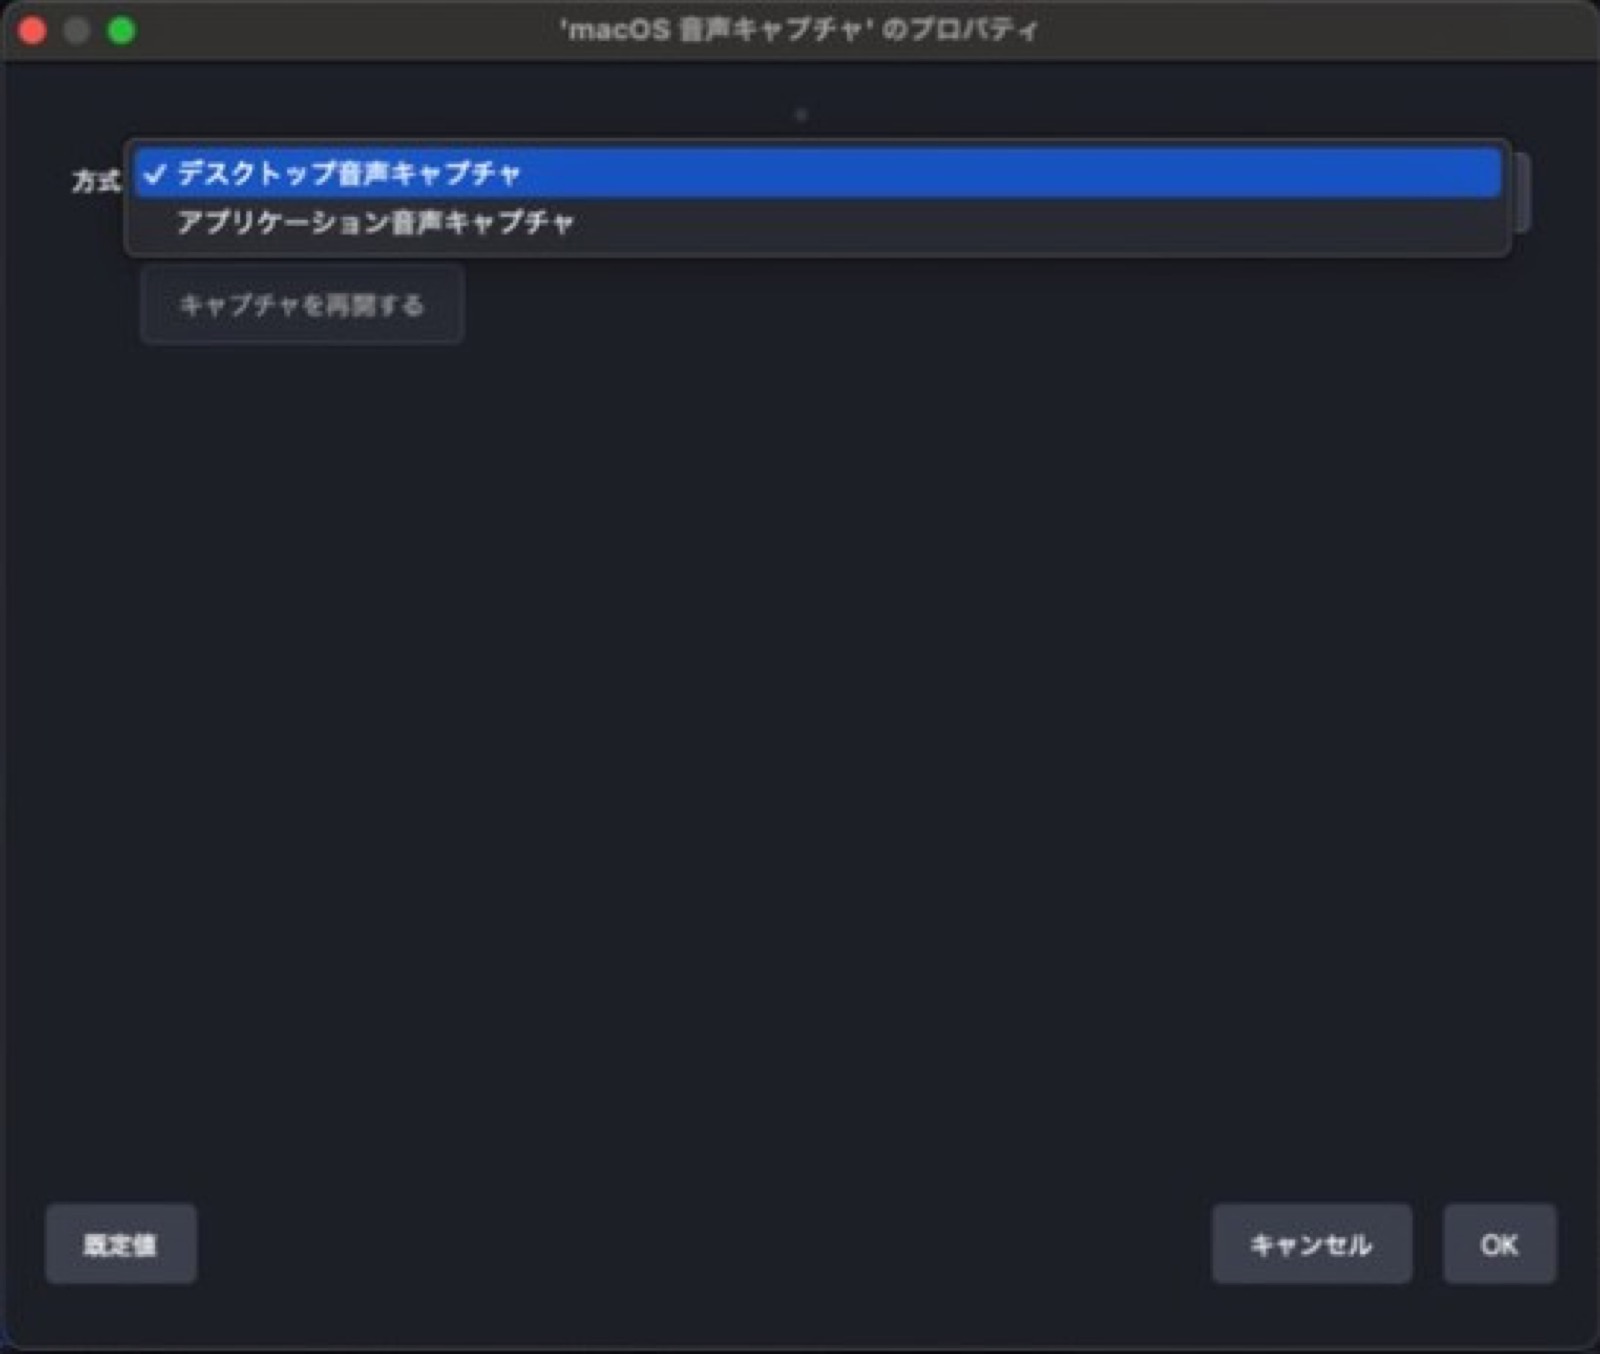
There are two methods:
- Desktop Audio Capture: capture all sound playing on the Mac.
- Application Audio Capture: capture only the app you select.
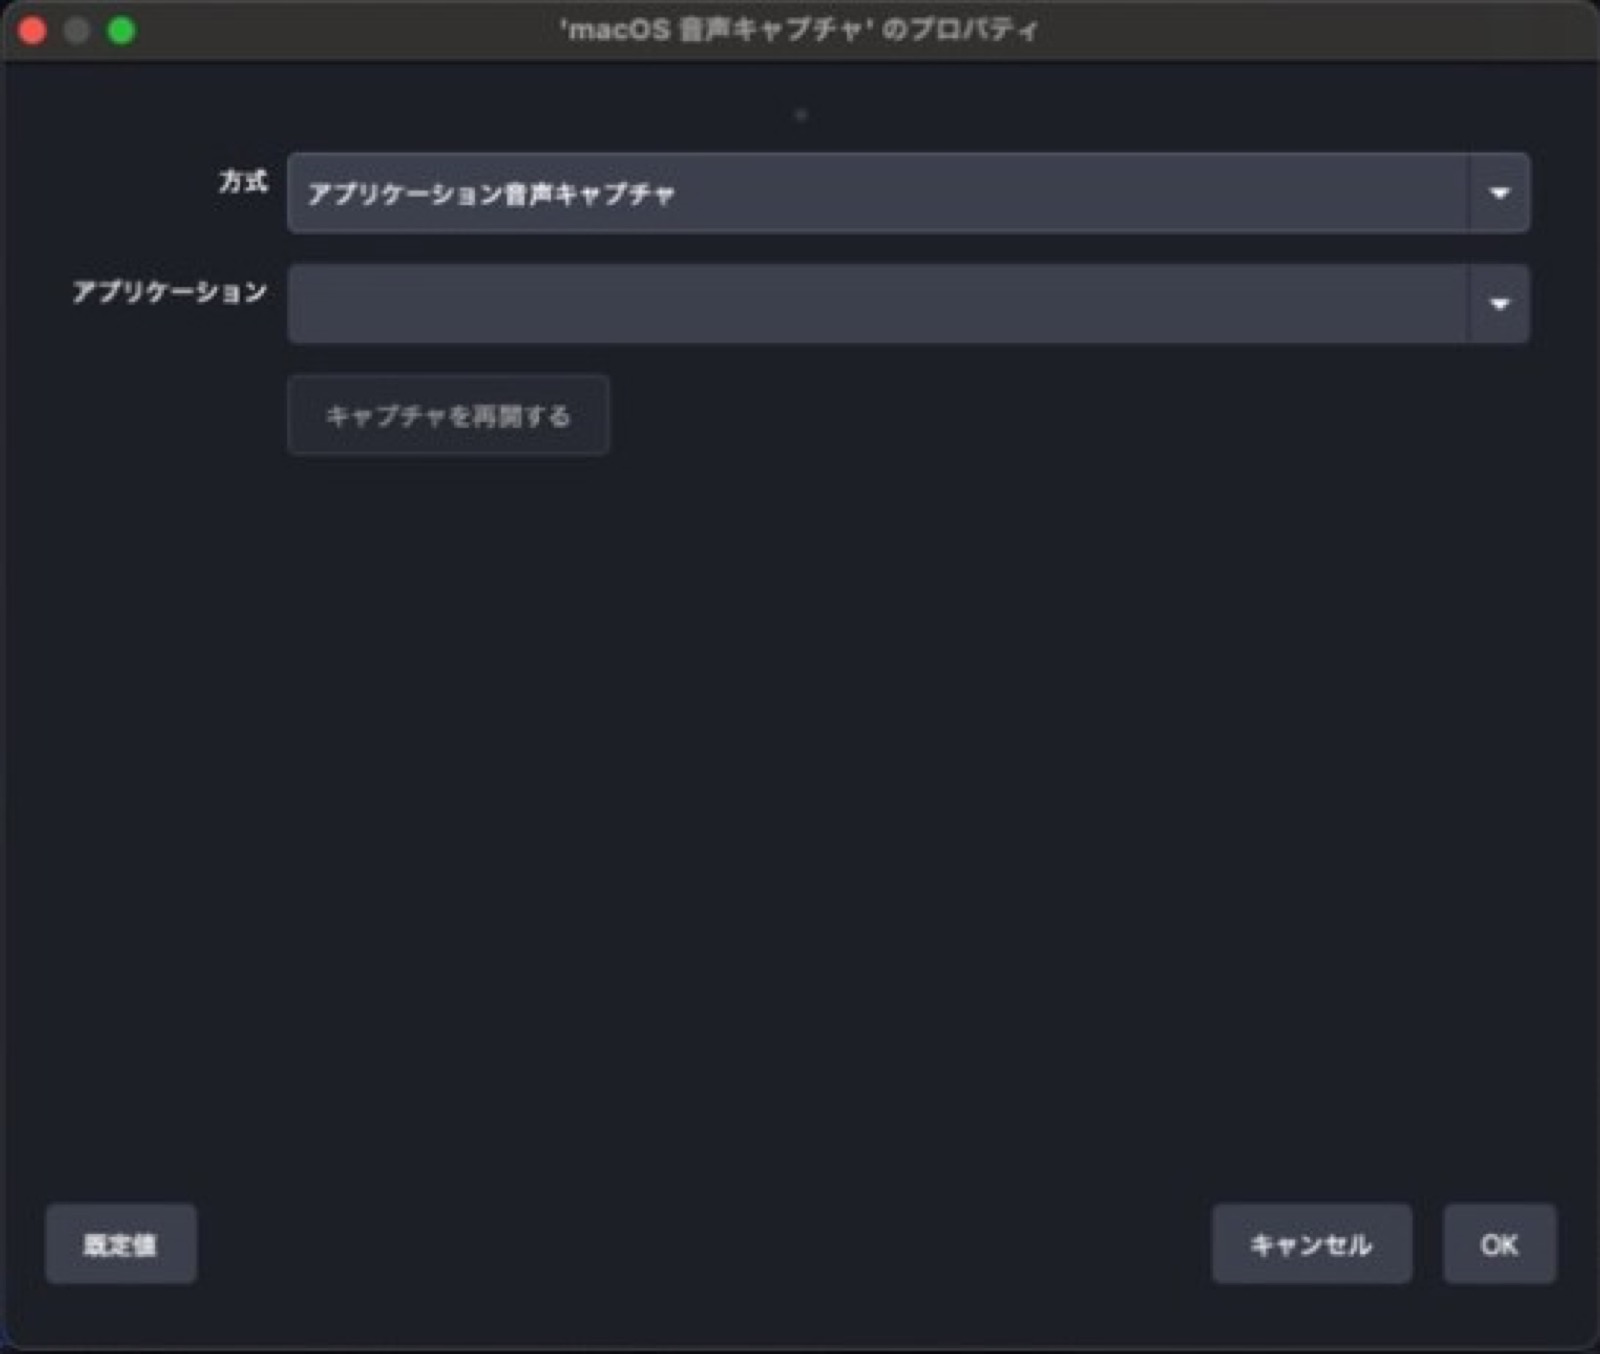
I recommend Application Audio Capture. You can make one track for the app playing music and another for the game. Notifications and sounds from other apps will not slip into your stream.
💡 Use music that is cleared for streaming.
Commercial songs or music that is not licensed for streaming can cause an archive to be muted or removed. Choose royalty-free music explicitly cleared for streaming, or music you own the rights to. If you only need to play a specific audio file, you can also use a Media source.
4-5 Watch the three tracks in the mixer
When you add voice, game audio, and music as sources, their meters appear in the Audio Mixer.
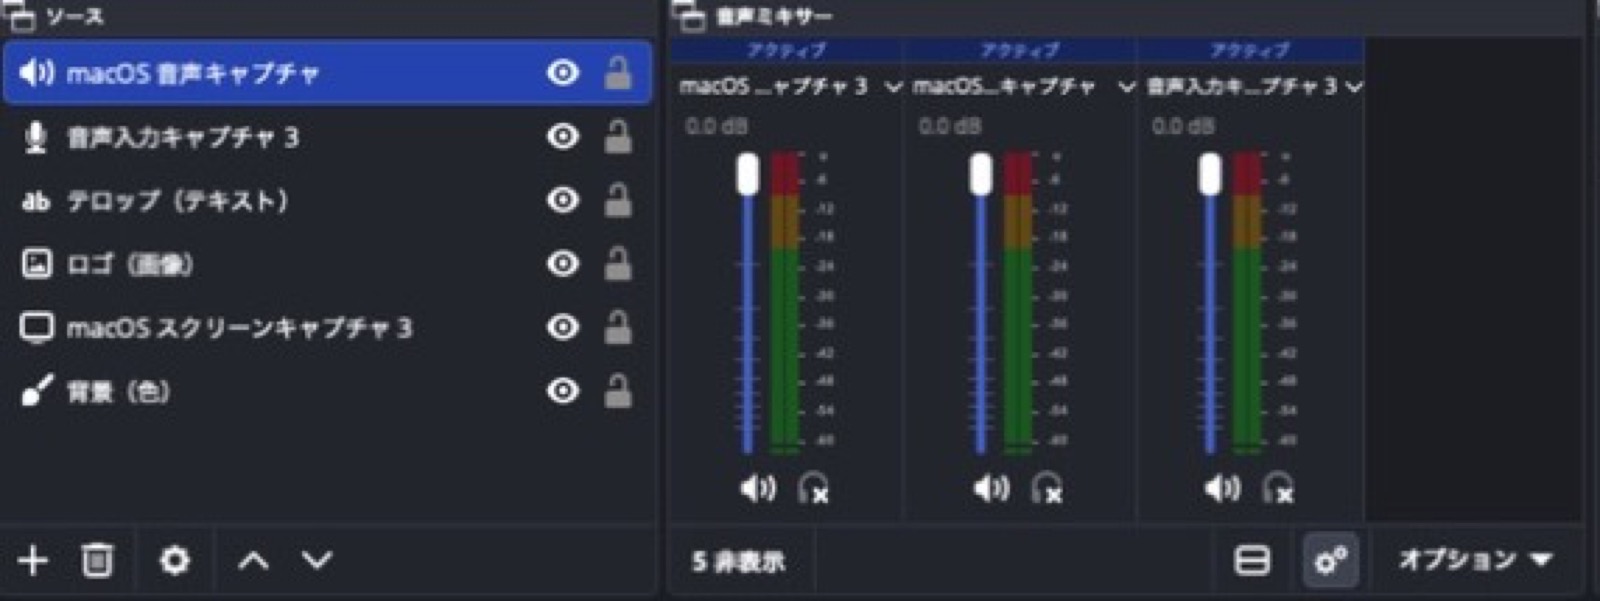
Names such as “Audio Input Capture 3” are hard to read quickly. Right-click a source name and choose Rename. Give them clear names such as:
- Mic (Voice)
- Game Audio
- Music
When you are rushing during a live stream, clear names make it much harder to mute the wrong source.
4-6 See everything in Advanced Audio Properties
Click the gear below the Audio Mixer to open Advanced Audio Properties.
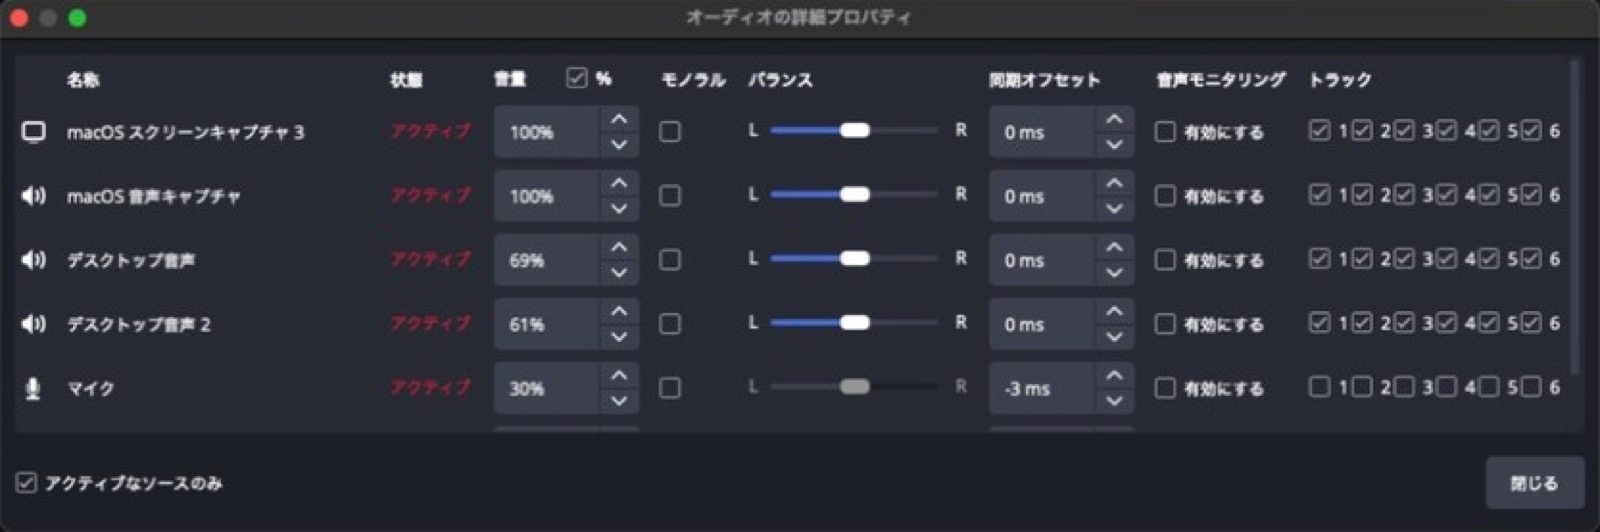
Every audio source appears on its own row. You can see:
- Volume: the same level as the mixer fader.
- Mono: the checkbox that fixes the one-ear issue (Section 4-3).
- Balance: how the sound is spread left and right.
- Sync Offset: adjust audio/video timing (Chapter 6).
- Audio Monitoring: choose whether to hear it in your headphones.
- Tracks: choose which recording tracks contain the source (Chapter 10).
This screen is a useful place to review all audio settings at once.
4-7 Set the sample rate to 48 kHz
A sample rate of 48 kHz is standard for video. In Settings → Audio, set the sample rate to 48 kHz and use stereo channels. If your interface is set to a different rate, match it in its own settings too. Matching rates helps avoid conversion or sync problems.
Chapter 4 recap
- OBS audio can enter through Global Audio Devices or as a scene source. Scene sources are more flexible.
- Do not capture the same sound through both Desktop Audio and Screen Capture.
- Add your microphone as Audio Input Capture and choose its device by name.
- Use macOS Audio Capture to separate app audio, including game audio and music.
- Rename sources clearly, and use Advanced Audio Properties to check mono, monitoring, and track assignments.
- Set the sample rate to 48 kHz.
Chapter 5 — Voice filters: order and starting-point settings
The sound viewers hear for the longest is not the game or the music. It is your voice. Clear speech makes a stream easier to keep watching.
OBS includes filters for shaping your voice. This chapter uses the same approach used in audio work and covers which filters to use, in what order, and with what starting values.
5-1 Filters are applied from top to bottom
Select the microphone source and click Filters above the Sources list. Add filters with the + at the lower left.
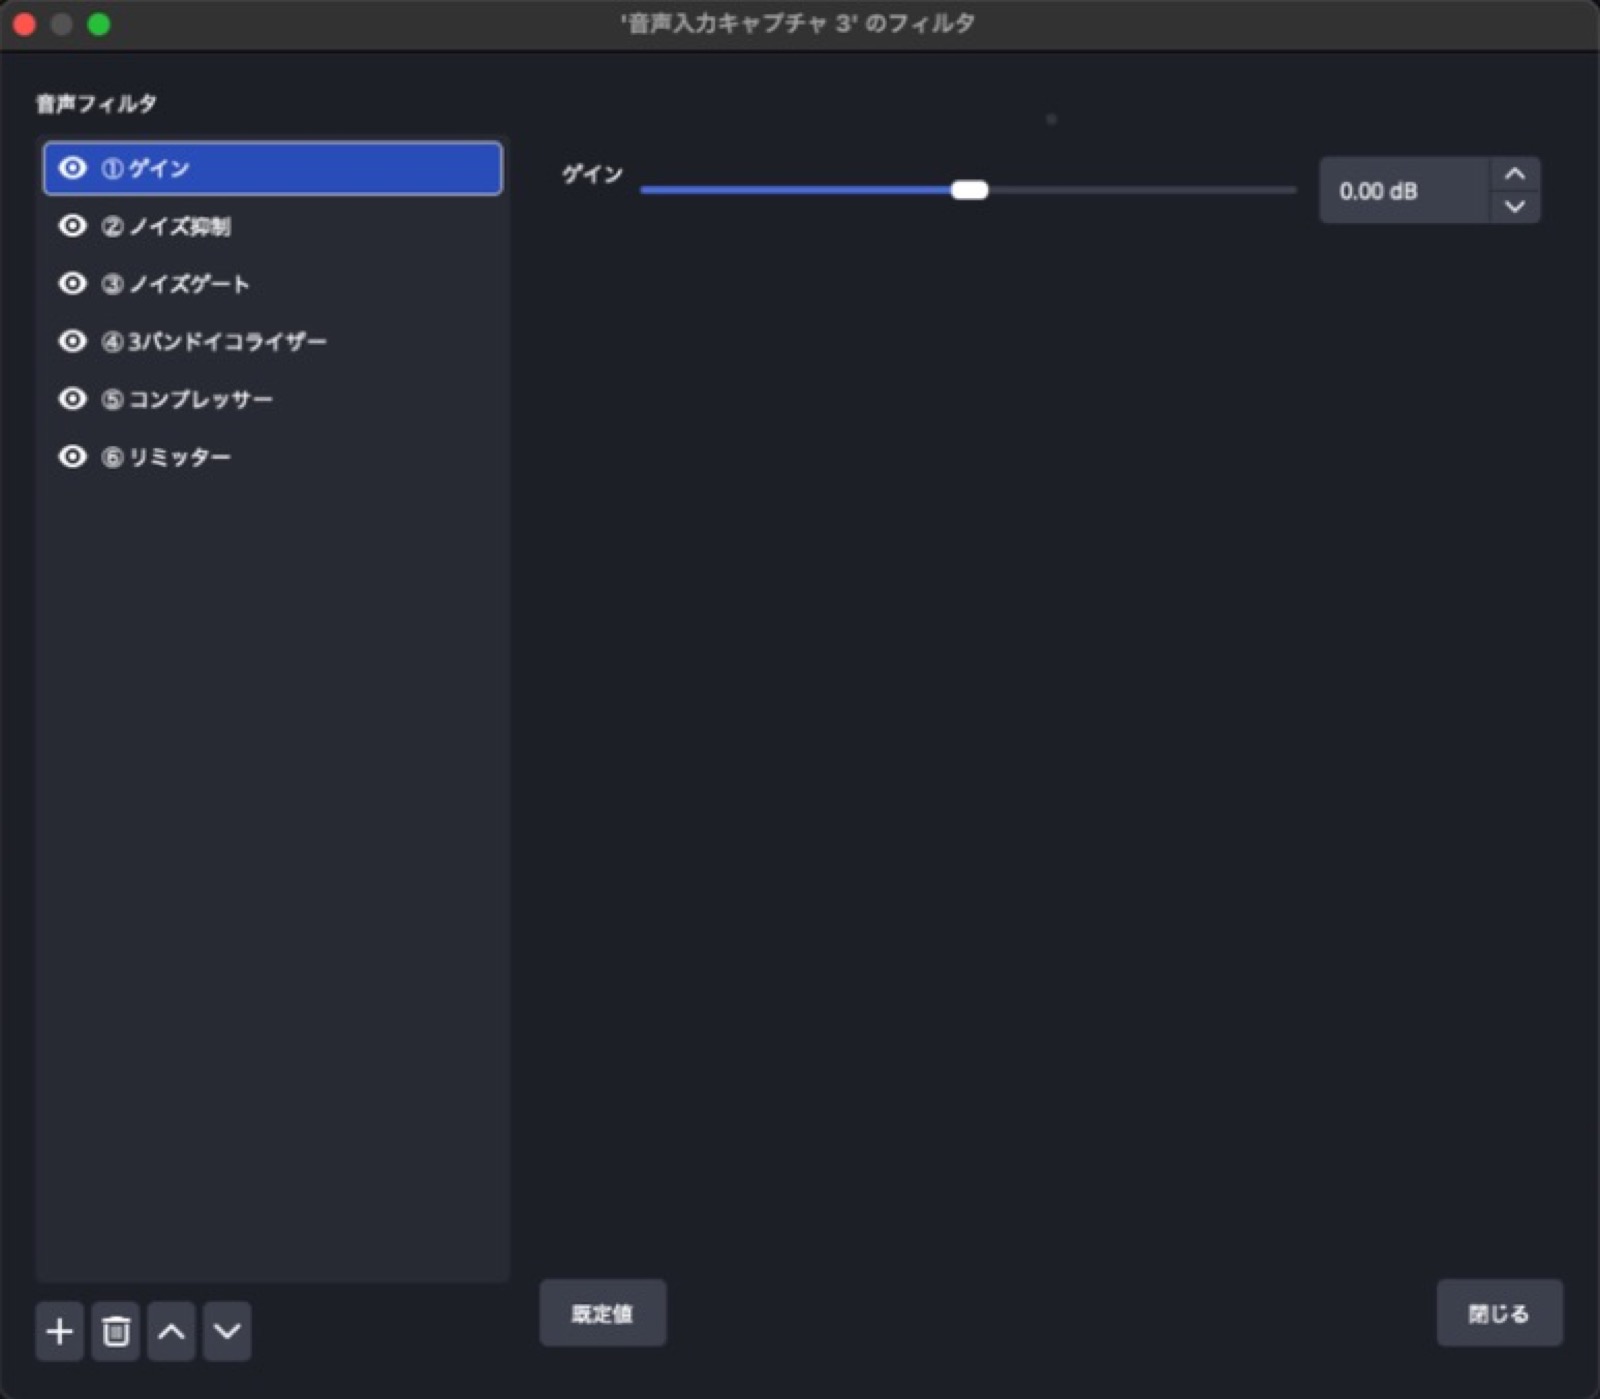
Filters are applied in the order shown, from top to bottom. The audio passes through the first filter, then the second, and so on. I recommend this six-step order:
1. Gain: set a consistent input level.
2. Noise Suppression: remove the steady hiss of an air conditioner or computer fan.
3. Noise Gate: close off quiet sounds when you are not speaking.
4. Equalizer: reduce muddiness or harshness in the voice.
5. Compressor: narrow the difference between loud and quiet speech.
6. Limiter: set a ceiling to prevent clipping when you shout.
Think of it like cooking: prepare the ingredients (gain), clean them up (noise suppression and gate), season (EQ), let everything blend (compression), then put a lid on the pot so it does not boil over (limiting).
💡 What happens if you change the order?
If you compress before noise suppression, the compressor can raise quiet noise, then the suppression tries to remove it. The background noise may keep appearing and disappearing, which is distracting. Clean the signal first, then even it out.
Reorder filters with ∧ and ∨ below the list.
5-2 ① Gain: start at 0 dB
Gain simply raises or lowers the level. Before adding gain in OBS, make sure the microphone itself is coming in at a healthy level. Set the gain knob on your audio interface so that ordinary speech moves the OBS meter around -20 to -15 dB.
Then use the OBS gain filter only to add a little if the interface cannot provide enough level, or to match the level of another microphone. Starting at 0 dB is fine.
5-3 ② Noise Suppression: choose RNNoise
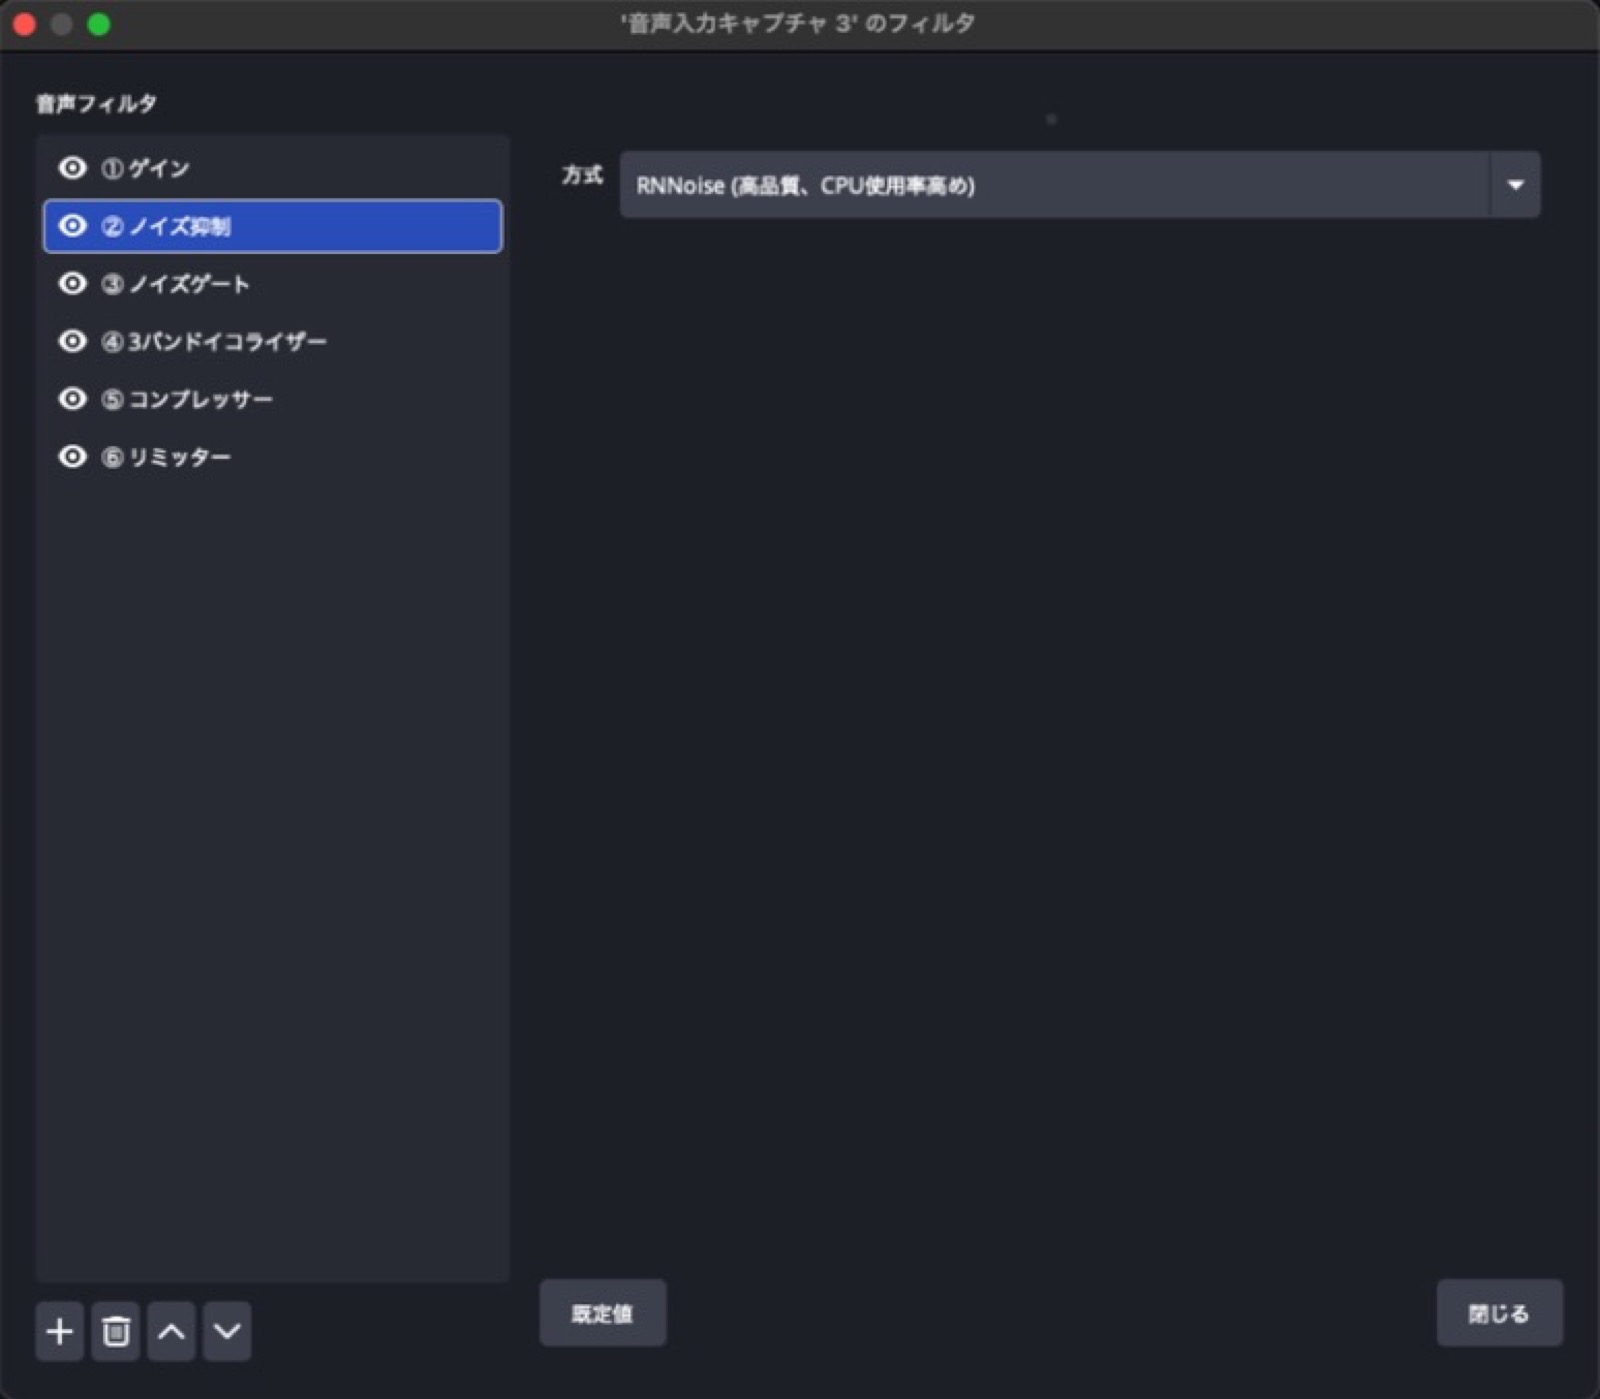
Noise Suppression removes steady sounds such as hiss and hum. OBS offers two methods; on a current Mac, I recommend RNNoise (higher quality, higher CPU use). It is designed to distinguish speech from noise and can remove air-conditioning and fan noise quite naturally. Despite the CPU warning, it should be fine on a recent Mac.
📝 Noise suppression is also a last resort.
The harder you suppress noise, the thinner your voice can sound. First improve the original recording: bring the mic closer, keep it out of the air-conditioner’s airflow, and move the computer farther away. Then use filters to finish the sound.
5-4 ③ Noise Gate: close it when you are not speaking
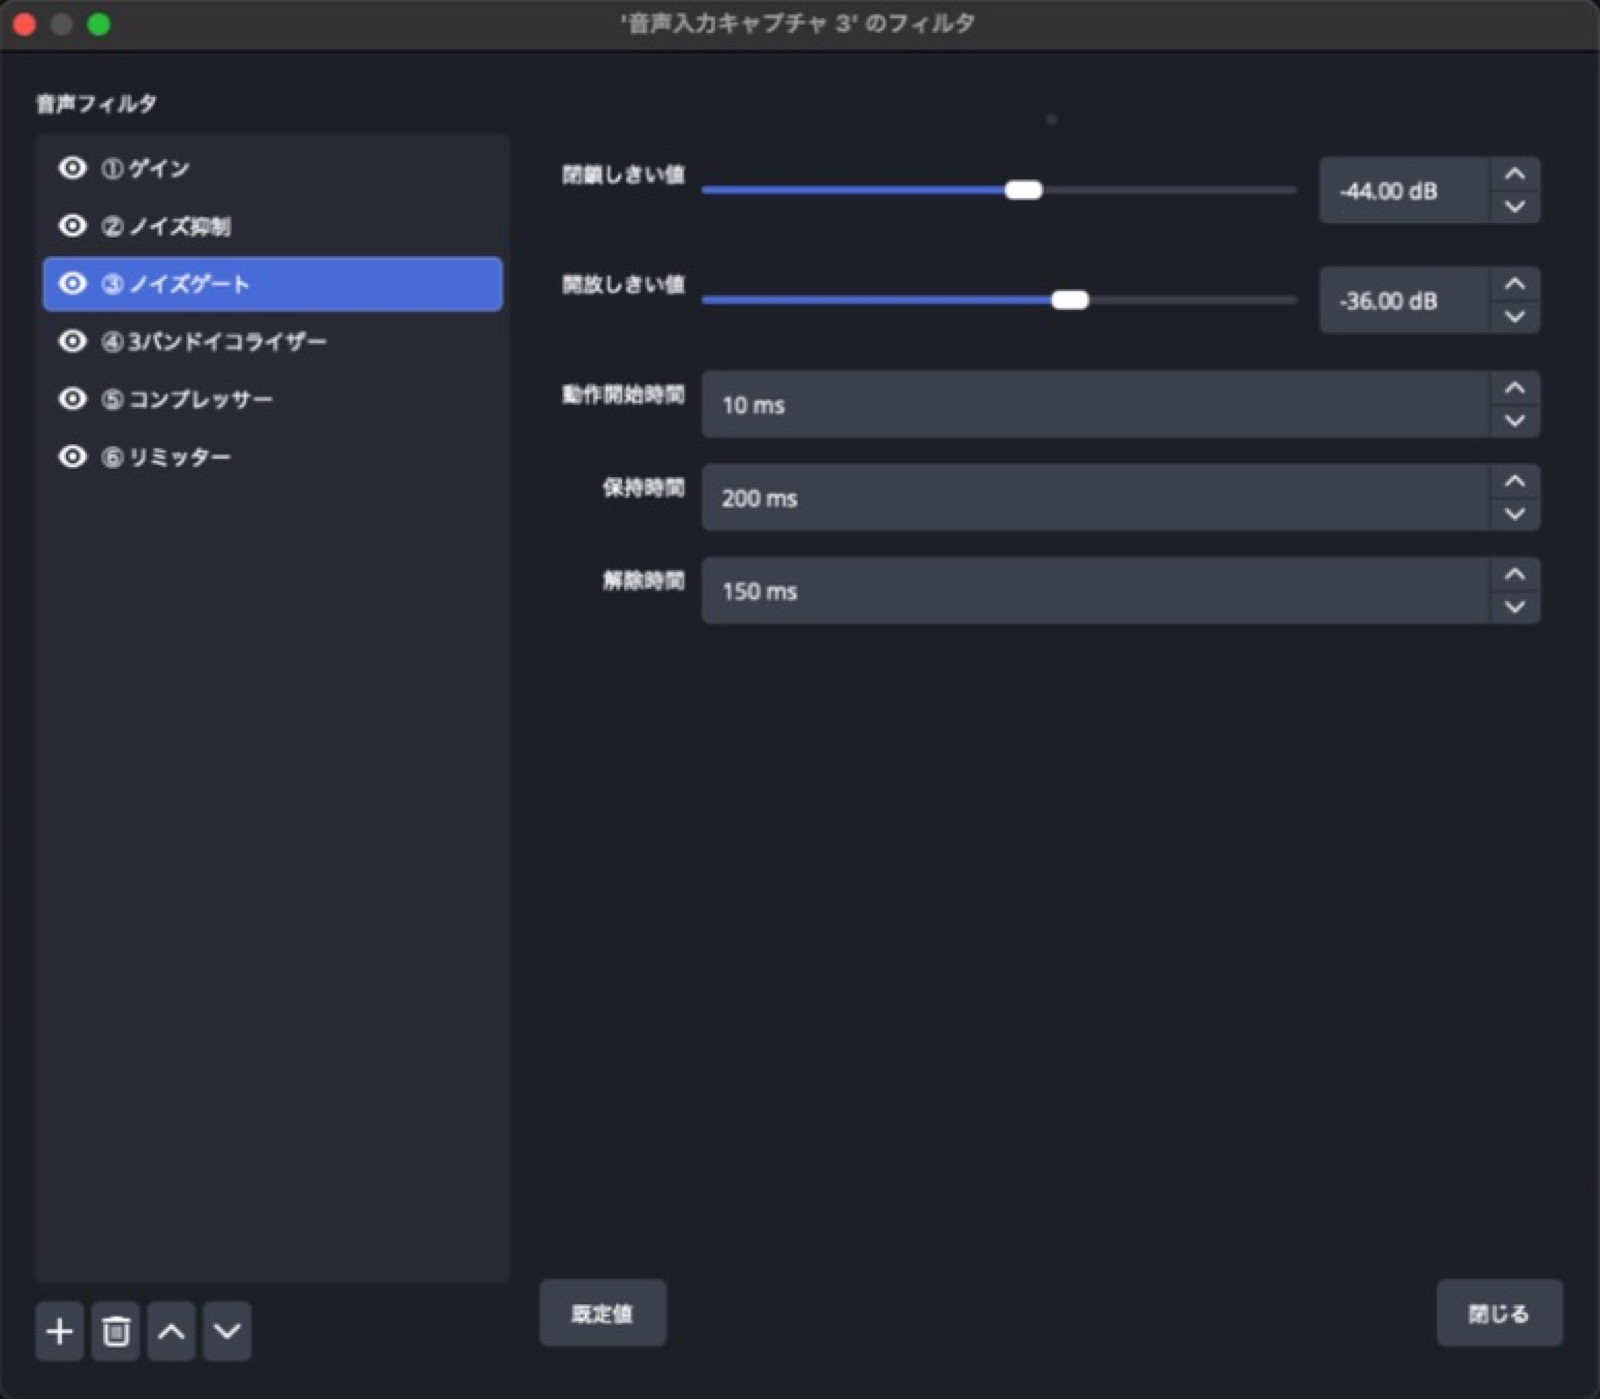
A Noise Gate closes completely when the sound falls below a set level. Use it to keep quiet keyboard sounds and room noise out of the stream when you are not talking.
The starting values shown in the screenshot are:
- Open threshold: -36 dB (it opens above this level, treating the sound as speech).
- Close threshold: -44 dB (it closes below this level).
- Attack: 10 ms (how quickly it opens).
- Hold: 200 ms (how long it stays open after the level falls).
- Release: 150 ms (how quickly it closes).
Keep about 8 dB between the open and close thresholds. Without a gap, the gate may rapidly open and close around quiet speech, making your voice sound chopped up.
💡 Tune the gate for your room.
Stay quiet and watch the mixer meter. The small movement you see is room noise. Set the close threshold a few dB above that noise so the gate closes while you are silent. If the first syllable gets cut off, lower the open threshold a little.
5-5 ④ Equalizer: just trim a little low end
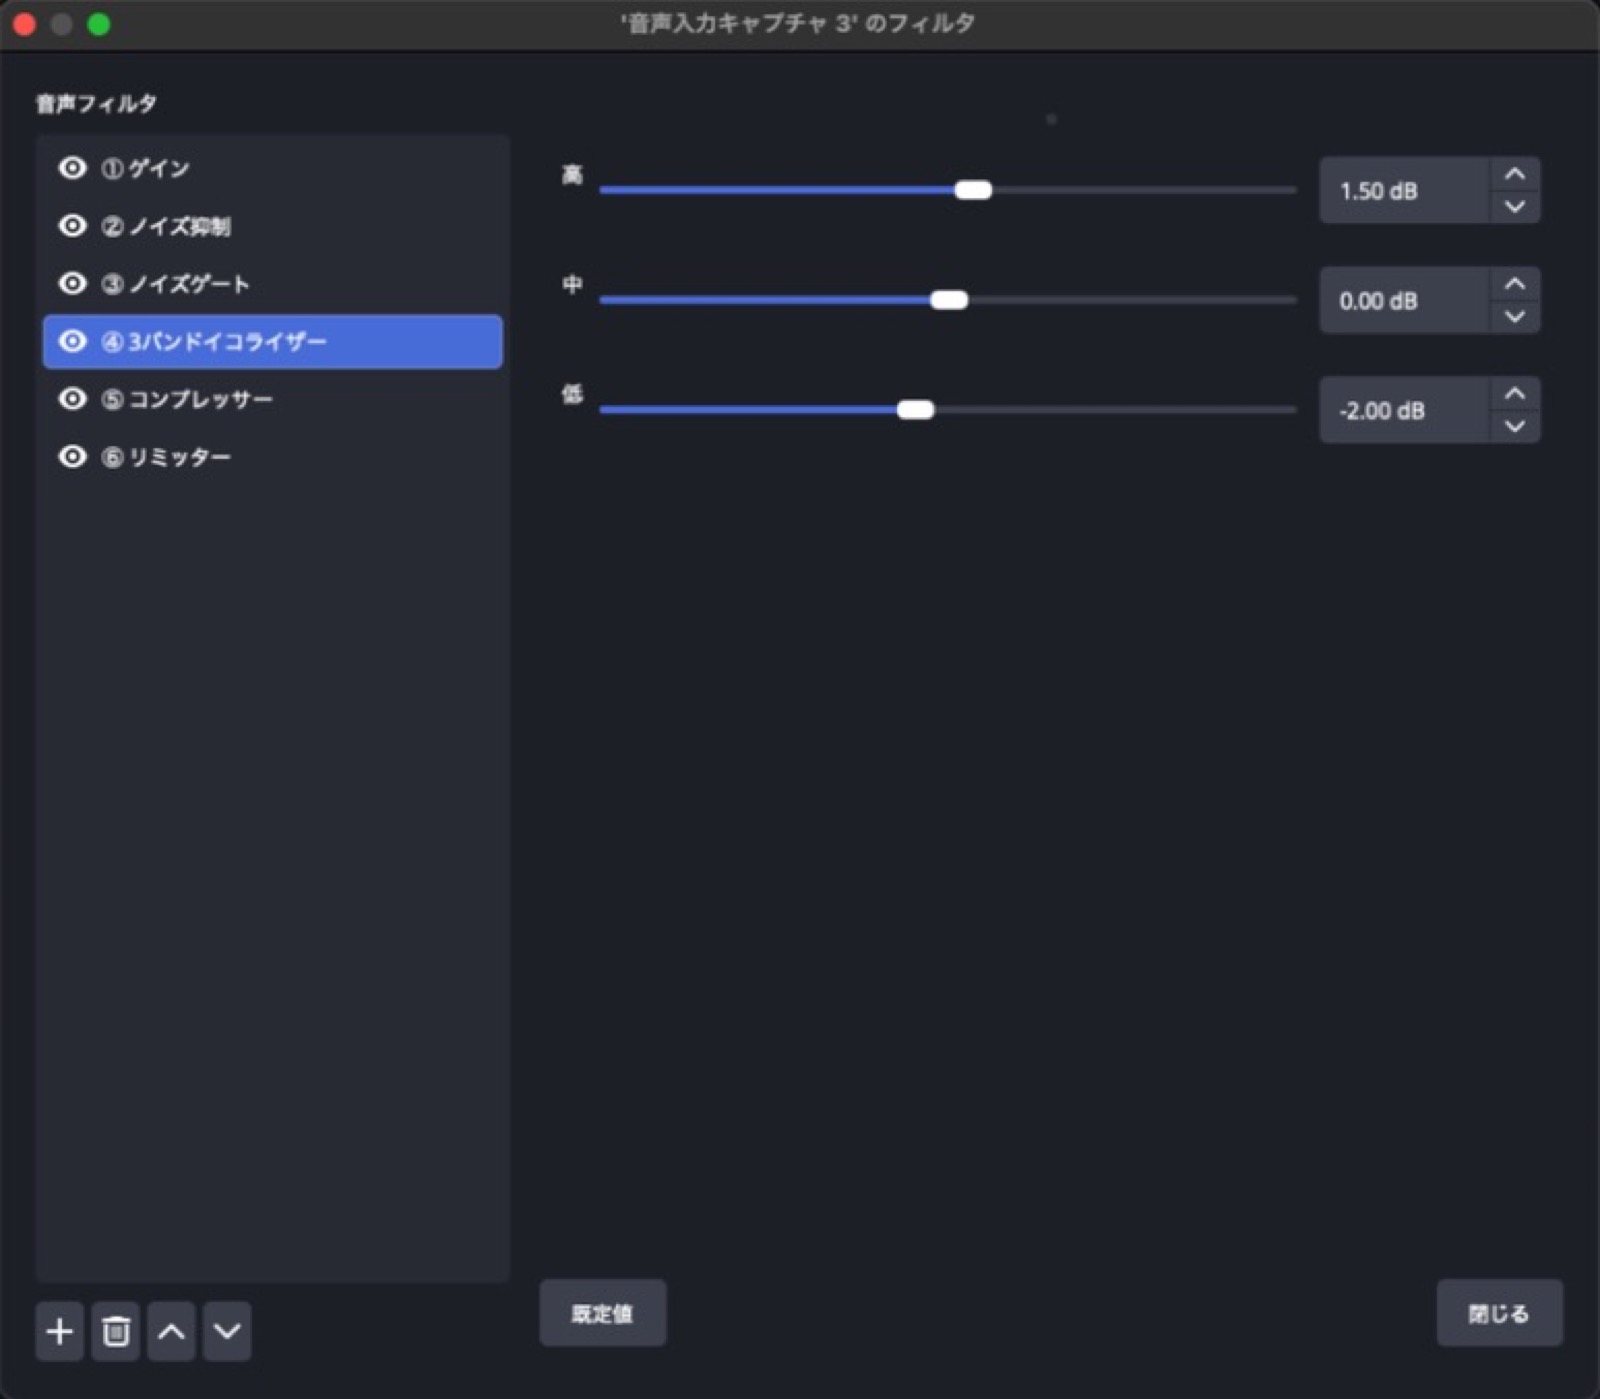
An equalizer (EQ) raises or lowers particular frequency ranges. OBS’s 3-Band Equalizer has simple low, mid, and high controls.
A common problem with streamed voice is a muffled sound, often caused by too much low end. The closer you speak to a microphone, the more the low frequencies can build up.
Starting points:
- Low: -2 dB (reduce some muddiness).
- Mid: 0 dB (leave it alone).
- High: +1.5 dB (add a little definition to the words).
The key is not to make big moves. Even a 2–3 dB change can alter the character of a voice. A small cut often sounds more natural than a boost.
5-6 ⑤ Compressor: smooth out vocal dynamics
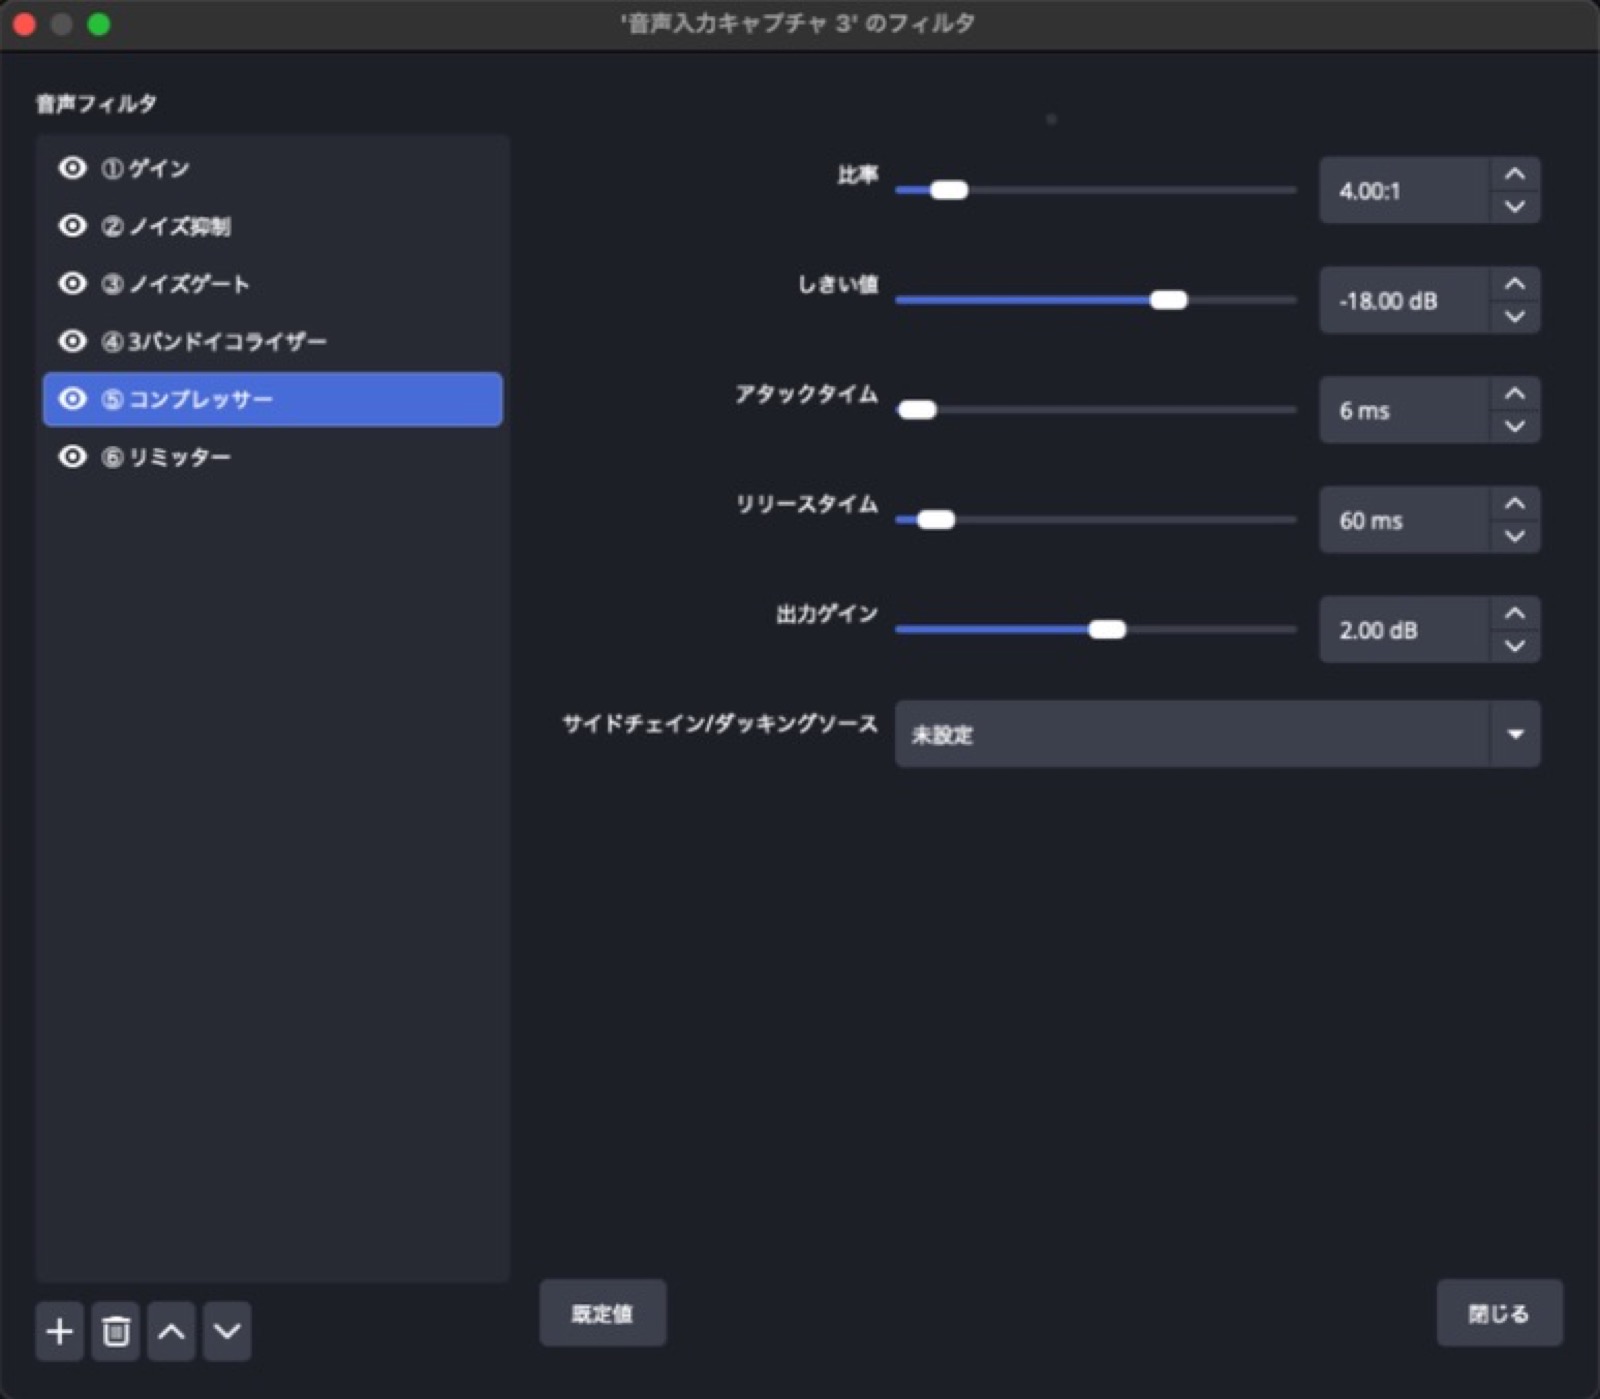
Game-streaming voices can be very dynamic: a quiet comment one moment, a shout when an enemy surprises you the next. If viewers turn up the quiet parts, the next shout can hurt their ears.
A compressor reduces the difference in level by turning down sound above a threshold at a set ratio. Starting points:
- Ratio: 4:1 (the amount above the threshold is reduced to one quarter).
- Threshold: -18 dB.
- Attack: 6 ms (how quickly compression starts).
- Release: 60 ms (how quickly it stops).
- Output Gain: +2 dB (make up some of the level reduced by compression).
For ordinary speech, aim for about 3–6 dB of gain reduction on the meter. More can make the voice lifeless and bring up breathing sounds.
💡 Automatically lower music with ducking.
At the bottom of the compressor is Sidechain/Ducking Source. Add a compressor to the music source and choose the microphone as its ducking source. The music will drop while you speak, like a radio DJ’s music bed. Try a ratio of 4:1–6:1 and a threshold around -30 dB to start.
5-7 ⑥ Limiter: set a ceiling that cannot be exceeded
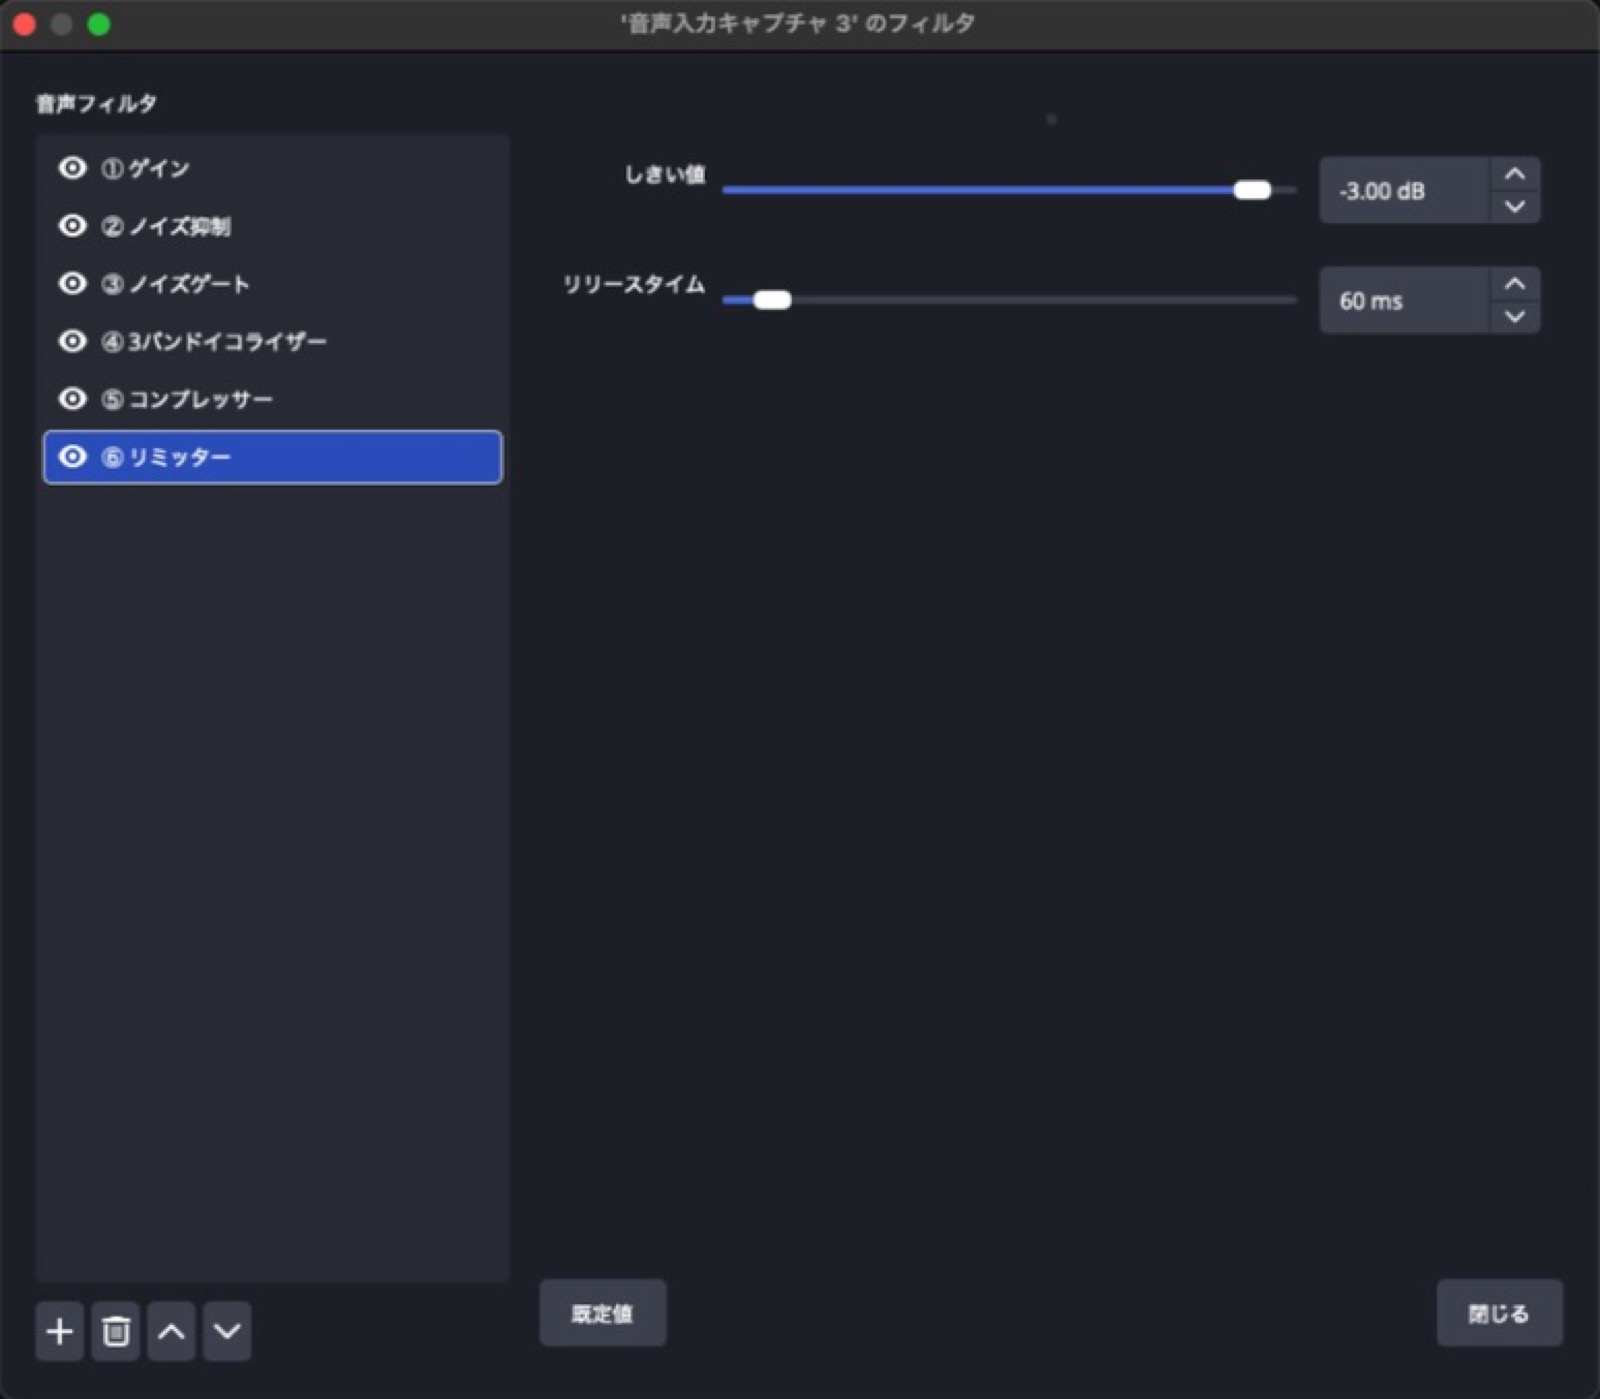
A compressor gently reduces level. A limiter sets a ceiling that the audio cannot pass.
- Threshold: -3 dB.
- Release: 60 ms.
This helps prevent distortion if you suddenly shout. A limiter should do nothing most of the time and only catch peaks. If it is always active during normal speech, the gain or compression earlier in the chain is probably too strong.
5-8 Listen and check the result
These values are only starting points. The right settings depend on your voice, microphone, and room.
1. Click Start Recording and record about 30 seconds: speak normally, whisper, and raise your voice.
2. Listen on earbuds or a phone speaker, as a viewer might.
3. Check whether quiet speech is clear, loud speech is comfortable, and the room is quiet when you stop talking.
The next chapter covers the balance between voice, game audio, and music, plus how to fix sync problems.
Chapter 5 recap
- Filters run from top to bottom. Recommended order: Gain → Noise Suppression → Noise Gate → EQ → Compressor → Limiter.
- Set the interface so the mic peaks around -20 to -15 dB during normal speech; start OBS Gain at 0 dB.
- Use RNNoise, but improve the recording environment first.
- Leave about 8 dB between the gate’s open and close thresholds.
- A small low-end cut can reduce muddiness.
- Start the compressor at 4:1 and -18 dB; aim for 3–6 dB of reduction.
- Set the limiter ceiling to -3 dB. If it is always active, reduce earlier gain or compression.
- Select the microphone as the music compressor’s ducking source to lower music while you speak.
Chapter 6 — Balance and sync: how to read the meters
Your voice is cleaned up, and game audio and music each have their own track. The final step is balancing the three.
This chapter covers reading the meters, setting useful starting levels for voice, game audio, and music, monitoring the sound in your headphones, and using Sync Offset when audio and video are out of sync.
Closed-back headphones or a headset are useful during a stream because they keep sound from bleeding into the microphone.
6-1 Read the meter colors: green, yellow, and red
The Audio Mixer meters have a scale and three colors.
- Green: normal level.
- Yellow: getting loud.
- Red: too loud; clipping is possible.
The scale is in dB (decibels), with 0 at the top—the ceiling. The more negative the number, the quieter the sound. The key rule is simple: keep every source out of the red, near 0 dB. Clipped audio sounds harsh and cannot be repaired later.
6-2 A useful target for level
As a starting point, watch the range where the meters move most often:
- Voice: -20 to -10 dB (loud speech can reach about -6 dB).
- Game audio: -25 to -15 dB (a little lower than the voice).
- Music: -35 to -25 dB (in the background, without competing with speech).
Voice is the focus. Keep game audio a little lower, and music another step lower. That alone helps prevent a stream where viewers cannot understand what you are saying.
💡 Use the fader for level and filters for tone.
The mixer fader sets each source’s volume. Filters such as the compressor in Chapter 5 control the difference between loud and quiet speech. Think of them as separate jobs: the mixer balances sources; filters shape the sound.
📝 Platforms may normalize volume later.
Services such as YouTube reduce some differences in loudness between videos. That does not mean louder is better. Clear speech without clipping matters much more.
6-3 Listen for yourself with audio monitoring
Meters do not tell you what the sound actually feels like. Audio Monitoring lets you hear what you are sending in your headphones.
In Advanced Audio Properties (Chapter 4), each source has an Audio Monitoring setting.
Options:
- Monitor Off: you cannot hear it, but it goes to the stream.
- Monitor Only (Mute Output): you can hear it, but it does not go to the stream.
- Monitor and Output: you hear it and it goes to the stream.
Choose the headphone output under Settings → Audio → Advanced → Monitoring Device.
💡 It is often better not to monitor your own voice through OBS.
Your voice comes back with a slight delay. Speaking while hearing that delayed voice can feel uncomfortable. Use your interface’s Direct Monitor for latency-free self-monitoring. Use OBS monitoring to check the levels of music and game audio.
6-4 Fix sync problems with Sync Offset
When reviewing a stream, you may notice the voice comes before the person’s lips move, or game audio comes before or after an explosion on screen. That is an audio/video sync problem.
Game video from a capture card often arrives in OBS slightly late, so the audio may seem early. Adjust Sync Offset in Advanced Audio Properties:
- To delay audio, enter a positive value (for example, 100 ms).
- Usually do not use a negative value; it cannot make the audio arrive earlier.
To adjust it:
1. Find a moment where audio and picture should line up clearly, such as a landing sound or a clap.
2. Record a test and review it.
3. If the sound is early, increase the game source’s Sync Offset by 50 ms at a time, recording and checking each time.
4. Keep the value that lines up best.
If your microphone is out of sync with a face camera or avatar, use the same approach on the microphone source.
Chapter 6 recap
- Read the meter colors: green, yellow, red. Keep every source out of the red.
- Starting levels: voice -20 to -10 dB, game audio -25 to -15 dB, music -35 to -25 dB. Voice is the focus.
- Use the mixer for level balance and filters for vocal dynamics.
- Use Audio Monitoring to check your headphones; use interface Direct Monitor for your own voice.
- Use a positive Sync Offset to delay audio. Adjust in 50 ms steps and review a recording.
Chapter 7 — Captions and lower thirds: show and hide them with one button
On a TV game show or sports broadcast, a lower-third banner slides in with a label such as “Today’s Game” or “Coming up.” That small touch can make a stream feel like a show.
This chapter covers making text and a banner at the bottom of the screen, then showing and hiding the banner with one button. A left-hand control device with labeled buttons is handy for this; Chapter 12 has more.
7-1 Build a lower third from a color block and text
Here is the finished screen.
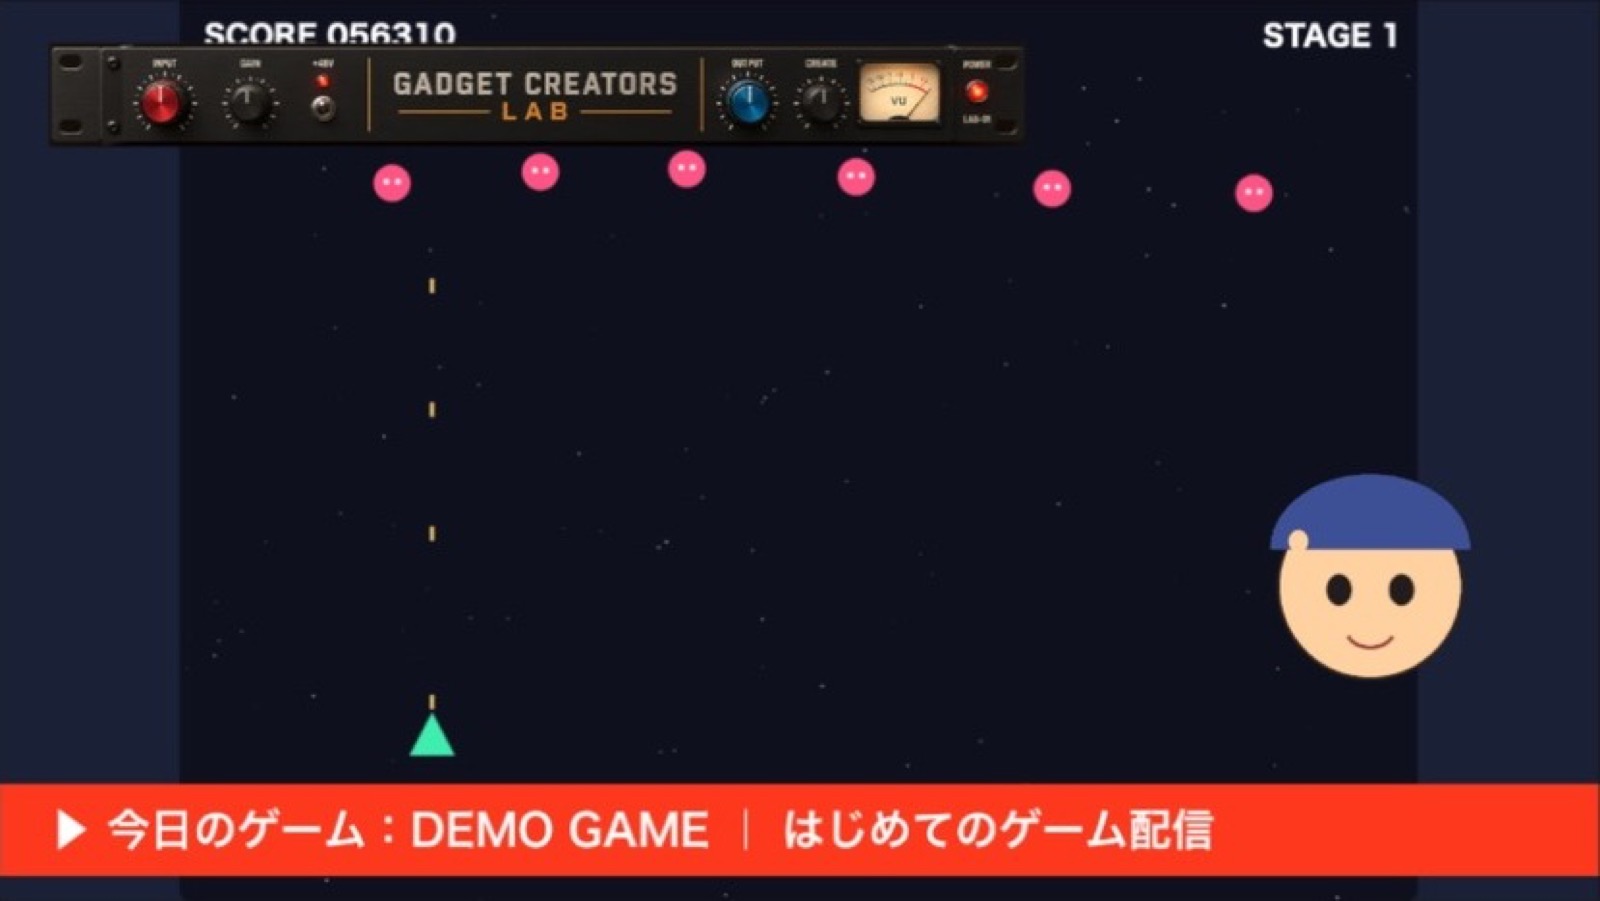
The banner uses two sources: a Color source for a long, narrow block (about 1920 pixels wide and 110 high), and a Text (FreeType 2) source for the words. Put the text above the color source in the layer list, and the banner is done.
To make one:
1. Click + → Color and name the source “Lower Third (Color).”
2. Choose a color in Properties and set the width to 1920 and height to 110.
3. Drag it to the very bottom of the preview. It will snap to the edge.
4. Click + → Text (FreeType 2) and name it “Lower Third Text.”
5. Enter the wording in Properties and choose a font. A bold sans serif is easy to read.
6. Move the text over the color block and place it above the color source in the list.
💡 Keep banner text short and large.
Many viewers watch on phones, where small text is hard to read. On a 1920 × 1080 canvas, start around 48–60 pt. Keep a banner to about 20 characters so viewers can read it at a glance.
7-2 Group the lower third
The banner has two sources, so you need to control them together. Group them: in the Sources list, hold ⌘ and click both the color and text sources, then right-click and choose Group Selected Items. You can now show or hide them as one “Lower Third.”
7-3 Show and hide it with a hotkey
Clicking the eye icon with a mouse during a stream is awkward. Use a hotkey instead.
Open Settings → Hotkeys and type the banner’s name in the Filter box. The Show and Hide fields for that source will appear.
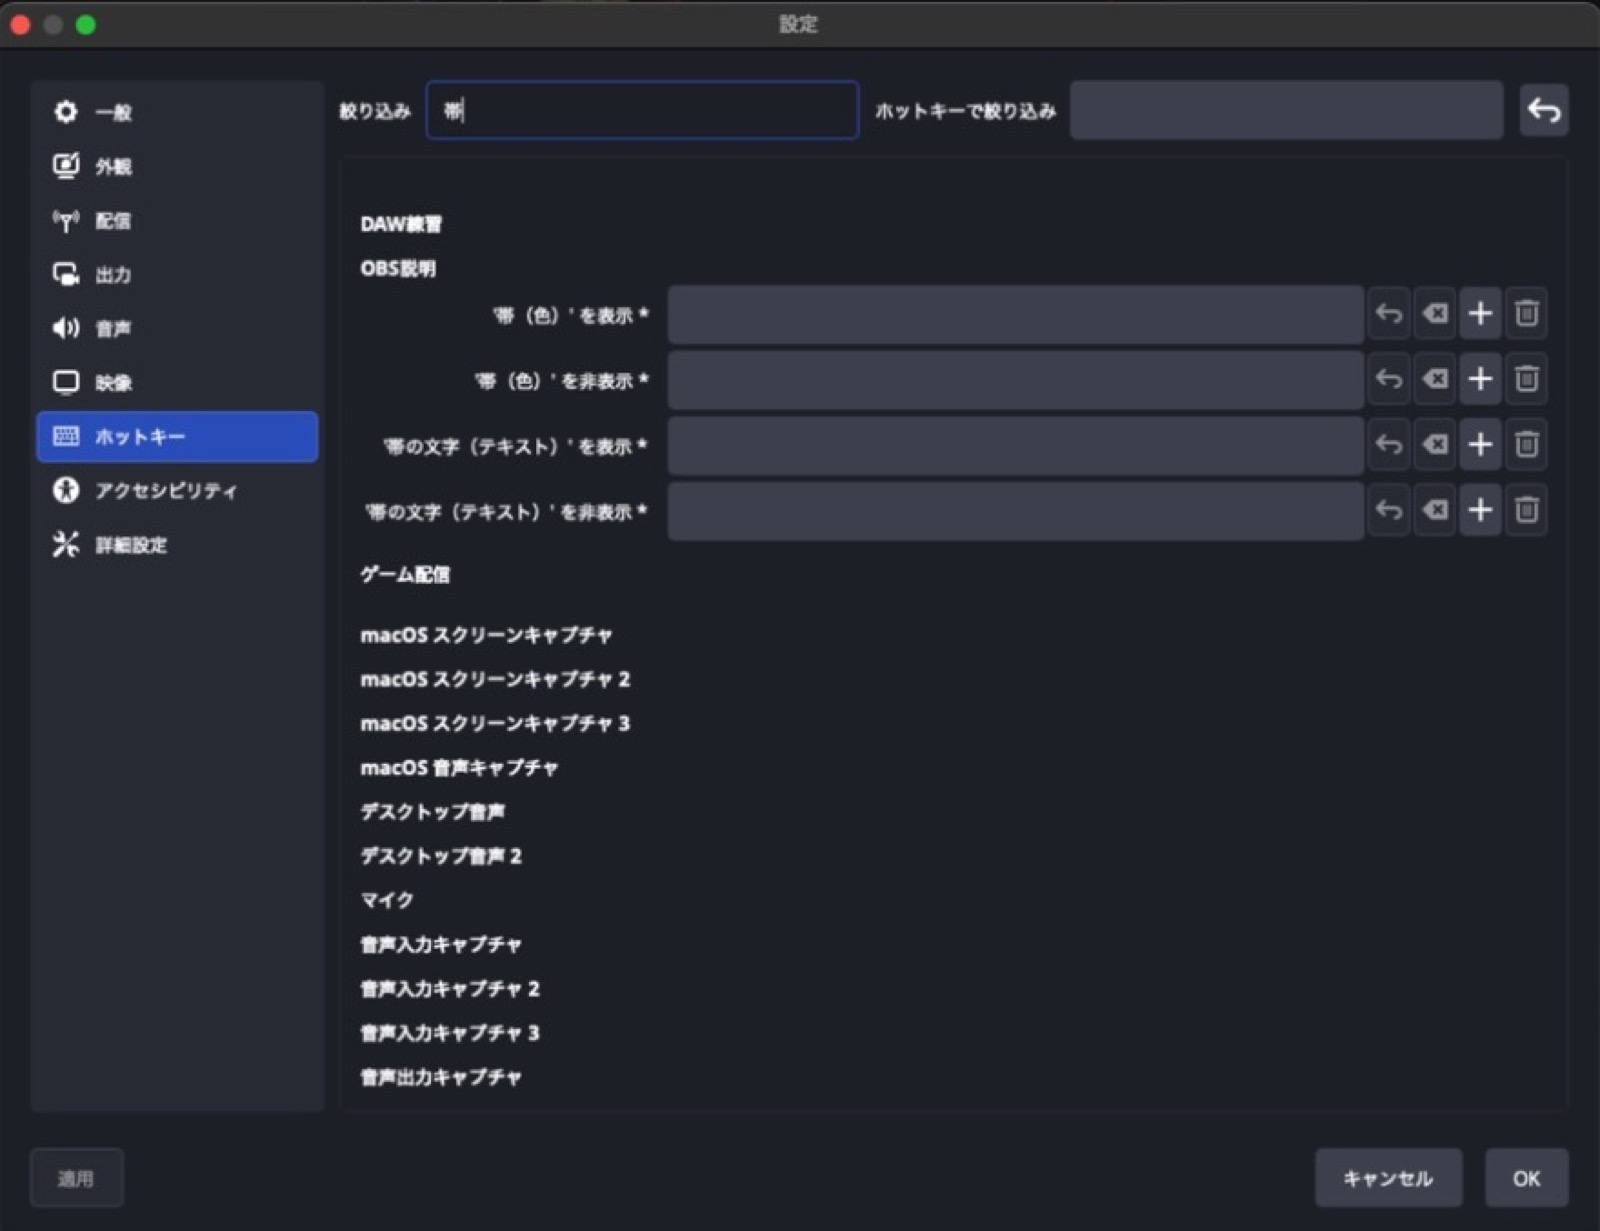
Click a field and press the key you want to assign. For example, F1 can show the banner and F2 can hide it. If you granted Input Monitoring permission in Chapter 1, the hotkeys will work even while OBS is behind your game.
📝 Hotkeys are assigned per scene.
The list is grouped by scene and source. If you want the same banner to use the same key in more than one scene, assign that key in each scene.
7-4 Make it slide in with a visibility transition
A hotkey makes the banner appear instantly. To give it a TV-style entrance, right-click the source and choose Show Transition, then select Fade or Slide and set the duration in milliseconds. Set a Hide Transition as well so it exits smoothly.
- Fade: gently fades in or out; works with any banner.
- Slide: glides in from the side or bottom for a broadcast feel.
A duration of 300–500 ms usually feels comfortable.
💡 For more elaborate motion, consider a plugin.
OBS plugins can add features. A “Move” style plugin can animate a banner from a chosen position, or reveal letters one at a time. Check Tools → Plugin Manager to see installed plugins. Before installing one, confirm that it supports Mac (including Apple silicon) and your version of OBS on its distribution page.
7-5 Lower-third ideas
Useful banners for a game stream include:
- Today’s game: tells people who joined late what you are playing.
- Today’s goal: “Beat the boss” or “Reach level 30.”
- Announcement: the next stream date or your social handle.
- Comment rules: for example, “Please avoid spoilers.”
Do not leave every banner on screen all the time. Show one at the beginning and a few times during the stream. That gives it a better chance of being noticed.
Chapter 7 recap
- Make the banner from a color block and a text source, with text above the color.
- Group the two sources so they show and hide together.
- Assign Show and Hide hotkeys in Settings → Hotkeys and grant Input Monitoring permission.
- Use a Show and Hide Transition for smooth motion (300–500 ms).
- Check Mac and OBS version compatibility before adding a plugin.
Chapter 8 — Stream as a VTuber: remove the background and layer your avatar
You can stream without showing your face, using a character (avatar) that moves along with you. OBS can also handle this VTuber style of game stream.
This chapter covers how the avatar app works with OBS, how to remove its background and layer it over a game with chroma key, and what to keep in mind on a Mac.
8-1 VTuber streaming uses two apps
The setup is straightforward:
- Avatar app: reads your face from a camera (the Mac camera or an iPhone) and animates the avatar.
- OBS: captures that app’s window and layers it over the game.
From OBS’s perspective, the avatar is simply another window. Use Window Capture in macOS Screen Capture, as in Chapter 3.
There are several avatar apps. One well-known option is VTube Studio, which animates Live2D avatars; some apps support Mac. Support and the method for sending video to OBS vary, so check the app’s official documentation before using it.
📝 Use an iPhone for face tracking
Some apps can read facial expressions with an iPhone’s Face ID camera and send the tracking data to the Mac app. It can often capture expressions in more detail than the Mac camera, so it is worth trying if you have an iPhone.
8-2 Remove the background with chroma key
Capturing the avatar app’s window usually captures its background too. Set the app’s background to bright green, then use OBS’s Chroma Key filter to make that green transparent. It works like the green screen used to replace the background behind a TV weather presenter.
Steps:
1. Set the avatar app’s background to green (for example, #00FF00).
2. Capture the avatar app’s window in OBS with Window Capture.
3. Select that source and choose Filters → + → Chroma Key.
4. Set Key Color Type to Green.
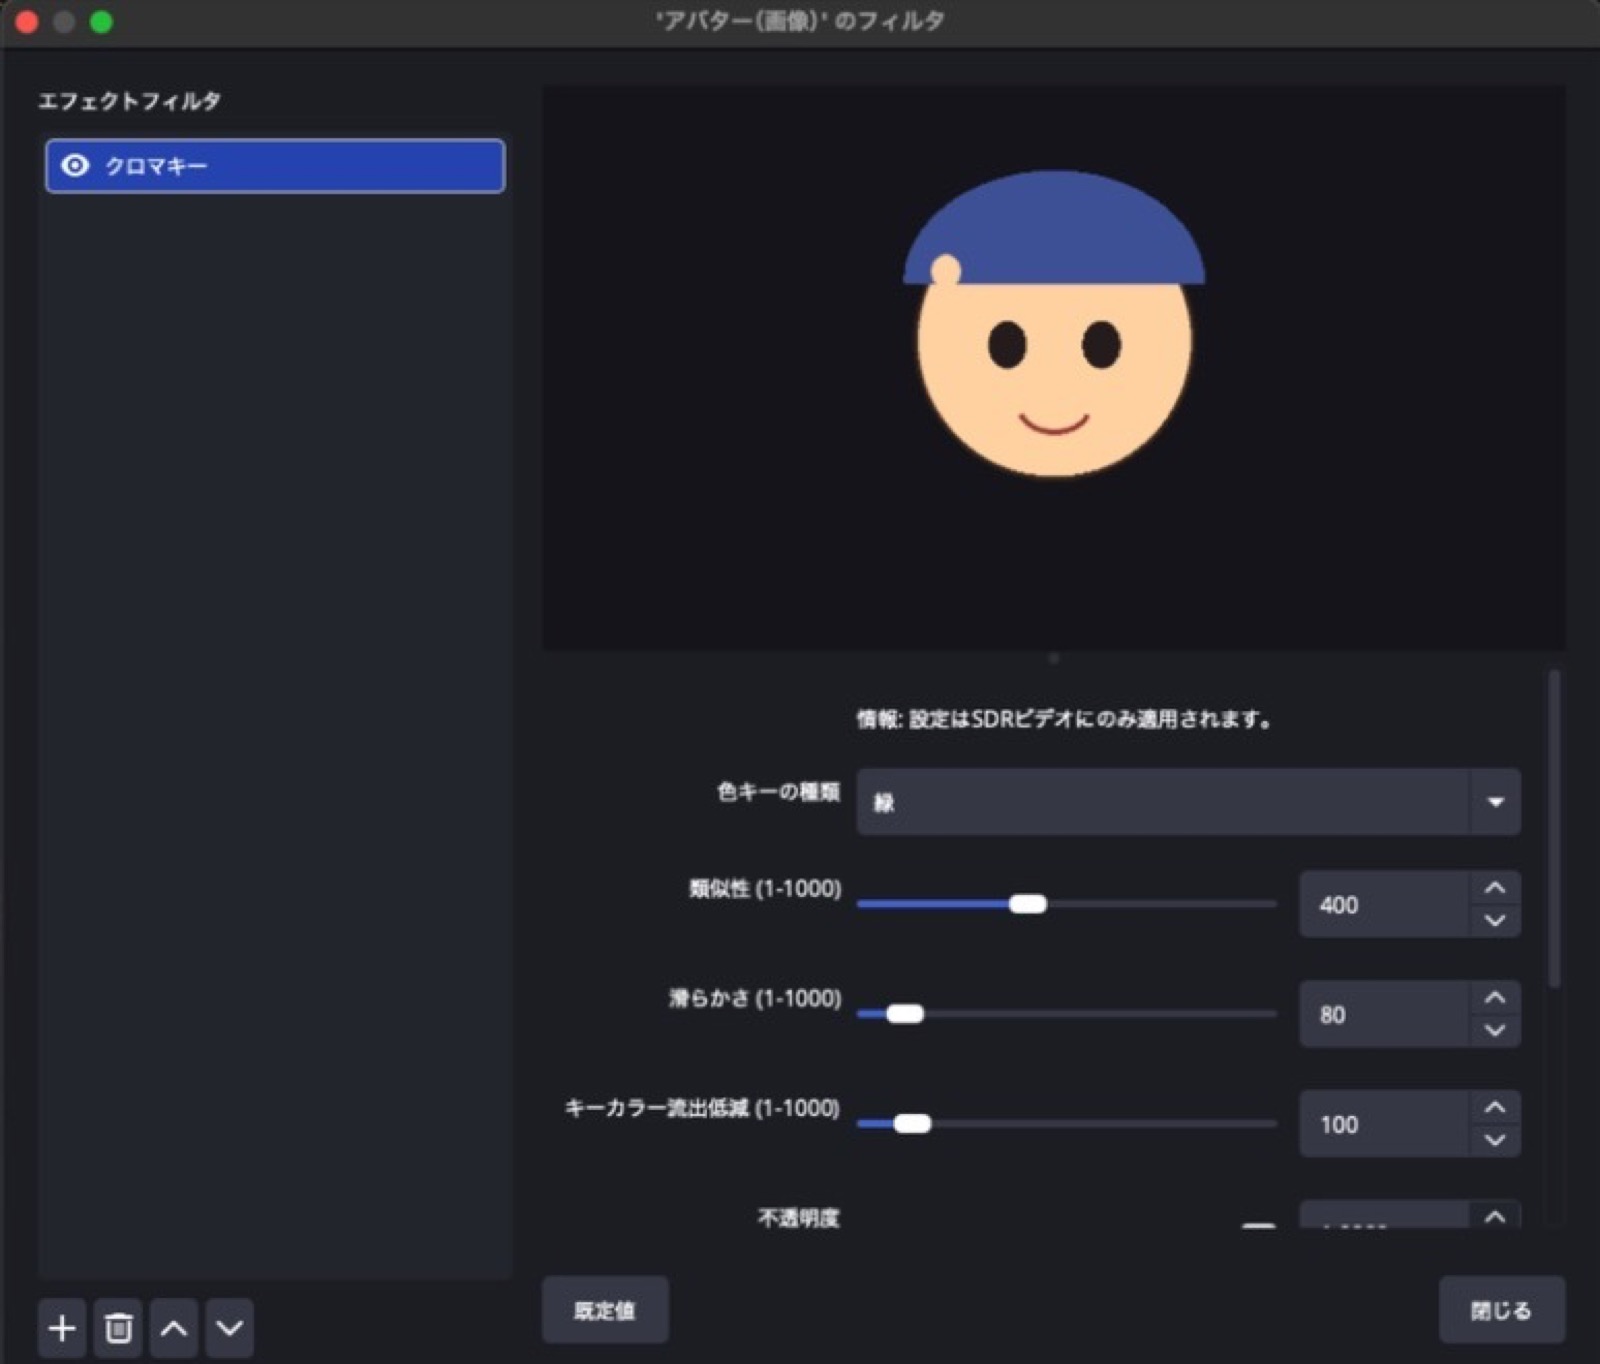
This screenshot shows the filter applied to a sample character on a green background. The green disappears, leaving the character.
The controls are:
- Similarity: how much of the image counts as green and is removed. Higher values remove more, but may erase colors in the avatar.
- Smoothness: softens the edge of the transparent area.
- Key Color Spill Reduction: removes a green tint left around hair and other edges.
Start with the screenshot’s values—Similarity 400, Smoothness 80, Spill Reduction 100. If green remains around the avatar, raise Similarity slightly. If parts of the avatar become transparent, lower it.
💡 Do not use green in the avatar.
Chroma Key removes green, so green clothing or eyes may disappear too. For a green-clothed avatar, use a blue background and set the key color to blue.
8-3 Place the avatar over the game
Once the background is removed, position and resize the avatar in the preview like any other source.
Place it where it does not cover important game information. Health, the mini-map, and score often sit in a corner, so look at the game and use an open corner. In the source list, put the avatar above the game but below the lower third (Chapter 7). That way the banner naturally appears in front of the avatar.
8-4 Notes for VTuber streaming on a Mac
1. It puts a heavy load on the computer. The game, avatar app, and OBS all run at once. Make a 30-minute test recording before streaming and check for stutters in Stats (Chapter 11).
2. Many tutorials assume Windows. Some rely on Windows-only plugins or video transfer methods. On a Mac, a green background and Chroma Key is the most reliable approach and works across apps.
3. Light your face-tracking camera. In a dark room, the camera may miss blinks and mouth movements. A soft light in front of your face can improve the avatar’s movement considerably.
Chapter 8 recap
- VTuber streams use an avatar app and OBS.
- Capture the avatar app’s window with Window Capture.
- Use a green background and Chroma Key; start at Similarity 400 and Smoothness 80.
- If the avatar uses green, key out blue instead.
- Place the avatar in a corner that does not cover game information; put it above the game and below the banner.
- On a Mac, green screen plus Chroma Key is reliable. Confirm Mac support in the app’s official documentation.
Chapter 9 — Streaming settings: image quality and your Mac’s encoder
Your picture and audio are ready. Now decide what quality to send and where to send it.
There are many numbers here, but for game streaming you mainly need to set five things: resolution, FPS, encoder, bitrate, and streaming service/stream key.
9-1 Resolution and FPS in Settings → Video
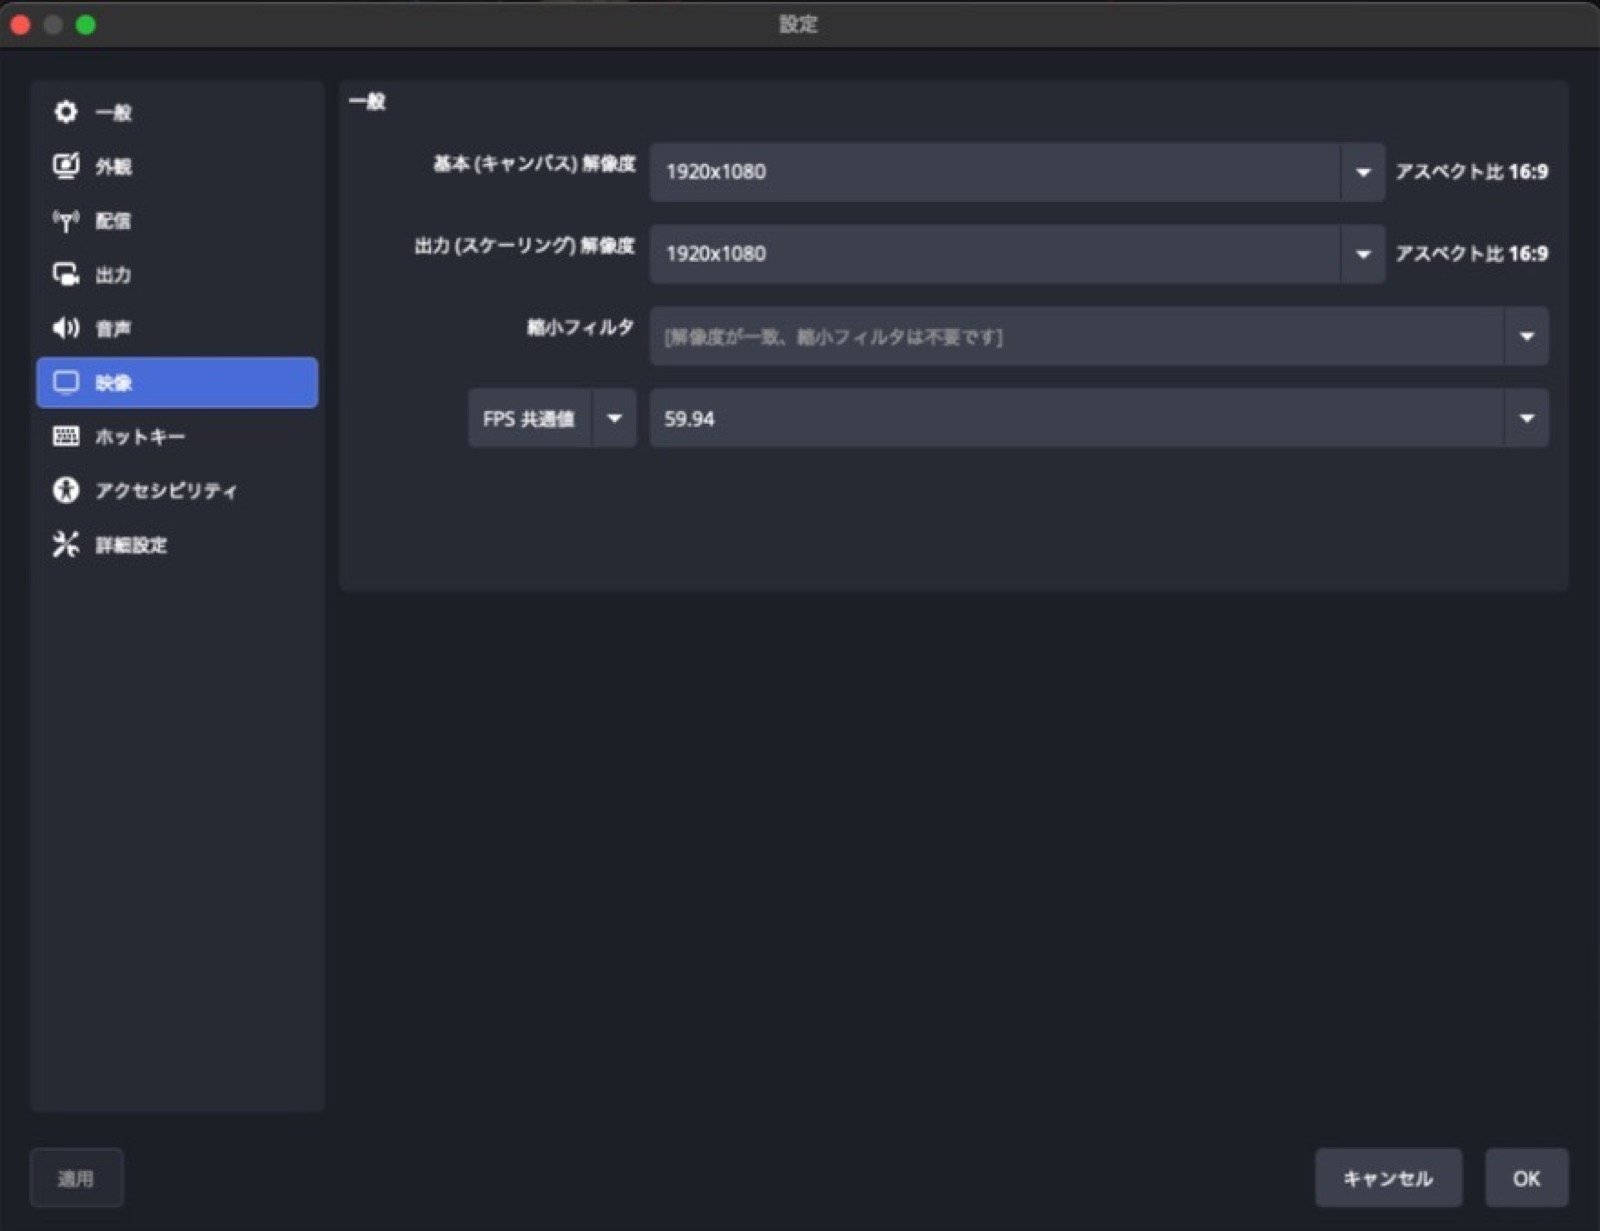
- Base (Canvas) Resolution: the size of the scene you build in OBS, usually 1920 × 1080.
- Output (Scaled) Resolution: the size actually sent to the stream.
- FPS: frames per second.
A common starting point is 1920 × 1080 at 60 FPS. The screenshot’s 59.94 is essentially the same. If your connection or Mac is struggling, reduce the output to 1280 × 720 or lower the frame rate to 30 FPS.
Fast action, racing, and fighting games look smoother at 60 FPS, even if you lower the resolution. Slower games such as RPGs, puzzles, and simulations can be fine at 30 FPS.
9-2 Encoder: use Apple hardware on a Mac
In Settings → Output, set Output Mode to Advanced to see the detailed Streaming settings.
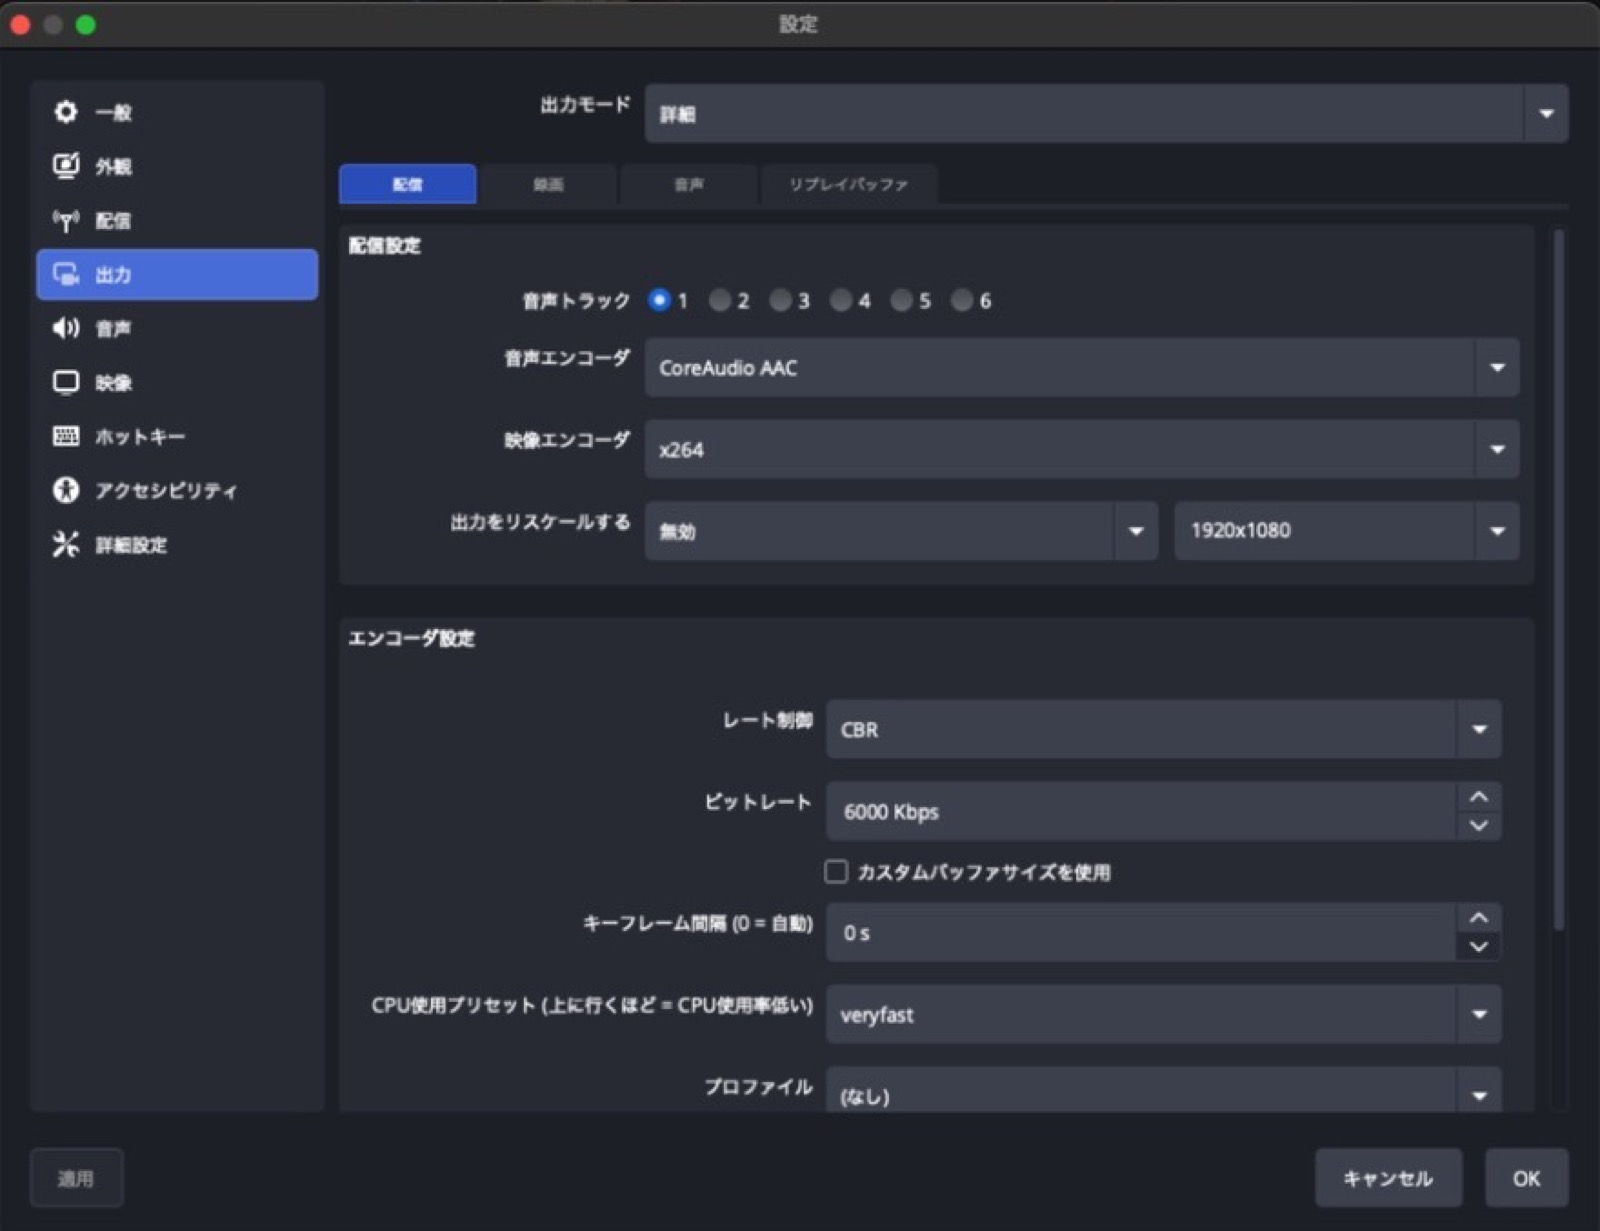
Look for Video Encoder. An encoder compresses video so it can be streamed. The main choices are:
- x264: uses the Mac’s CPU. It can look good, but puts more work on the CPU.
- Apple VT (Hardware): uses dedicated video-encoding hardware in the Mac and puts less work on the CPU.
Games already use a lot of CPU and GPU. If the CPU also has to encode with x264, the game may stutter or the stream may drop frames. For game streaming on a Mac, I recommend Apple VT hardware encoding. Depending on the platform, you may also see HEVC or AV1 options.
📝 The screenshot uses x264.
It shows the OBS setup on my Mac as it was. If you have carried settings forward from an older version, you may still be using x264. Check which encoder is selected.
9-3 Bitrate: follow your platform’s guidance
- Rate Control: CBR (constant bitrate) is the usual choice for streaming.
- Bitrate: the amount of data sent each second. Follow the recommended value published by your streaming service. As a starting point, 1080p at 60 FPS is around 6,000 Kbps.
- Keyframe Interval: 2 seconds is common (0 means automatic).
The bitrate cannot exceed your upload speed. If you run the bandwidth test in the Auto-Configuration Wizard from Chapter 1, OBS will suggest a value that suits your connection. If you are unsure, start with that.
💡 If the picture looks blocky, check the bitrate first.
Blocky artifacts usually mean there is not enough bitrate. If your connection has no room for a higher value, lowering the output resolution to 1280 × 720 can look cleaner than trying to push more data.
9-4 Streaming service and stream key in Settings → Stream
Choose a service such as YouTube or Twitch under Settings → Stream. Use Connect Account to sign in and let OBS configure the details, or paste the stream key shown in the streaming service’s dashboard.
⚠️ Never show your stream key to anyone.
It is the key to broadcasting on your channel. If someone gets it, they may be able to stream to your account. Do not show the Stream tab when sharing your screen or posting a settings screenshot. If the key is exposed, generate a new one in the service dashboard.
Chapter 9 recap
- Start at 1920 × 1080 and 60 FPS; lower the output resolution or use 30 FPS if needed.
- Choose Apple VT hardware encoding on a Mac to reduce CPU load.
- Use CBR and follow your platform’s bitrate and keyframe guidance.
- Select the streaming service in Settings → Stream and keep the stream key private.
Chapter 10 — Recording and archives: keep voice and game audio on separate tracks
A recording can preserve more than the finished stream mix. By recording voice, game audio, and music separately, you can adjust them later in an editor.
10-1 Why separate tracks?
If everything is mixed into one track, turning down the game also turns down your voice. Separate tracks let you adjust the voice, game, and music independently, or replace music in an edited video.
10-2 Check the recording settings
Open Settings → Output → Recording. Choose a recording path, format, and encoder.
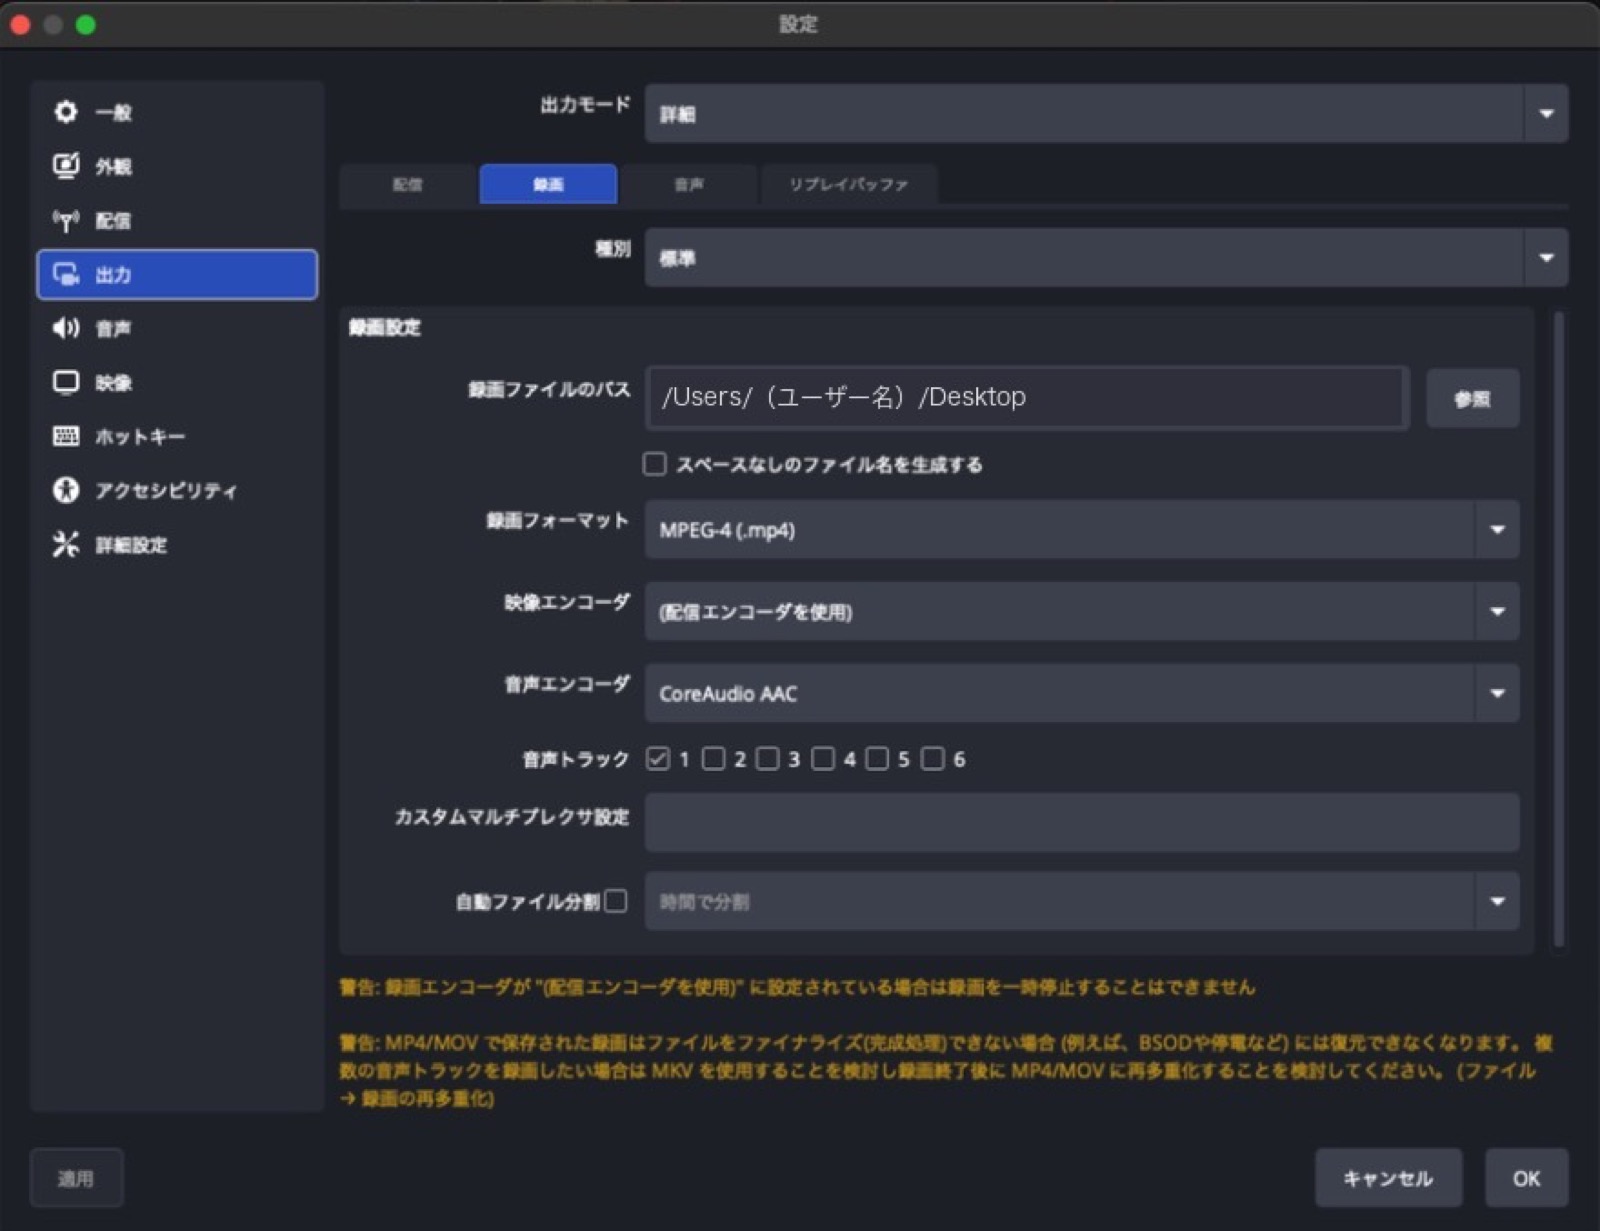
The warning under the screenshot explains that MP4/MOV recordings may not be recoverable if the file cannot be finalized, such as after a power outage. A regular MP4 is finalized when recording stops; if the Mac fails mid-recording, the whole file may be unreadable.
For a long game recording, choose one of these:
- MKV: the recorded portion remains usable if recording stops unexpectedly. Later, use File → Remux Recordings to convert it to MP4.
- Hybrid MP4 (available in current OBS): an MP4 format designed to be more resilient if recording stops unexpectedly.
Check the audio tracks you want included in the recording (for example, tracks 1–4).
10-3 Assign audio to tracks
Assign tracks in the Tracks columns at the right of Advanced Audio Properties (Chapter 4).
I recommend:
- Track 1: everything (voice + game + music), ready to play as a finished mix.
- Track 2: voice only.
- Track 3: game audio only.
- Track 4: music only.
Set the checkboxes this way:
- Microphone: tracks 1 and 2.
- Game audio: tracks 1 and 3.
- Music: tracks 1 and 4.
Track 1 contains the complete mix, so if you do not plan to edit, you can use it as usual. Use tracks 2–4 when you want to edit.
💡 Only Track 1 goes to the stream.
In Output → Streaming, set Audio Track to 1. Tracks 2–4 are recording material for editing.
10-4 Working with the tracks in an editor
Import the MKV or MP4 recording into a video editor such as Final Cut Pro, DaVinci Resolve, or Premiere Pro. The audio tracks appear separately.
- For a quick clip, use Track 1 only.
- For a detailed edit, use Tracks 2–4 to raise the voice, lower game audio, and make other changes afterward.
Keeping music on its own track also lets you replace a song in the video even if you used a different song on the stream. That is especially useful when streaming and video licenses differ.
Chapter 10 recap
- Separate voice, game audio, and music to make editing flexible.
- Use MKV or Hybrid MP4. A standard MP4 can become unreadable if recording stops unexpectedly.
- Track 1 is the full mix; Track 2 is voice; Track 3 is game audio; Track 4 is music.
- Assign tracks in Advanced Audio Properties.
- Only Track 1 goes to the stream; tracks 2–4 are for the recording.
Chapter 11 — Pre-stream checklist and troubleshooting
You now have the pieces for a stream. This chapter gathers a checklist to use before going live and fixes for common problems. Print it or save it on your phone for quick access.
11-1 The five-minute pre-stream checklist
Picture
- [ ] The Starting Screen scene is selected.
- [ ] The game window appears; the preview is not black.
- [ ] Notifications, email, and personal files are not visible.
- [ ] The lower-third text (today’s game or goal) is updated.
Audio
- [ ] When you speak, the microphone meter moves around -20 to -10 dB.
- [ ] The game audio meter moves and is a little lower than your voice.
- [ ] The same sound is not captured twice (Desktop Audio and Screen Capture).
- [ ] The music is cleared for streaming.
- [ ] The microphone is muted in the break scene.
Mac
- [ ] Close other demanding apps, such as a browser with many tabs or a video export.
- [ ] Connect the power adapter; performance may drop on battery.
- [ ] Silence notifications. Focus mode keeps them from appearing on stream.
Stream
- [ ] Set the title and description on the streaming service.
- [ ] If recording too, choose MKV or Hybrid MP4.
11-2 Check Stats while streaming
While live, use View → Docks → Stats to see whether the stream is getting through.
Watch these values:
- CPU Usage: if it stays very high (for example, above 80%), the Mac may be struggling.
- Frames Skipped Due to Rendering Lag: OBS is not building the screen fast enough.
- Frames Skipped Due to Encoding Lag: encoding is not keeping up; review the encoder in Chapter 9.
- Dropped Frames (Network): the connection cannot send the video; lower the bitrate.
Numbers near zero are healthy. If they keep rising, reduce load in the area that is causing the problem.
11-3 Common problems and fixes
Q. The screen is black and the game does not appear.
- Check Screen Recording under Check App Permissions (Chapter 1).
- After granting permission, quit and reopen OBS.
- If the game is fullscreen, try Application Capture (Chapter 3).
Q. The microphone is not coming through.
- Check Microphone permission (Chapter 1).
- Make sure the source is set to the named mic, not “Default” (Chapter 4).
- Check that the audio interface gain is not turned down.
Q. I hear the voice in only one ear.
- Check Mono for the mic in Advanced Audio Properties (Chapter 4).
Q. The game is too loud or sounds muddy.
- Check that Desktop Audio and Screen Capture are not capturing it twice (Chapter 4).
Q. Hiss surrounds the voice.
- Add RNNoise Noise Suppression (Chapter 5).
- Move the microphone away from the air conditioner or computer fan.
Q. The first word gets cut off.
- Lower the Noise Gate’s Open Threshold a little (Chapter 5).
Q. The audio distorts when I shout.
- Check that the Limiter is on and set to -3 dB (Chapter 5).
- Lower the interface gain a little.
Q. Audio and video are out of sync.
- Delay the game audio or microphone with Sync Offset (Chapter 6).
Q. The banner will not appear with its hotkey.
- Check Input Monitoring permission (Chapter 1).
- Check that the key is assigned in that scene (Chapter 7).
Q. The video stutters or shows blocky artifacts.
- Check Stats to see which dropped-frame count is increasing (Section 11-2).
- Choose Apple VT hardware encoding (Chapter 9).
- Reduce output resolution to 1280 × 720.
11-4 Find help in the log file
If you cannot find the cause, OBS keeps a record of activity in a log file. Open it from Help → Log Files.
The log is in English, but words such as “Failed” and “error” often appear near a useful clue. If you ask for help on the OBS forum, attaching the log can make it easier for others to answer.
📝 Check the log before sharing it.
It may contain your Mac username, file paths, and device names. Review it for details you do not want to post publicly.
Chapter 12 — Operate OBS with your left hand and keep playing
The hardest part of streaming games is that both hands are busy playing. If every banner, music change, or switch to the break scene requires reaching for the mouse and finding OBS, you have to stop playing.
This chapter covers ways to control OBS with your left hand.
12-1 Choose your hotkeys
In Chapter 7, we assigned hotkeys to show and hide the banner. You can assign keys to most OBS actions under Settings → Hotkeys.
Useful game-stream hotkeys include:
- Change scenes: Starting, Gameplay, Break, Ending.
- Mute/unmute the microphone when you cough, sneeze, or need to answer someone.
- Show/hide banners such as the game title or an announcement.
- Start/stop recording.
- Save the Replay Buffer to capture a great moment for a clip later.
💡 Choose keys the game does not use.
F1–F12, the number pad, or combinations such as Control + Option + a number are less likely to conflict with game controls. Write the assignments on a chart and keep it where you can see it. During a stream, it is easy to forget.
12-2 Put the controls on a left-hand device
If it is hard to remember keyboard shortcuts, use a device with labeled buttons and icons. A Stream Deck-style controller is popular with streamers. Each button has a small display, so you can see at a glance which one means “Break,” “Mic OFF,” or “Banner.”
It can work with OBS to switch scenes with one press, or turn a button red when the mic is muted.
Other left-hand devices combine dials and buttons for video or image editing. Some can adjust music volume with a dial. Choose one that fits how you work.
📝 The connection to OBS: WebSocket
Many of these devices and apps communicate with OBS through its WebSocket server. Enable it under Tools → WebSocket Server Settings. Set a password and do not share it.
12-3 Turn a phone or tablet into a control surface
You do not need to buy a dedicated device. Some apps turn an iPhone or iPad into a button panel that sends shortcuts or OBS commands to a Mac on the same Wi-Fi network.
I am also developing an app that turns a phone into a left-hand button panel. I will add details here when it is ready to share.
12-4 Bonus: rehearse scene changes in Studio Mode
Click Studio Mode in Controls to split the preview in two:
- Left: the next screen to prepare.
- Right: the screen currently on stream.
Check the next scene or banner placement on the left, then send it to the right with Transition. It works like a television control room.
You do not need it for every solo stream, but it is reassuring when you want to confirm that the game appears correctly before switching from the starting screen.
Chapter 12 recap
- Assign common actions to hotkeys that do not conflict with the game; write them down.
- A left-hand device such as Stream Deck provides labeled, icon-based buttons.
- If you enable the WebSocket server, always set a password.
- Phone and tablet apps can also act as button panels.
- Studio Mode lets you preview the next screen before sending it live.
Starter kits for different budgets
OBS is free, so you can start today if you have a Mac and a game. If you want your voice to come through clearly, add gear a little at a time.
Kit A: Get your voice out there (around ¥20,000 or less)
A USB microphone plus earbuds or headphones you already own is enough to start.
Audio-Technica AT2020USB-X (USB microphone)
A condenser mic that connects over USB-C. It has a headphone jack so you can hear your voice directly.
Kit B: Upgrade the audio (around ¥50,000 or less)
Separate the microphone and audio interface for a step up in voice quality.
YAMAHA AG03MK2 (streaming mixer)
A compact mixer with a microphone input and loopback features for streaming.
Shure BETA 58A (dynamic microphone)
A popular live vocal mic that picks up less room sound and surrounding noise. I use one too.
SONY MDR-CD900ST (monitor headphones)
Closed-back headphones widely used in Japanese recording studios. I use these too.
Kit C: Go all in (no set budget)
For a full, rich voice with a radio sound.
Shure SM7B (dynamic microphone)
A broadcast and streaming standard known for a full, smooth vocal sound. It needs substantial gain, so choose an interface with enough headroom. I use one too.
Focusrite Scarlett 2i2 4th Gen (audio interface)
A popular interface that can connect two microphones.
For every product, check the product page for macOS compatibility before buying.
Closing
Thank you for reading all the way through.
OBS can look like a wall of buttons at first. By now, though, you should understand three core ideas:
- A screen is built by combining scenes and sources.
- Audio is easier to manage when you think in three tracks: voice, game audio, and music.
- Shape your voice in this order: Gain → Noise Suppression → Gate → EQ → Compressor → Limiter.
Once you have those ideas down, you can decide where a new feature or plugin belongs.
One last thing: there is no single set of “correct” numbers for streaming audio. The values in this guide are starting points. Record, listen, make a small change, and listen again. Repeating that process is the quickest way to find the sound that suits your voice, your room, and your microphone.
There are people on the other side of the screen looking forward to hearing you. Have a great stream.
Photo credits
- Header image, OBS game-streaming guide (Photo: the author)
- OBS screenshots (Photo: the author)